"War begets war. It is as if the destruction draws in new combatants like sharks to blood. War is like a dragon where, for every head cut off, two more grow to take its place."
Campaign To Date:
After a bloody civil war, Traitor forces have taken the planet of Xhorik Prime, establishing a secure port for Horus' forces on his long march to Terra. Led by the cunning Khan Turan Jorma, small bands of Loyalist survivors continue to wage a guerilla war from the mountains and caves of the barren, ork-infested east.
After the Traitor victory, infighting led to the banishment of a band of World Eaters and their messianic Chaplain Zungarz. In order to gain the glory of Khorne, he is leading his berzerker forces on a rampage against Loyalist, Ork and Traitor forces alike.
The chaos and bloodshed around the Xhorik System has also drawn various pirates, marauders and mercenaries to the sector, looking for opportunity amidst the disorder. Foremost among these rogues and renegades are General Titus Ghoulv's Iron Battalion, also known as the Chem Hounds for their indiscriminate use of chems and combat drugs.
All three of these warbands are desperate for the weapons and munitions that will allow them to continue to fight, and indeed survive, in the war-torn galaxy during these darkest days of the Heresy. They set their sights on the Armorium of Beilyr, known to contain a mass of weaponry stored during the Great Crusade, including some rare and powerful relics of Terra and Mars predating the Empire of Man. The three forces close in on their target, each looking to claim this unrivaled prize.
Pre-Game and Mission:
With the rare opportunity to get both of my brothers together for a game, we put some thought into the scenario to ensure it would be fun and make for a great game. In the past, we have tended to play two players commanding one army vs the other player. This time, we wanted to try a three-way battle with each brother commanding his own army. I flipped through my shelf of Horus Heresy and 40k books and found the scenario Point of Desperation in the black book VI Retribution: a three-player battle that looked balanced and tactically interesting. The scenario focused around maintaining control of the central objective, the armorium, in order for your faction to continuously offload as many weapons and munitions as possible. At the end of each turn, if a sole player had control of the objective, he would score 3 VP. If control was shared, each player would score 1 VP. The secondary objectives rewarded you for slaying the opposing warlords (1VP; or 2 VP if killed in melee by an HQ choice), destroying one unit of each of the two opposing armies in the same turn (Complete Destruction, 1VP) and for having the most units remaining at the end of the game (Overwhelming Force, 1VP). These victory conditions gave some nice balance to different types of armies and strategies, but of course the core focus would be to win the battle for the central objective for as long as possible. To fit our larger table and our own preferences, we made a few modifications to the scenario, covered in the Scenario Setup.
With the scenario selected, I immediately set out to create a suitable terrain piece to represent the armorium. The progress was documented on the Armorium Terrain Piece Build post and the final product can be seen in the Armorium Finished post.
We also wrote some additional pre-game narrative to help setup the clash:
Campaign Update: World Eaters
Campaign Update: White Scars
Campaign Update: Pirates of Dark Planet
The Galaxy Will Burn
Bill: I enter into this mortal clash feeling confident since the army I have been given the honor of commanding is well-equipped for everything the mission calls for. Zungarz and his Hell Hounds, the glory hogs of the last battle, would be given another chance to swat aside resistance and protect a much-contested central objective. Their numbers and determination would have to persevere against much heavier fire than anything ever thrown against them in the past. Pete's tank heavy army had no less than three large blast marker weapons that could turn space marines into meat soup. The risk of gathering around a control point would be extreme; one 'Hit' could spell instant death for anyone, even mighty Zungarz himself.
I honestly don't have a plan for killing so many Armor 14 behemoths and can only use my Predator as a shield against their withering blasts. By turn 2, it should be able to wedge itself into the space between the bunker ruins and cathedral, blocking movement and creating obstructed LoS as long as it doesn't blow up. My Dreadnought and Terminators do have chainfists but I plan to rush them as fast as possible towards the center and I am sure there won't be any tanks there at any point. Hopefully Phil would use his anti-tank units against the Leman Russes since they present such a huge threat. My only plan is to push Phil's infiltrators and scouts out of scoring range with all haste and pray that the ruins' cover saves keep a few World Eaters alive...
Aside from a lack of artillery, Pete's World Eaters are a well-tuned game-winning machine made of speed, flexibility, and raw power. The Red Butchers are an unstoppable force of nature and it has long been a dream to direct their hateful blows. Backing them up is a second Terminator squad which, though inferior, counts as a scoring unit. The lightning claw squad, along with the Hell Hounds, would be tasked with clearing and controlling the bunker. The Butchers would just butch.
As if such a wave of destruction needed any help, the Dreadnought was available to add further pain to my enemies but I didn't have much of a plan for it. It's chainfist could pop the lid on a troublesome tin can to allow him to pull out the meat inside but only if he could touch it. I felt good about his trusty forcefield to protect him from cannon blasts but since he couldn't score (or even fit in the bunker ruins to help) or create a wreck to block tanks, his role would be minimal in the game.
Perhaps the most unexpected but welcomed unit in an army of slavering maniacs was the snipers; the Butcher's Eyes. They could infiltrate to give me an early game scoring option as my foot troops hoofed it to the bunker. They must be the last sane members of Angron's vicious followers, shaking their heads sadly at the deterioration of their brothers' minds and trying to protect them as best they can. They would be my only unit to camp out and shoot. Hopefully, their crack shot aim could fell a few foes.
I feel great about my ability to score VP's in this battle. The Eyes would start the point counter rolling and the Hounds and Terminators would set it spinning. No doubt I would suffer horrendous losses as my tightly-packed infantry takes point blank tank shells but the game is only a finite number of turns. By the time I run out of bodies to throw into the meat grinder, it would end. There wasn't really any other option but to charge in and hope Pete rolls poorly. I may not score on the first or last turns, but I feel very confident about scoring all throughout the middle.
Ride Like The Wind
Phil: To say I was excited about this game would be a drastic understatement. We had a great three-way scenario picked out that we had never played. We had a new terrain centerpiece built specifically for this game. We had several pieces of pre-game story written to provide some narrative. We had a new army entering the main campaign against the marines with Pete's militia. And with the postponement, we had additional time to let it build up.
Unlike the other two armies, I had a few options on how to configure my force for this game. As I looked through my collection of White Scars, I started to formulate a plan to utilize my main strength of highly-mobile scoring units and to minimize my weakness of mostly lower durability. I don't have a lot of painted models, but I have some flexibility in how I configure them in terms of squad sizes, loadouts and transports.
First, I started with the core requirements of a Chogorian Brotherhood to understand the points cost of my essentials: a Praetor on jetbike, a six-man Skyhunter squadron with two volkite culverins, and my five-man Outrider squadron with plasma guns. This would give me two fast units that could hit vulnerable units and reach the objective quickly when needed. It would also give me the fastest warlord, allowing me to choose if and when I wanted to engage my rivals in a duel for those bonus VPs. However, neither of these units were well suited to sitting on an objective while both opposing armies charge in. They would be used to engage and destroy enemy targets of opportunity around the flanks in the early game and then hopefully swoop in late in the game when the last enemy units on the objective were bloodied and weakened.
I knew I wanted to be on that objective on turn 1, something that would be tough for my opponents to match. The Recon Squad was an obvious choice as a Troops selection with infiltrate, but I realized that the World Eaters would also have an infiltrating squad so I would need a backup plan in case they beat me to the punch and deployed infiltrators on the objective first. So I studied my options and realized my Recon Squad could take a Rhino as a transport and it could infiltrate with them! (This was something none of us had ever tried and should catch my opponents off guard.) This would allow me to be no farther than 18" from the objective even if I was in sight of the enemy. Then using their Scout move I could redeploy them even closer, so long as I ended 12" away from the nearest enemy. This would put me close enough to the objective to reach it on turn 1 since the World Eater infiltrators could not occupy the entire objective and I would be able to approach from a side where that 12" offset from the enemy models would be less than 12" to the edge of the objective. Thus I felt confident I could either control or contest the objective on Turn 1.
A full squad of Recon marines with cameoline and a rhino hiding in a ruin would be likely to survive a turn or two of even the most committed enemy shooting, but I knew they would be quickly overwhelmed in melee by the Red Butchers, who would likely be arriving in turn 2 with their Land Raider, or the Hellhounds with their chain axes who would be arriving on foot in turn 2 or 3. In order to hold the objective longer, I would need some additional numbers arriving in turn 1 or 2, preferably something that would be at least respectable in melee. Running a Chogorian Brotherhood, all infantry needed a transport or they would be forced to start in reserves and would not make it to the objective until turn 3 or 4 at best. I was tempted to take a unit of five Ebon Keshig in an Anvilus Dreadclaw, but past experience has taught me that they can't stand up to the Butchers and, although they do not give up VPs for being destroyed, they are not a scoring unit and could not hold the objective for me. I also considered my usual approach of a plasma support squad in drop pod that could cripple an enemy squad or tank upon arrival, but I knew from experience they were a glass cannon that would die too quickly and would cost too many points (1750 points does not go far in Horus Heresy!). Finally, I settled on a Veteran Tactical Squad to be the occupants of the Dreadclaw. With Weapon Masters (+1 WS) as their veteran ability, combined with their two attacks and two close combat weapons, and a sergeant with power glaive, they would be fairly tough in melee. But the icing on the cake was to take only 9 men in the squad to leave room in the transport for the secret weapon: a Legion Centurion Champion. With weapon skill 6, a 2+ save, and a power glaive, I figured he would be a tough matchup for even an enemy warlord. If he could get into a duel with one, he had a chance to net me 2 VP (the rule stated the enemy warlord needed to be killed by an HQ in melee to get the extra VP) and even if he lost, I would lose nothing but my pride.
I now had four scoring units, all with the ability to quickly reach the objective, but my potential damage output was pretty underwhelming. I knew I could not win by just running onto the objective and dying so I needed a way to hit back and destroy some key threats. Looking through my last few units, the Primaris-Lightning Strike Fighter with its six Kraken Heavy Penetrator missiles and tank-killing upgrades was an obvious choice for this role. The Lighting would strafe the battlefield destroying whichever enemy vehicles were the biggest threat to my small and somewhat fragile army.
With the army selected, the plan was clear. Each unit had its role and its preferred targets. Now it was just a matter of putting it all into action.
Pillage and Plunder
Pete: Since the total points cost of my Cults and Militia army
determined the size of the battle, I had no options on what to take and what to
leave out. I knew the four tanks, including the Super Heavy Malcador, should be
able to deal out plenty of pain – so I had a chance, if I played the perfect
game and everything fell my way. My biggest glaring weakness would be the lack
of scoring units in a game determined by controlling a central objective.
Militia vs. Marines. Ugh, that’s not gonna be easy. But if I could roll
forward, dropping dinner plates of death onto that objective and clear it out…
just maybe I could rush in the final couple turns and score some VPs. I had one
ace up the sleeve though, with my “ogryn” brute squad of five 3-wound ork nobs
with frenzon stimulants, able to stand toe-to-toe with any marine unit outside
of the Red Butchers. Perhaps if they landed on that objective, after being
screened by a wall of tanks as they strolled up to the bunker, they could fight off
any wounded units left on the board.
The fire support squad would be largely ignored due to the
more pressing concerns of the armored division rumbling around the field of
battle, so I hopped they would get a lucky crack shot here or there and perhaps
change the course of the game by taking out a few jet bikers, a predator or a
contemptor dread at an opportune time.
My main objective was to have fun and enjoy the rare treat
of the three brothers playing a game of Horus Heresy together. Objective
complete!!
Army Selection: 1750 Points
World Eaters Warband Zungarz's 'Zerkers- Bill
- Chaplin Zungarz: Artificer Armor, plasma pistol, refractor field, crozius arcanum
- Tactical Squad Hellhounds: 17 marines – 16 with bolters, bolt pistols and chain axes. 1 sergeant with artificer armor, power fist and plasma pistol
- Reconnaissance Squad Butcher's Eyes: 5 marines with power armor, sniper rifles, cameoline
- Unending Slaughter: Terminator squad with lightning claws, one with chain fist and heavy flamer
- The Red Butchers: 1 Devoured with dual chain fists, 4 Butchers with dual power axes
- Land Raider Phobos Flesh Grinder: side sponson twin-linked lascannons, twin heavy bolter, armored ceramite, machine spirit
- Contemptor Dreadnought Delrog the Diabolical with twin-linked lascannon and chainfist
- Predator Severing Cut with Predator Autocannon and lascannon sponsons and Machine Spirit
Traitor Militia General Titus Ghoulv’s Iron Battalion: The Marauders of Meddeon VII, The Pirates of the Northern Fringe, The Chem Hounds - Pete
- Force Commander Saghesh the Sadistic: power sword, plasma pistol, refractor field, Alchem-Jackers, Warrior Elite
- Ogryn Brute Squad Dregg Nukem’s Shrapnel Eaters: 5 Ogryns with power axes, carapace armor and Frenzon stimulant injectors
- The Tongue Collectors: 15 Grenadiers with plasma gun, flamer
- The Psycho Slaves: 15 Grenadiers with melta gun, flamer
- The Black Bombardiers: Support squad with 3 missile launcher teams and 2 lascannon teams
- 3 Auxilia Medicae: Dr. Cut, Dr. Cauterize and Nurse Ratchet
- Leman Russ Squadron Ghoulv's Iron Fist:
- Leman Russ Battle Tank with lascannon
- Leman Russ Demolisher with heavy bolter
- Leman Russ Vanquisher with heavy bolter
- Malcador Heavy Battle Tank Chimaera with armored ceramite and flare shields
White Scars Brotherhood of the Wind - Phil
- Khan Turan Jorma: jetbike, paragon blade, cyber hawk
- Centurion Champion Subotei: power glaive, refractor field, artificer armor
- Skyhunter Squadron Khujaa: 6 jetbikes, 2 x volkite culverin
- Veteran Tactical Squad Arryn: 9 veterans, one plasma gun, sergeant with power glaive and artificer armor
- Recon Squad Chono: 10 marines with recon armor and camo cloaks, sergeant with power fist and artificer armor, with Rhino with multimelta
- Outrider Squad Tsujen: 5 Outriders with plasma, sergeant
- Anvilus Dreadclaw Drop Pod
- Primaris Lightning Strike Fighter Ariunbold: twin-linked lascannon, 6 x Kraken Heavy Penetrator Missiles, Battle Servitor Control, Ground-tracking Auguries
Deloyment:
World Eaters Deployment and Plan:
Bill: I used my pre-game strategic option to make 3 turns of night fighting, increasing the ruins' cover save from 4+ to 3+. I felt that this would benefit my melee-heavy army the most and keep Pete's tanks from fragging too many of my marines. I could have taken the option to deploy infiltrators first but, regrettably, didn't take it. Phil quickly snatched it up and deployed his Recon squad (in a Rhino) in the central ruins, securing it for 3 VP's at the end of turn 1 and there was nothing I could do about it. The tough calls a commander has to make...
Still, three turns of darkness could be invaluable in enduring the cannons, not to mention the deadly flyer Phil would be sending forth to rain missiles on everything. I ended up deploying and going first, which was perfectly fine. My opponents would undoubtedly prefer to go after me to have more time to kill my boys before scoring but I didn't think my turn order would affect my strategy at all so I didn't prioritize changing it.
I set up my Butchers inside the Land Raider, ready to blitz Phil's side, and the Dreadnought and Predator to throw at Pete's. My Hellhounds and lightning claw terminators would run up the center, boot out the recon marines, and hold the ruins. The snipers had nowhere ideal to set up since the terrain was intentionally set up sparsely around the ruins and so had to take up shooting positions in the ruins to my right. They would by my late-game insurance policy; a scoring unit protected by 3+ (2+ during night fighting) ruins (including their cameoline) that could run in and score if everyone else was pushing up daisies. It was quite different from the role I imagined for them but Phil's unit was the only one able to infiltrate in the ruins. I would have at least 4 turns to see how effective their shooting would be. The night fighting wouldn't be doing them any favors.
Ok, time for action! Axes high! Everyone, follow me!
 |
| Zungarz and his Hellhounds form the core of the World Eaters line, suported by the mighty Delrog the Diabolical and the Predator battle tank Severing Cut. |
 |
| The World Eaters line up directly across from the Armorium, with a block of infantry in the center and mobile armor on the flanks. |
 |
| The Butchers's Eyes recon squad infiltrate into a ruin close to the Armorium in order to provide supporting fire and to move to the Armorium when the time is right. |
White Scars Deployment and Plan:
Phil: Despite my Legion's unmatched speed and the inclusion of a Recon squad, I rolled the lowest for which game setup item I could choose. There were advantages to my army with each choice so I was not too worried about it. As it turned out, Pete chose to deploy and go last, which is a nice advantage when VPs are scored at the end of each game turn; Bill chose night fighting to protect his melee units from shooting; and that left me with the opportunity to select to deploy infiltrators first, which aligned well with my strategy, but was not crucial to it, as described above. The other choice was to select my deployment zone, but I only planned on deploying one unit in my zone to start the game so the main advantage would have been to force one of my opponents into a non-ideal position.
I was hoping to setup my Skyhunters where they could pulverize Pete's infantry with their lower armor saves, but once I saw his grenadiers were completely concealed by his wall of tanks and that there was a large ruin preventing me from flanking his advancing line, I changed my strategy. I decided to hold them in my deployment zone out of line of sight of the heaviest weapons and use them to provide covering fire for my units that would be desperately trying to survive in the central ruin. They would then dash into the ruin late in the game when the number of threats was whittled down in order to capture (or at least contest) the objective.
The Recon marines deployed right in the central ruin, as planned, on the far side from Pete's gun line of militia battle tanks. The rest of the force would be arriving from reserves. The drop pod would deposit my veterans and Centurion Champion right at the objective and then move to block and delay my opponent's units. The Outriders would outflank and hope to attack an exposed key target before moving to the objective, while the Primaris-Lightning would swoop in and provide the anti-tank covering fire for my troops.
The plan was to hold the objective for the first two or three turns until my infantry units were inevitably crushed in melee and then grab it again around turn 5 with my mounted troops and hold/contest it for the rest of the game. Meanwhile, I would hope to slay the World Eaters' warlord with my Centurion Champion and, if I was lucky on the turn my reserves arrived, maybe I could get a bonus VP for destroying a unit from each army. I felt I had a solid plan built around the strengths and limitations of my army, and a better ability to choose the matchups of my units than my opponents due to my mobility.
The stage was set for a bloody clash where only the boldest and cleverest general would prevail. Mount up, Scars! Let's ride!
 |
| The only White Scars to begin in their deployment zone are the Khan and his Khujaa Skyhunters. The rest of the force either infiltrates or waits in reserves to strike at the right time and place. |
 |
| Khan Turan Jorma leads the raid. |
 |
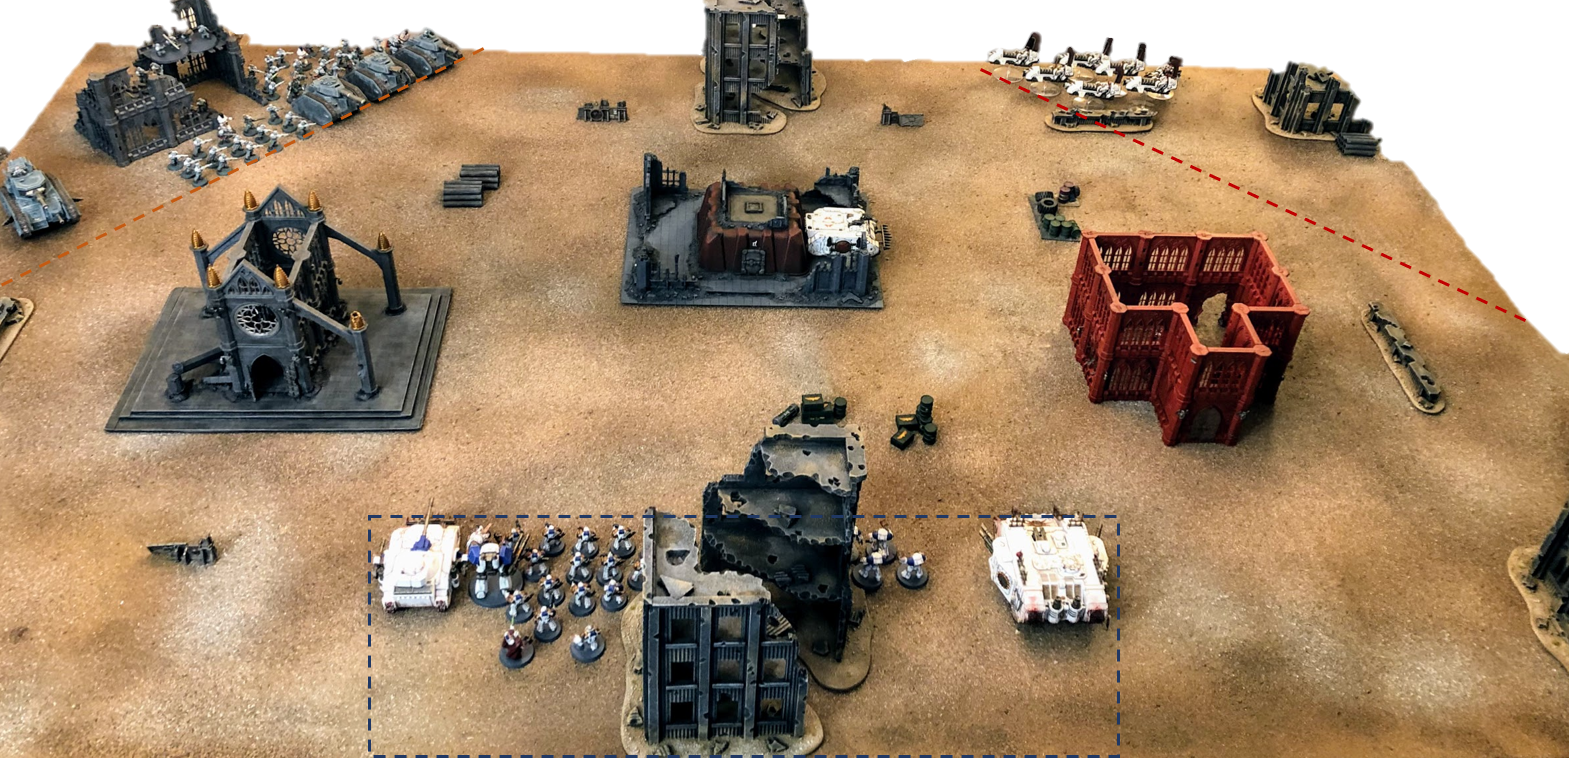
Recon Squad Chono infiltrate to the Armorium with their Rhino in order to capture the best weapons and munitions.
|
Traitor Militia Deployment and Plan:Pete: I chose to go third anticipating that I would need the very end of the game to make up some final VPs and make a game of it. If I could blow the absolute hell out of the objective for four turns, perhaps it would be a game of grind-it-out attrition. That’s really the only play I had. I didn’t have any transports or infiltrating units, so I’d be the slowest army on the board.
Seeing the other armies set-up, I didn’t change my plan much – a wall of front armor value 14 tanks, screening my squishy troops and elites. What did change was pulling the Malcador in a flanking move, which would in theory circle around Bill’s rear and add additional devastation to his units that had cover from the Leman Russ squadron. With base speed 12”, it wouldn’t be outlandish to expect the Malcador to arrive neatly in Bill’s deployment zone by turn 2 or 3 – moping up any puny opposition in the way.
Again, the fire support squad was placed in the only elevated cover in the deployment zone. Although I was concerned with the limited views due to the cathedral on the right and the burnt-out building on the left. Phil and Bill would need to spend time engaging my units close to my quarter of the board to give the fire support squad something to shoot at! Not a given since the objective was centrally located…
One last piece of deployment wisdom was to screen the rear armor of the Leman Russ squadron as well as control the left side of my deployment zone – all anticipating plasma wielding bikers roaring onto the board on turn 2 or 3. I’ve learned how to at least minimize their carnage by blocking their best entry points.
 |
| The Chem Hounds deploy a wall of Leman Russ tanks ahead of their massed infantry. Heavy weapons provide support from the elevated ruins and a mghty Malcador holds the far right flank. |
 |
| Saghesh the Sadisticis the force commander. He is protected by his Ork (Ogryn) Brutes. A steady supply of chems is provided by the robotic Dr. Cut. |
 |
| The three rival factions approach the coveted Armorium from different directions. |


