I am working up some of the classic metal third-generation storm trooper models from 2003, when they were known as Cadian Kasrkin, and before the current iteration now known as Tempestus Scions. (This must have been when GW started to phase out generic sci-fi names and concepts and make all things specific to their universe.) I would love to get some of the older metal Storm Troopers models from around the time of early 3rd edition as well, but they are harder to find. While looking for the older models I remembered, I came across these even older Storm Troopers from the Rouge Trader days that I do not remember. Check these out:

The Xhorik Wars: Chronicling the wars of the Xhorik System over the millennia
Friday, February 26, 2021
Storm Trooper Test Model
Monday, February 22, 2021
Deredeo Pattern Dreadnought
Now that the Traitors have taken most of the key spaceports of Xhorik and driven the remaining Loyalists into the mountains, fresh supplies and equipment can be brought in to tighten the Warmaster's grip on this key planet. The first unit Preator Wolfgang requested as support for his continued campaign against the White Scars and Kozar Army was a Deredeo Pattern Dreadnought for some much needed anti-aircraft firepower.
This dedicated heavy weapons platform combines superior firepower with the flexibility, mobility and durability of a dreadnought chassis.
Wolfgang's prized new toy comes equipped with an Arachnus Heavy Lascannon Battery, a torso mounted twin-linked heavy bolter, and a carapace-mounted Aiolos Missle Launcher. A Helical Targeting Array gives the Deredeo Skyfire and Interceptor if it neither moves nor runs during its turn.

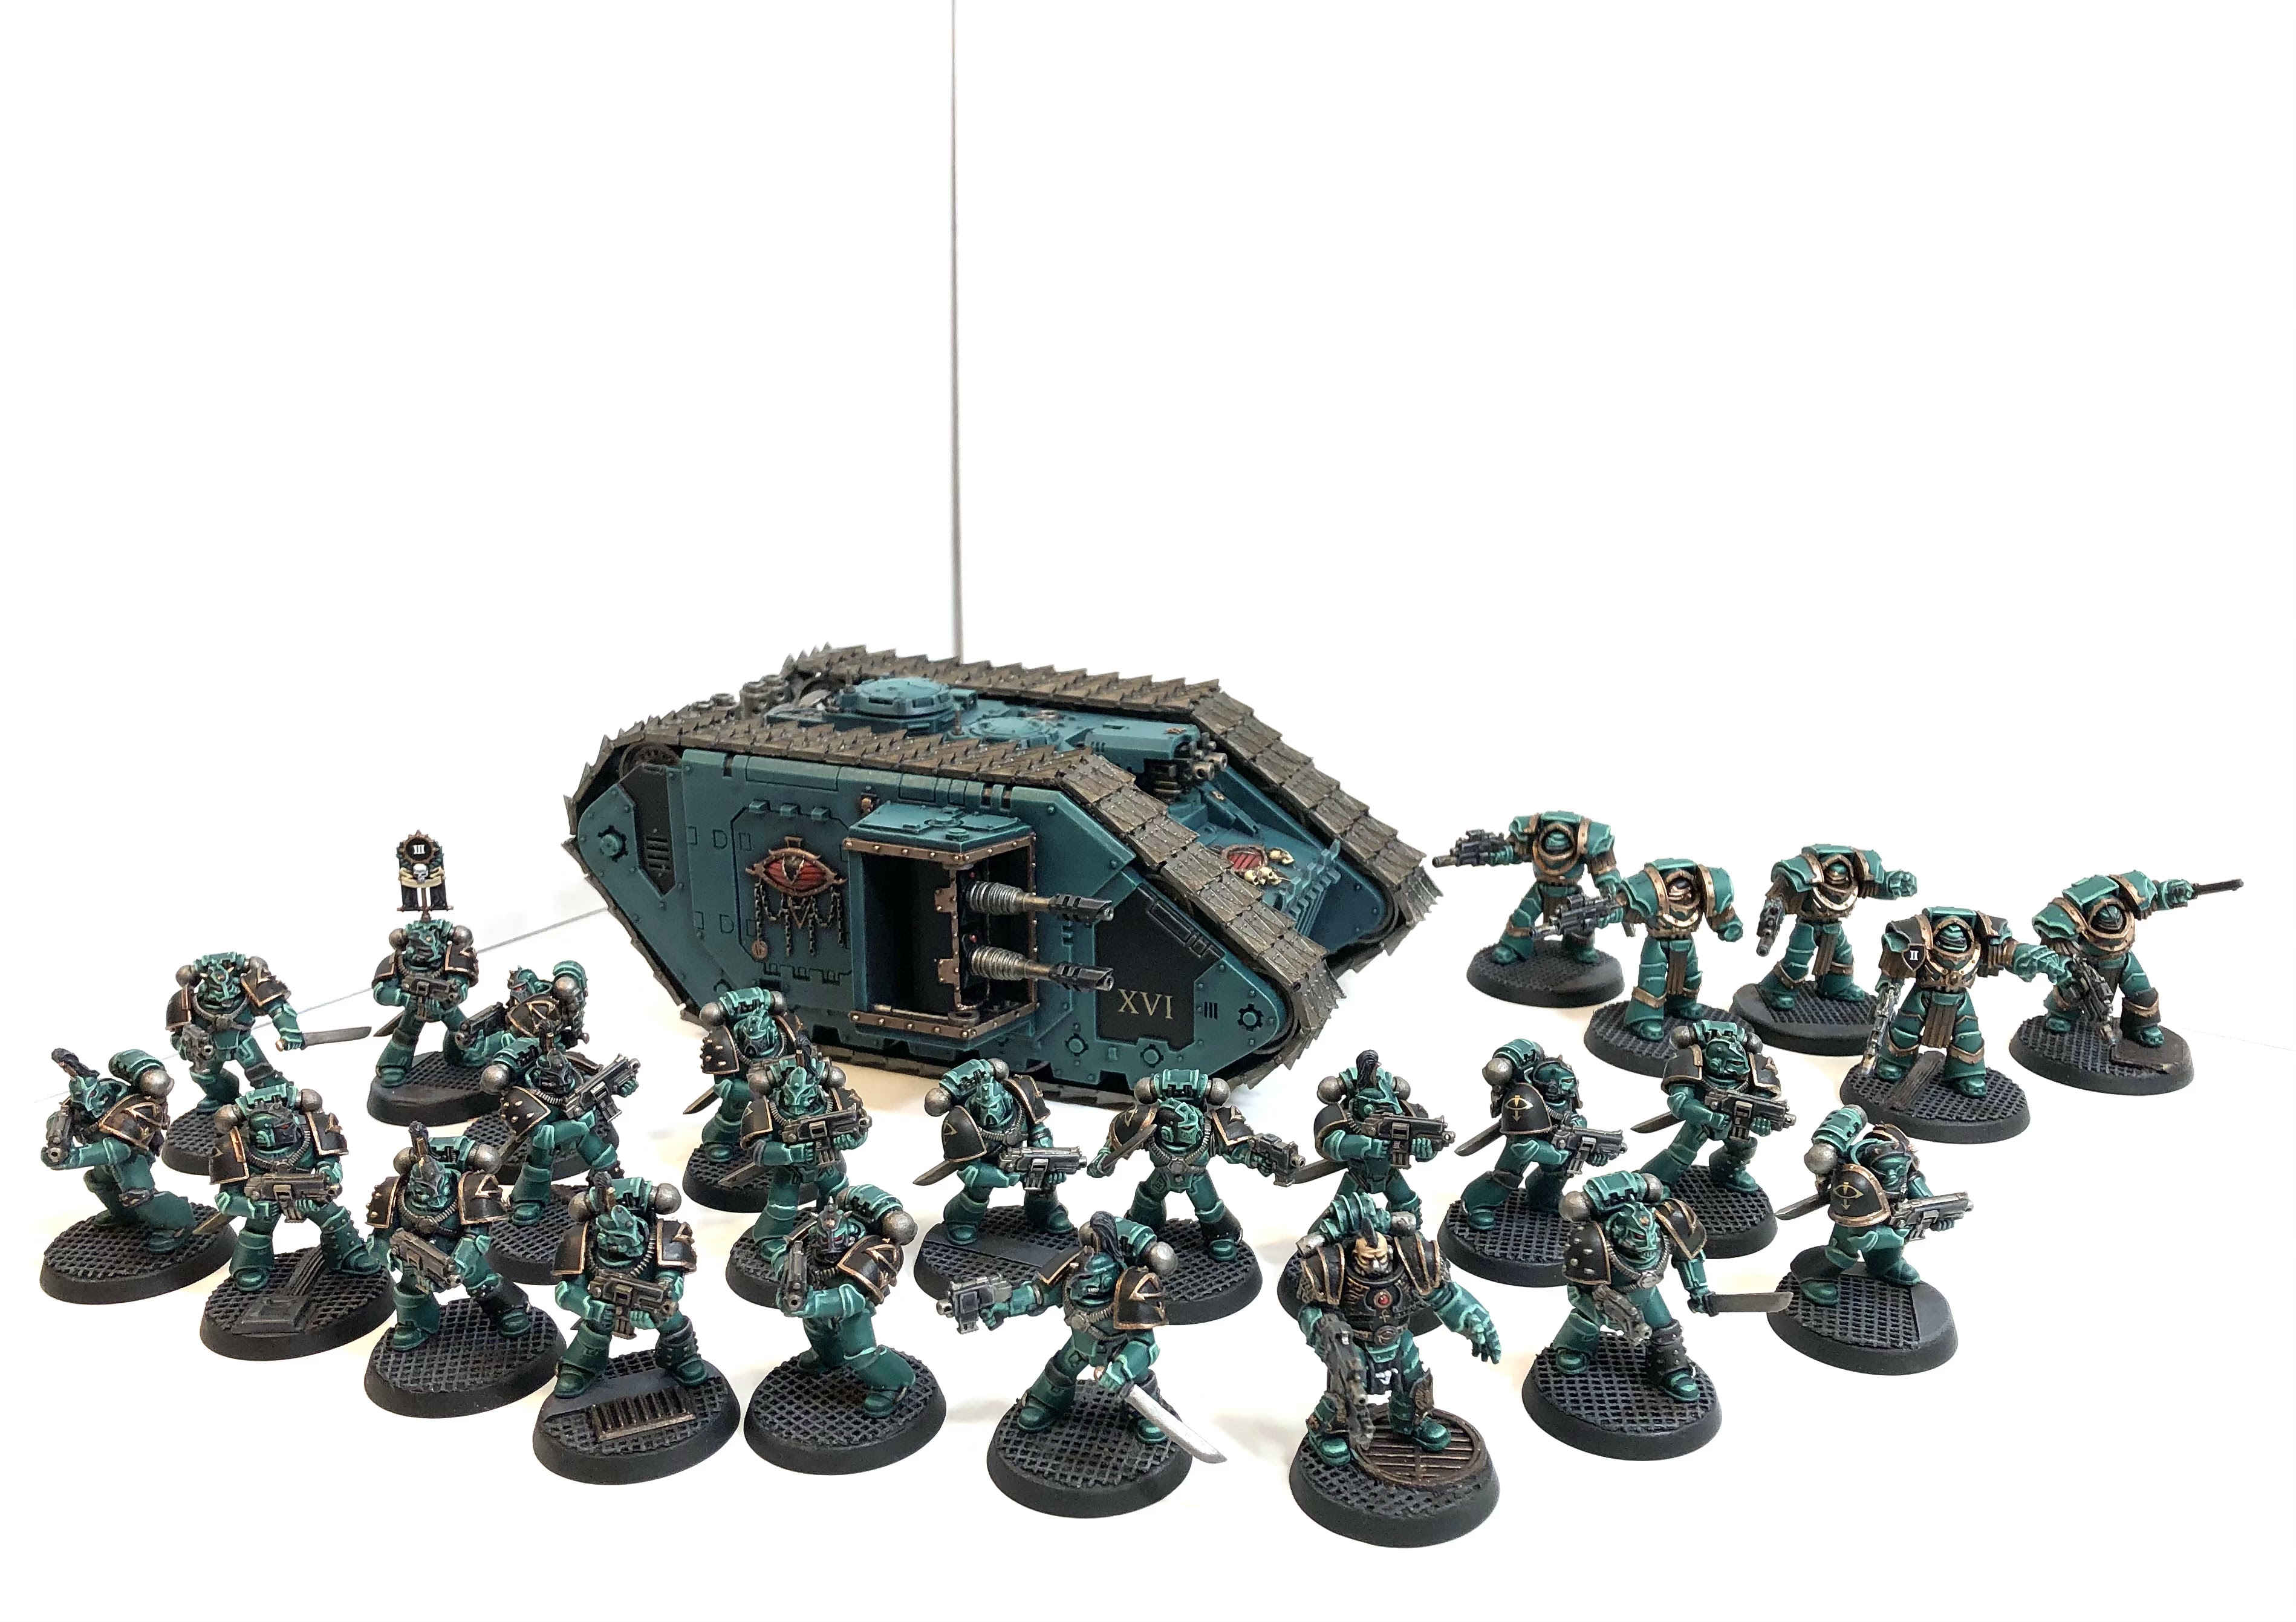
Sunday, February 21, 2021
Sons of Horus Army Update
The Sons of Horus so far:
- 20-man tactical squad with additional close combat weapons, vexilla and sergeant with artificer armor and power fist
- 5-man Cataphractii terminator squad with combi-meltas, 3 power fists, 2 chain fists
- Land Raider Phobos with two twin-linked lascannons and twin-linked heavy bolters


Saturday, February 13, 2021
New Terrain: Antenna Tower
Is it a radio tower, a forcefield generator, a radioactive reactor or something else? This versatile piece should make a good objective in a variety of games.
Tuesday, February 9, 2021
The STEEL Legion
The Steel Legion I ordered over a month ago finally arrived. It is amazing to get these old metal models. GW has changed just about all of their metal sculpts to their Finecast resin so I haven't actually bought a new metal model in years - maybe a decade - until these. These truly are the STEEL Legion. And at $35 for ten, they are the same price as the cheapest plastics and feel like a steal compared to anything from Forge World.
 |
| And he even has a slottabase! |
Just handling these old metal models again in a great feeling. They certainly would be a pain to do any conversions, and of course every squad looks exactly the same in all the same poses, but you can't complain about the assembly time! They need some straightening of gun barrels and quite a bit of flash cleanup and mold line removal, but overall pretty fast compared to assembling Elysian Drop Troopers and all their little fiddly bits. And these guys are a great scale for Horus Heresy marines - they precede the massive scale creep that has bloated the miniatures more and more over the years and eventually led to the heresy of Primaris marines.
Sunday, February 7, 2021
Next Campaign: Loyalist Imperial Guard vs Traitor Space Marines?
I have been brainstorming ideas for the next campaign and my favorite idea so far is to have the Imperial Army launch an invasion to take back Xhorik Prime from the Traitors. But let me hear what ideas you have.
Operation Downfall
In campaign for Xhorik Prime, the Traitors were victorious and have conquered most of the populated areas of the main continent. The small detachment of White Scars on Xhorik Prime have been defeated, their forces shattered and the cities lost. A few isolated bands of White Scars remain, scattered and uncoordinated. They can mount the occasional raid, but they have no ability to hold ground or face the Traitors in open battle. With all Imperial forces pulled away from hunting orks in the east to fight the Traitors in the west, the orks have regrouped and started mounting raids on the human cities again.
During the weeks of the Xhorik Prime campaign, Loyalist forces on Xhorik Secondus have been mobilizing an army to oppose the Traitors. Although they had a Planetary Defense Force (PDF), they lacked the capacity to quickly launch an expedition onto a war-torn planet. By the time, they were ready to attack, Kozar had fallen and the Traitors had taken control of most of the (human-)populated areas of the main continent. To recapture the planet before the army of Horus arrived in the system, the Imperial generals on Xhorik Secondus would have to take a dangerous gamble: to launch an invasion of a hostile planet - and with minimal space marine support.
The planned invasion was dubbed Operation Downfall and consisted of three parts. The first step would be a night drop by several dozen regiments of drop troopers around the invasion landing sites. The drop troopers were to disable enemy planetary defenses, disrupt communications, and capture key bridges that would allow the invading Imperial army to quickly breakout from the landing zones before the Traitor forces could fully respond. In the second phase, the main army would land at space ports in enemy territory and secure a beachhead to hold open the supply lines. The final phase would be a push to crush the heart of the Traitor territory in the Federation of Unimund.
Many of the generals thought the plan was suicidal. Sending an army of humans, no matter how well prepared and numerous, to launch a massive interplanetary invasion against the most elite warriors in the galaxy sounded like folly. Their only chance was to take the Traitors by surprise, and establish a firm beachhead, enabling a constant stream of reinforcements with which to grind down the outnumbered space marines in a war of attrition. If the invasion failed to establish a toehold before the Traitors responded in force, they would be mercilessly crushed.
Campaign Phase 1: Night Drop
The first phase of the campaign takes place during the night preceding the main invasion as dozens of regiments of drop troopers make a combat drop to secure the landing zones for the fleet. This phase consists of several games that take place more or less simultaneously as different companies of the Xhorik 87th Drop Troops make their drops with different objectives. Even though night drops are dangerous and full of confusion, it was deemed the best way to take the Traitors by surprise and accomplish their objectives before greater force could be applied.
All games of Phase 1 use the Night Fighting and Hidden Setup rules for the entire game, unless specified otherwise. This represents the darkness and the general confusion both sides found themselves in during the nighttime raid. All scenario rules are as per the WH40k 4th Edition Rulebook (2004 edition).
Scenarios:
Hold at All Costs: Represents the Traitors defending a key position such as a road, bridge or hill that the attackers must take to enable the invasion (Hold the Objective)
Patrol: This represents small bands of Loyalists, scattered by their night drop, trying to meet up and find their objective who then bump into a Traitor patrol searching for the invaders. Both sides must eliminate the other. (Kill Points)
Sabotage: This represents the attackers attempting to destroy a key installation, such as force field generator, missile silo, or planetary defense turret. (Destroy/Protect the Objective)
After these three missions are played, a final battle is fought. The final battle takes place at dawn just as the main invasion is about to start so the Night Fighting rules only apply to the first two turns.
If the defenders win 2 out of 3, the final battle is Meat Grinder as the attackers throw everything they have at a desperate attempt to clear the Traitors from the landing zones. The defender has the advantage and so can choose to re-roll the results to see if the game ends.
If the attackers win 2 out of 3, the final battle is Ambush as the attackers have completed their mission and setup to in hiding to destroy a Traitor column heading for the landing zones. The attacker has the advantage and so can choose to re-roll the results to see if the game ends.
For balance, I propose all WH40k non-space marine infantry have their costs reduced by 25%.
So what do you guys think? Any other ideas?
Saturday, February 6, 2021
Campaign Phase 4, The Battle for Berat: Game 5 - The Decisive Moment
"The Battle for Berat was a decisive moment for the planet of Xhorik Prime during the Horus Heresy. And the action around the central industrial area was the decisive moment of that Battle."
- The Xhorik Wars:
The Military History of a Keystone System Across the Millenia
Campaign To Date:
With the advent of the Horus Heresy, the Warmaster ordered that the Xhorik System be taken to act as a way station for resupply on his long march to Terra. The Death Guard and their human allies on Xhorik Prime launched an attack on the White Scars and their allies, the Stratocracy of Kozar.
In Phase 1 of the campaign, the Traitors pushed the Loyalists from the war-torn border city of Bielyr in a series of bloody street fighting.
In Phase 2, the war escalated across the badlands of the Valbaara Plateau in several pitched battles. In the end, the Brotherhood of the Wind was defeated and their leader Praetor Zherdan was killed by the Death Guard.
In Phase 3, the Death Guard marched to the major Kozar city of Berat, fighting their way through a number of Loyalist counter attacks. In the end, helped by taking control of low-planetary orbit over the city in a void battle, the Traitors smashed through the outer walls of Berat behind the might of their super heavy Fellblade battle tank.
---------------------------------------------------------------------------------
Phase 4 is the battle for the Kozar city of Berat. The Traitors have broken through the gates and are working their way toward the city center block by bloody block in a brutal street fight. This Phase uses a number of special rules:
Campaign Points: CP are earned by playing games and by achieving secret secondary campaign objectives (drawn randomly each game and kept secret). They can be used to gain advantages in games. The player with the most CP at the end of the phase wins.
Normal games:
Win: 5 CP
Draw: 3 CP
Loss: 1 CP
Final Game:
Win: 10 CP
Draw: 6 CP
Loss: 2 CP
(Special rules apply for the final scenario.)
Hunter Killers: Due to the very dense terrain providing ample hiding places, surprise attacks are extra deadly. Units who used Infiltrate, Scout or Outflank can charge the on the first game turn or the turn they come into play. If they don’t charge, they gain an extra +1 cover save for their first turn in play (stacks with any bonuses they have already).
Street Fighting: Narrow streets, debris, billowing smoke and crumbling towers limit the ability to utilize large vehicles and artillery. Other than the final battle, a max of one total unit can be selected with any of the keywords: heavy, artillery, flyer, or over 3 HP. In the final battle, everything goes.
Grinding Attrition: Other than Troops choices, any unit that is destroyed cannot be used in the next battle. If the next battle is the final battle, it can be taken but must start in reserves. Any unit that is selected as Troops choice can be used even if it was destroyed in the previous battle.
Named Warlord: Choose your warlord trait. Must be the same for the whole phase. Can also can always re-roll LD and morale checks. Other warlords must roll for trait.
If named warlord dies in battle, roll die:
1-2: debilitating injury: can't use in the rest of the campaign phase until final battle
3-4: major injury: can't use in next game
5: close call: no effect
6: Miraculous Recovery (Chosen of the Emperor/Horus/gods of Chaos): can use as normal and has an inspiring presence for the next battle: all units within 12" can use his LD.
The Revenant: Once warlord returns after dying in a game, he has Hatred (Traitors/Loyalists) for the rest of the campaign phase.
Our standard Terrain Rules are in effect.
Pre-Game and Mission:
Loyalists - Phil
++++++++++++++++++++++++++++++++++++++++++++++++++++++++++++
++++++++++++++++++++++++++++++++++++++++++++++++++++++++++++
Battle:
The Decisive Moment
It has been about 40 years since a combined force of Sons of Horus, Death Guard, and White Scars brought the Xhorik System into compliance during the Great Crusade. The major population centers of the largest continent were quickly brought under Imperial control in the typical fashion: a series of pinpoint attacks of overwhelming force by the Legions against the enemy's strong points, followed by rapid surrender. Due to the richness of the primary planet and the strategic location of the system on a sort of crossroads of warp currents, small garrisons of the Death Guard and White Scars legions were left on the planet to oversee the tithes of men and material to the Great Crusade and to help eradicate the threat of large ork populations in the eastern wastes.
In Phase 1 of the campaign, the Traitors pushed the Loyalists from the war-torn border city of Bielyr in a series of bloody street fighting.
In Phase 2, the war escalated across the badlands of the Valbaara Plateau in several pitched battles. In the end, the Brotherhood of the Wind was defeated and their leader Praetor Zherdan was killed by the Death Guard.
In Phase 3, the Death Guard marched to the major Kozar city of Berat, fighting their way through a number of Loyalist counter attacks. In the end, helped by taking control of low-planetary orbit over the city in a void battle, the Traitors smashed through the outer walls of Berat behind the might of their super heavy Fellblade battle tank.
---------------------------------------------------------------------------------
Phase 4 is the battle for the Kozar city of Berat. The Traitors have broken through the gates and are working their way toward the city center block by bloody block in a brutal street fight. This Phase uses a number of special rules:
Campaign Points: CP are earned by playing games and by achieving secret secondary campaign objectives (drawn randomly each game and kept secret). They can be used to gain advantages in games. The player with the most CP at the end of the phase wins.
Normal games:
Win: 5 CP
Draw: 3 CP
Loss: 1 CP
Final Game:
Win: 10 CP
Draw: 6 CP
Loss: 2 CP
- Spend 1 CP to re-roll the die to deploy first or to re-roll the die to steal the initiative. Can only be used once per game.
- Spend 1 CP to include a unit that would not be allowed due to the Grinding Attrition or Street Fighting special campaign rules below. The point cost of the unit still counts toward the army total. Can only be used once per game.
- Spend 1 CP to re-roll the die to see if the game ends. Can only be used once per game.
(Special rules apply for the final scenario.)
Hunter Killers: Due to the very dense terrain providing ample hiding places, surprise attacks are extra deadly. Units who used Infiltrate, Scout or Outflank can charge the on the first game turn or the turn they come into play. If they don’t charge, they gain an extra +1 cover save for their first turn in play (stacks with any bonuses they have already).
Street Fighting: Narrow streets, debris, billowing smoke and crumbling towers limit the ability to utilize large vehicles and artillery. Other than the final battle, a max of one total unit can be selected with any of the keywords: heavy, artillery, flyer, or over 3 HP. In the final battle, everything goes.
Grinding Attrition: Other than Troops choices, any unit that is destroyed cannot be used in the next battle. If the next battle is the final battle, it can be taken but must start in reserves. Any unit that is selected as Troops choice can be used even if it was destroyed in the previous battle.
Named Warlord: Choose your warlord trait. Must be the same for the whole phase. Can also can always re-roll LD and morale checks. Other warlords must roll for trait.
If named warlord dies in battle, roll die:
1-2: debilitating injury: can't use in the rest of the campaign phase until final battle
3-4: major injury: can't use in next game
5: close call: no effect
6: Miraculous Recovery (Chosen of the Emperor/Horus/gods of Chaos): can use as normal and has an inspiring presence for the next battle: all units within 12" can use his LD.
The Revenant: Once warlord returns after dying in a game, he has Hatred (Traitors/Loyalists) for the rest of the campaign phase.
Our standard Terrain Rules are in effect.
We created a new scenario: The Decisive Moment
Army Selection: 4000 Points
Traitors - Pete
Death Guard
- Preator Wolfgang: terminator armor, volkite charger, paragon blade, digital lasers, rad grenades, Fearless, It will not Die
- Deathshroud Terminators with hand flamers, power scythes and rad grenades
- Tactical Support Squad Folterer: 8 marines with flamers and melta bombs, sergeant with artificer armor.
- Tactical Squad: 14 marines with close combat weapons, sergeant with power fist and artificer armor and Apothecary Gerhard
- Tactical Squad Toddestraffe: 10 marines with close combat weapons, sergeant with power fist and artificer armor. Mounted in a Rhino APC with a pintle mounted heavy flamer.
- Heavy Support Squad Feuer Sturm: 7 marines with missile launchers and Apothecary
- Predator Mittel Panzer 021 with Predator Autocannon and lascannon sponsons and Machine Spirit
World Eaters
- Chaplin Zungarz: Artificer Armor, plasma pistol, refractor field, crozius arcanum
- Tactical Squad Hell Hounds: 17 marines – 16 with bolters, bolt pistols and chain axes. 1 sergeant with artificer armor, power fist and plasma pistol
- Reconnaissance Squad Butcher's Eyes: 5 marines with power armor, sniper rifles, cameleoline
- Unending Slaughter: Terminator squad with lightning claws
- The Red Butchers: 1 Devoured with dual chain fists, 4 Butchers with dual power axes
- Land Raider Phobos Flesh Grinder: side sponson twin-linked lascannons, twin heavy bolter, armored ceramite, machine spirit
- Contemptor Dreadnought Delrog the Diabolical with twin-linked lascannon and chainfist
- Predator Severing Cut with Predator Autocannon and lascannon sponsons and Machine Spirit
Loyalists - Phil
White Scars Brotherhood of the Wind
- Khan Turan Jorma: jetbike, paragon blade, cyber hawk
- Centurion Champion Subotei: power glaive, refractor field, artificer armor
- Skyhunter Squadron Khujaa: 6 jetbikes, 2 x volkite culverin
- Tactical Squad Temgar: 10 marines with close combat weapons, sergeant has power glaive, artificer armor with Rhino with multimelta
- Recon Squad Chono: 10 marines with recon armor and camo cloaks, sergeant with power fist and artificer armor
- Outrider Squad Tsujen: 5 Outriders with plasma, sergeant
- Tactical Support Squad Khoer: 8 marines with plasma guns, with Drop Pod
- Ebon Keshig: 10 terminators, 8 power glaives, 2 power fists, 1 melta gun
- Sicaran Omega Tank Destroyer Flamespear: lascannon sponsons
- Primaris Lightning Strike Fighter Ariunbold: twin-linked lascannon, 6 x Kraken Heavy Penetrator Missiles, Battle Servitor Control, Ground-tracking Auguries, Ramjet Diffraction Grid
Kozar Army, Berat Garrison
- Force Captain Xhaer: plasma pistol, iron halo, familiar, Warrior Elite, Duck and Cover (Cyber Augmented)
- Platoon command squad: power fist, 3 grenade launchers, vexilla, vox caster
- Medicae: 2 medics
- Infantry Platoon Secondus: lascarbines
- Fire Support Squad Septima: 6 fire teams with heavy flamers
- Recon Squad Decima: 5 infantry with sniper rifles and camo cloaks
- Recon Squad Tertius: 5 infantry with shotguns and a demolition charge
- Grenadier Squad : 11 infantry, 1 with plasma gun
- Arvus Lighter with lascannon and 2 hellstrike missiles
- 3 x Tarantulas sentry guns with twin-linked lascannon
- Tarantula sentry gun with heavy bolter
- 2 x Sentinels with lascannon
- Tauros with grenade launcher
- Medusa Siege Cannon with 2 extra crew
++++++++++++++++++++++++++++++++++++++++++++++++++++++++++++
Battle:
The Decisive Moment
 |
| Each army sends a powerful contingent led by their Warlord to contest the central industrial facility, knowing that this point would be the lynchpin of the wider battle. |
Subscribe to:
Posts (Atom)