Special Orders to A-Platoon, C-Company, 63rd Division PDF:
(1) This position will be held, and the platoon will remain here until relieved.
(2) The enemy cannot be allowed to interfere with this programme.
(3) If the section cannot remain here alive, it will remain here dead, but in any case, it will remain here.
(4) Should any man, through shell shock or other cause, attempt to surrender or retreat, he will remain here dead.
(5) Should all guns be destroyed, the platoon will use frag grenades and bayonets.
(6) Finally, the position, as stated, will be held.
-Lt. Gorman, A-Platoon, C-Company, 63rd Division PDF
Background:
After furious initial fighting with the ork invaders, the battered Planetary Defense Forces (PDF) were then set upon by a new threat: a novel type of Xenos. As the orks swept down into Chirosov Valley, the humans still held the mines and hills east of Vayya while the city itself was under siege. In the snowy hills, there were erratic and unreliable reports coming in about monsters appearing out of the snow and attacking. Then the garrison at Outpost Zeta-47 went silent. An expeditionary force was sent out to clear the threat and recover the outpost. The Tyranids were looking to sweep all resistance from the area so it could be harvested by ripper swarms. The PDF soldiers peered into the billowing snow, wondering what they would face at Outpost Zeta-47...
Battle:
 |
| Major Dlonra led two heavy platoons reinforced with armor to secure the outpost. |
 |
| The previous garrison of Outpost Zeta-47 had been overrun by a new race of Xenos that were now swarming the area. |
 |
| Bundled up against the biting winds, the men of B-Platoon slog forward into the seemingly empty outpost. |
 |
| The anchor of the Tyranid force was a massive tusked Carnifex with scything talons. |
 |
| Zoanthropes helped provide synapse control of the swarms of gaunts. |
 |
| B-Platoon heavy weapons take up elevated firing positions in some outlying buildings. |
 |
| As the Zoanthropes detect new prey appraoching, they mass their gaunts together for an attack. |
 |
| Waves of termagants are supplemented by the fast and independent hunters known as Genestealers. |
 |
| A veteran recon squad maneuvers around the far left flank of the PDF. |
 |
| Major Dlonra commands his forces from the center of his line. |
 |
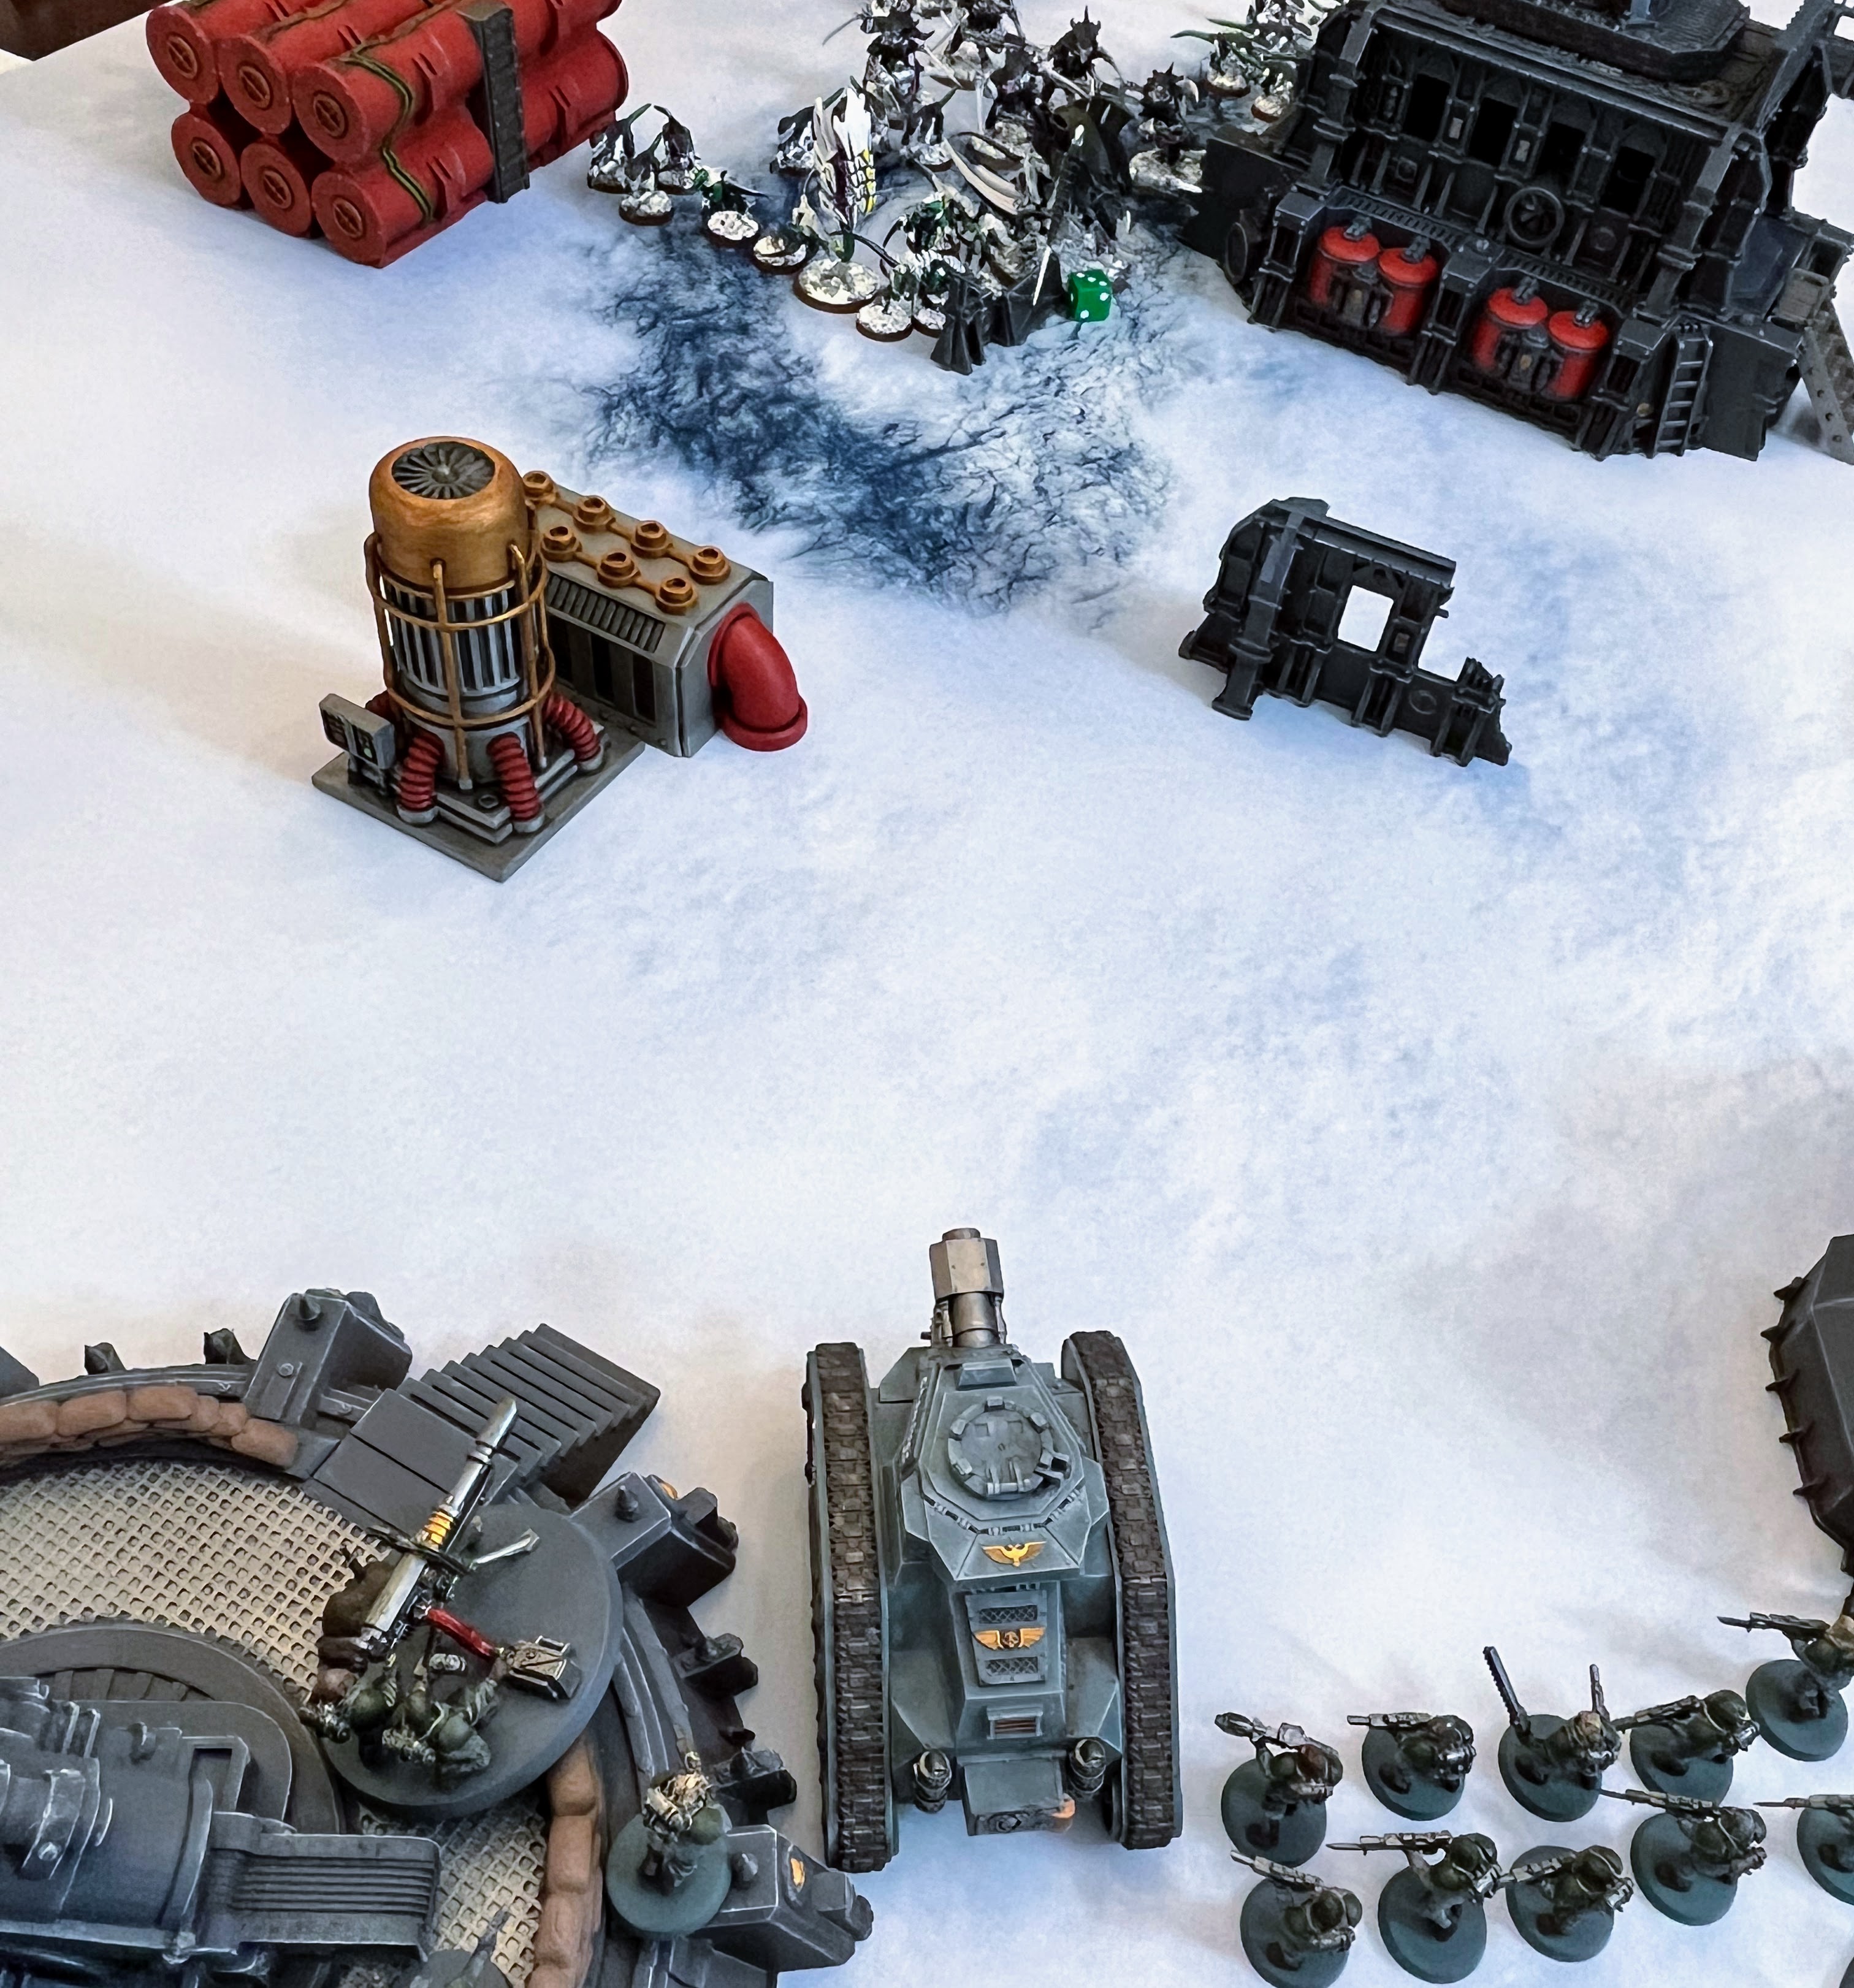
| The PDF relies on its heavy tanks to overpower any foe. |
 |
| The Broodlord leads his own flanking attack, intending to quickly strike the PDF gunline and neutralize their firepower to enable the rest of the swarm to close in. |
 |
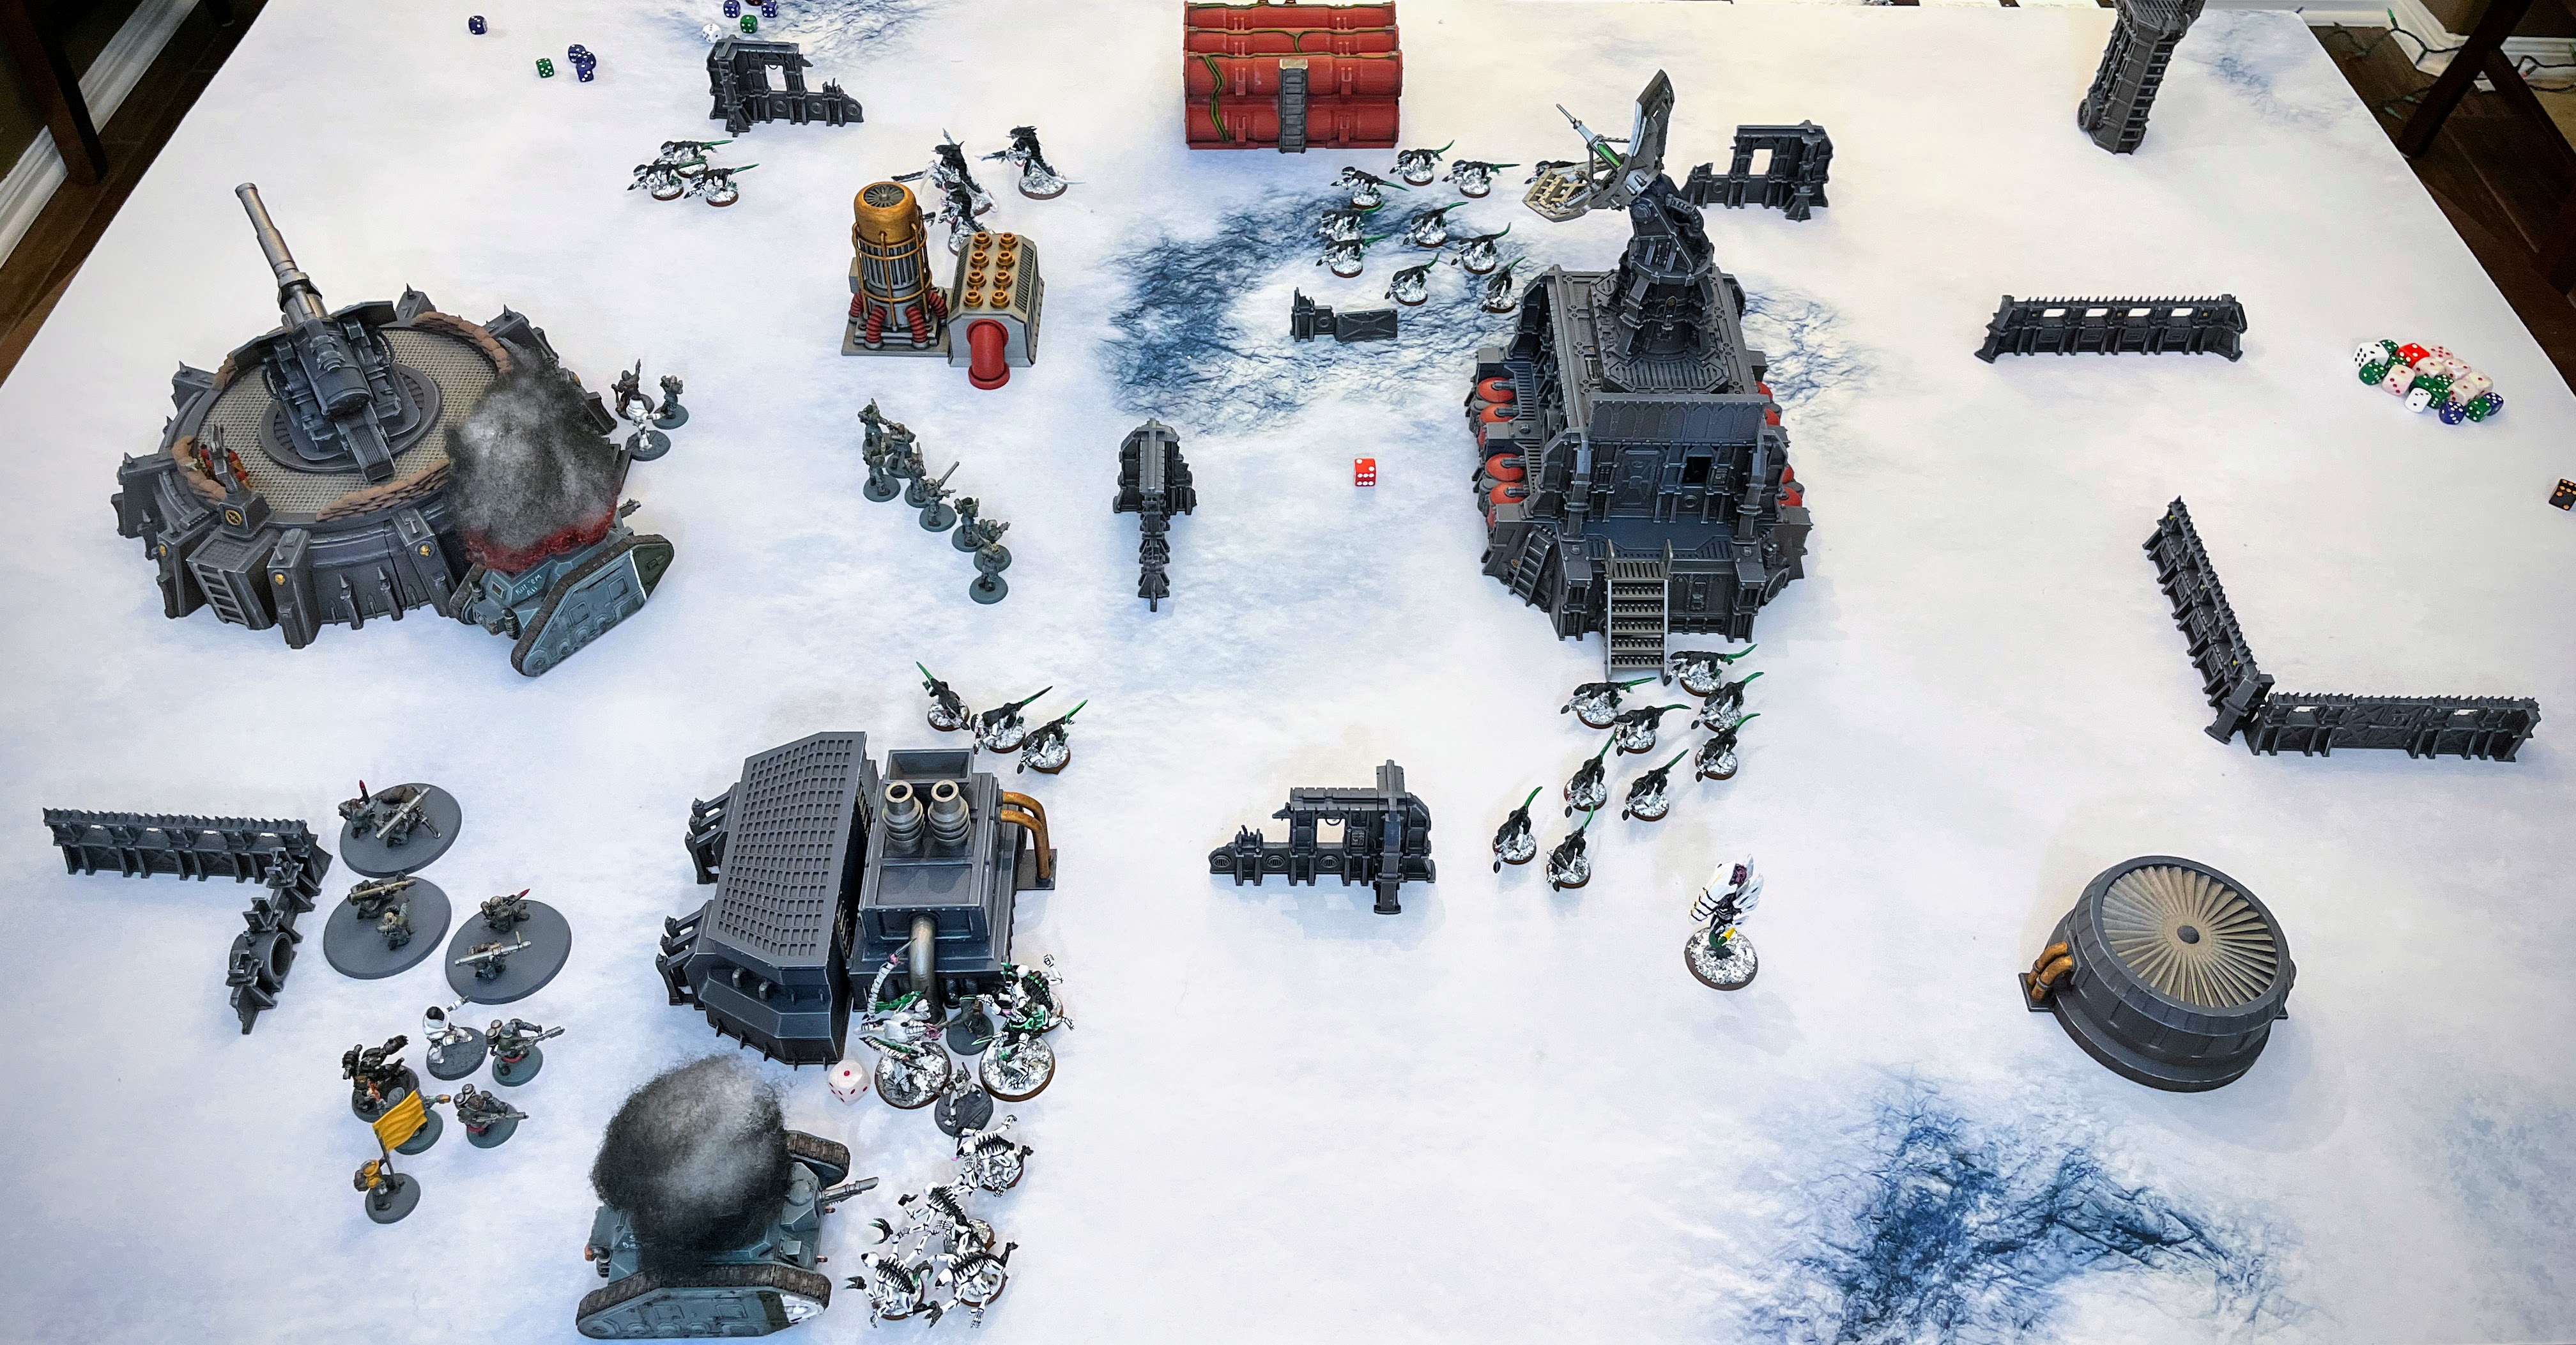
| The two forces face off for control of the Outpost. |
 |
| Speedy hormogaunts lead the attack. |
 |
| The PDF land a Demolisher cannon shell directly in the midst of the swarm. Chittin limbs are sent flying in all directions as 11 gaunts are blown to bits. |
 |
| The will of the hive mind drives the swarm forward with no care for casualties. |
 |
| The snow blows as the two sides face off. |
 |
| The PDF hold their positions and rely on their firepower to whittle down the frightening xenos from a distance. |
 |
| The Genestealers on the flank scurry forward, closing the gap with B-Platoon. |
 |
| The center advances rapidly under the fire of the PDF. |
 |
| The injured Carnifex roars and lurches forward with its lumbering gait. |
 |
| The two forces battle for the center of the outpost. |
 |
| The Tyranids advance across the front, spreading out to control as much of the Outpost as possible. |
 |
| The PDF fires with desperation at the rapidly approaching alien monsters. More bugs go down, but others seem to materialize out of the snow to take their places. |
 |
| "Kill 'em all!" bellows Sergeant Yurd, his commanding voice not betraying any hint of the panic he was beginning to feel. |
 |
| Another direct hit! The battle cannon destroys five of the genestealers as they lope forward. |
 |
| "Hold the line, you stinking maggots!" bellows Major Dlonra, his voice amplified by the speakers in his command suit of power armor. |
 |
| The men of A-Platoon follow orders and fire another volley at the approaching swarm. |
 |
| Shell and lascannon blasts erupting in their midst, the xenos advance relentlessly. |
 |
| Seemingly out of nowhere, a Lictor bursts out of a deep snow drift and leaps upon the heavy support squad from the rear, quickly striking down three men with its long, spiked limbs. |
 |
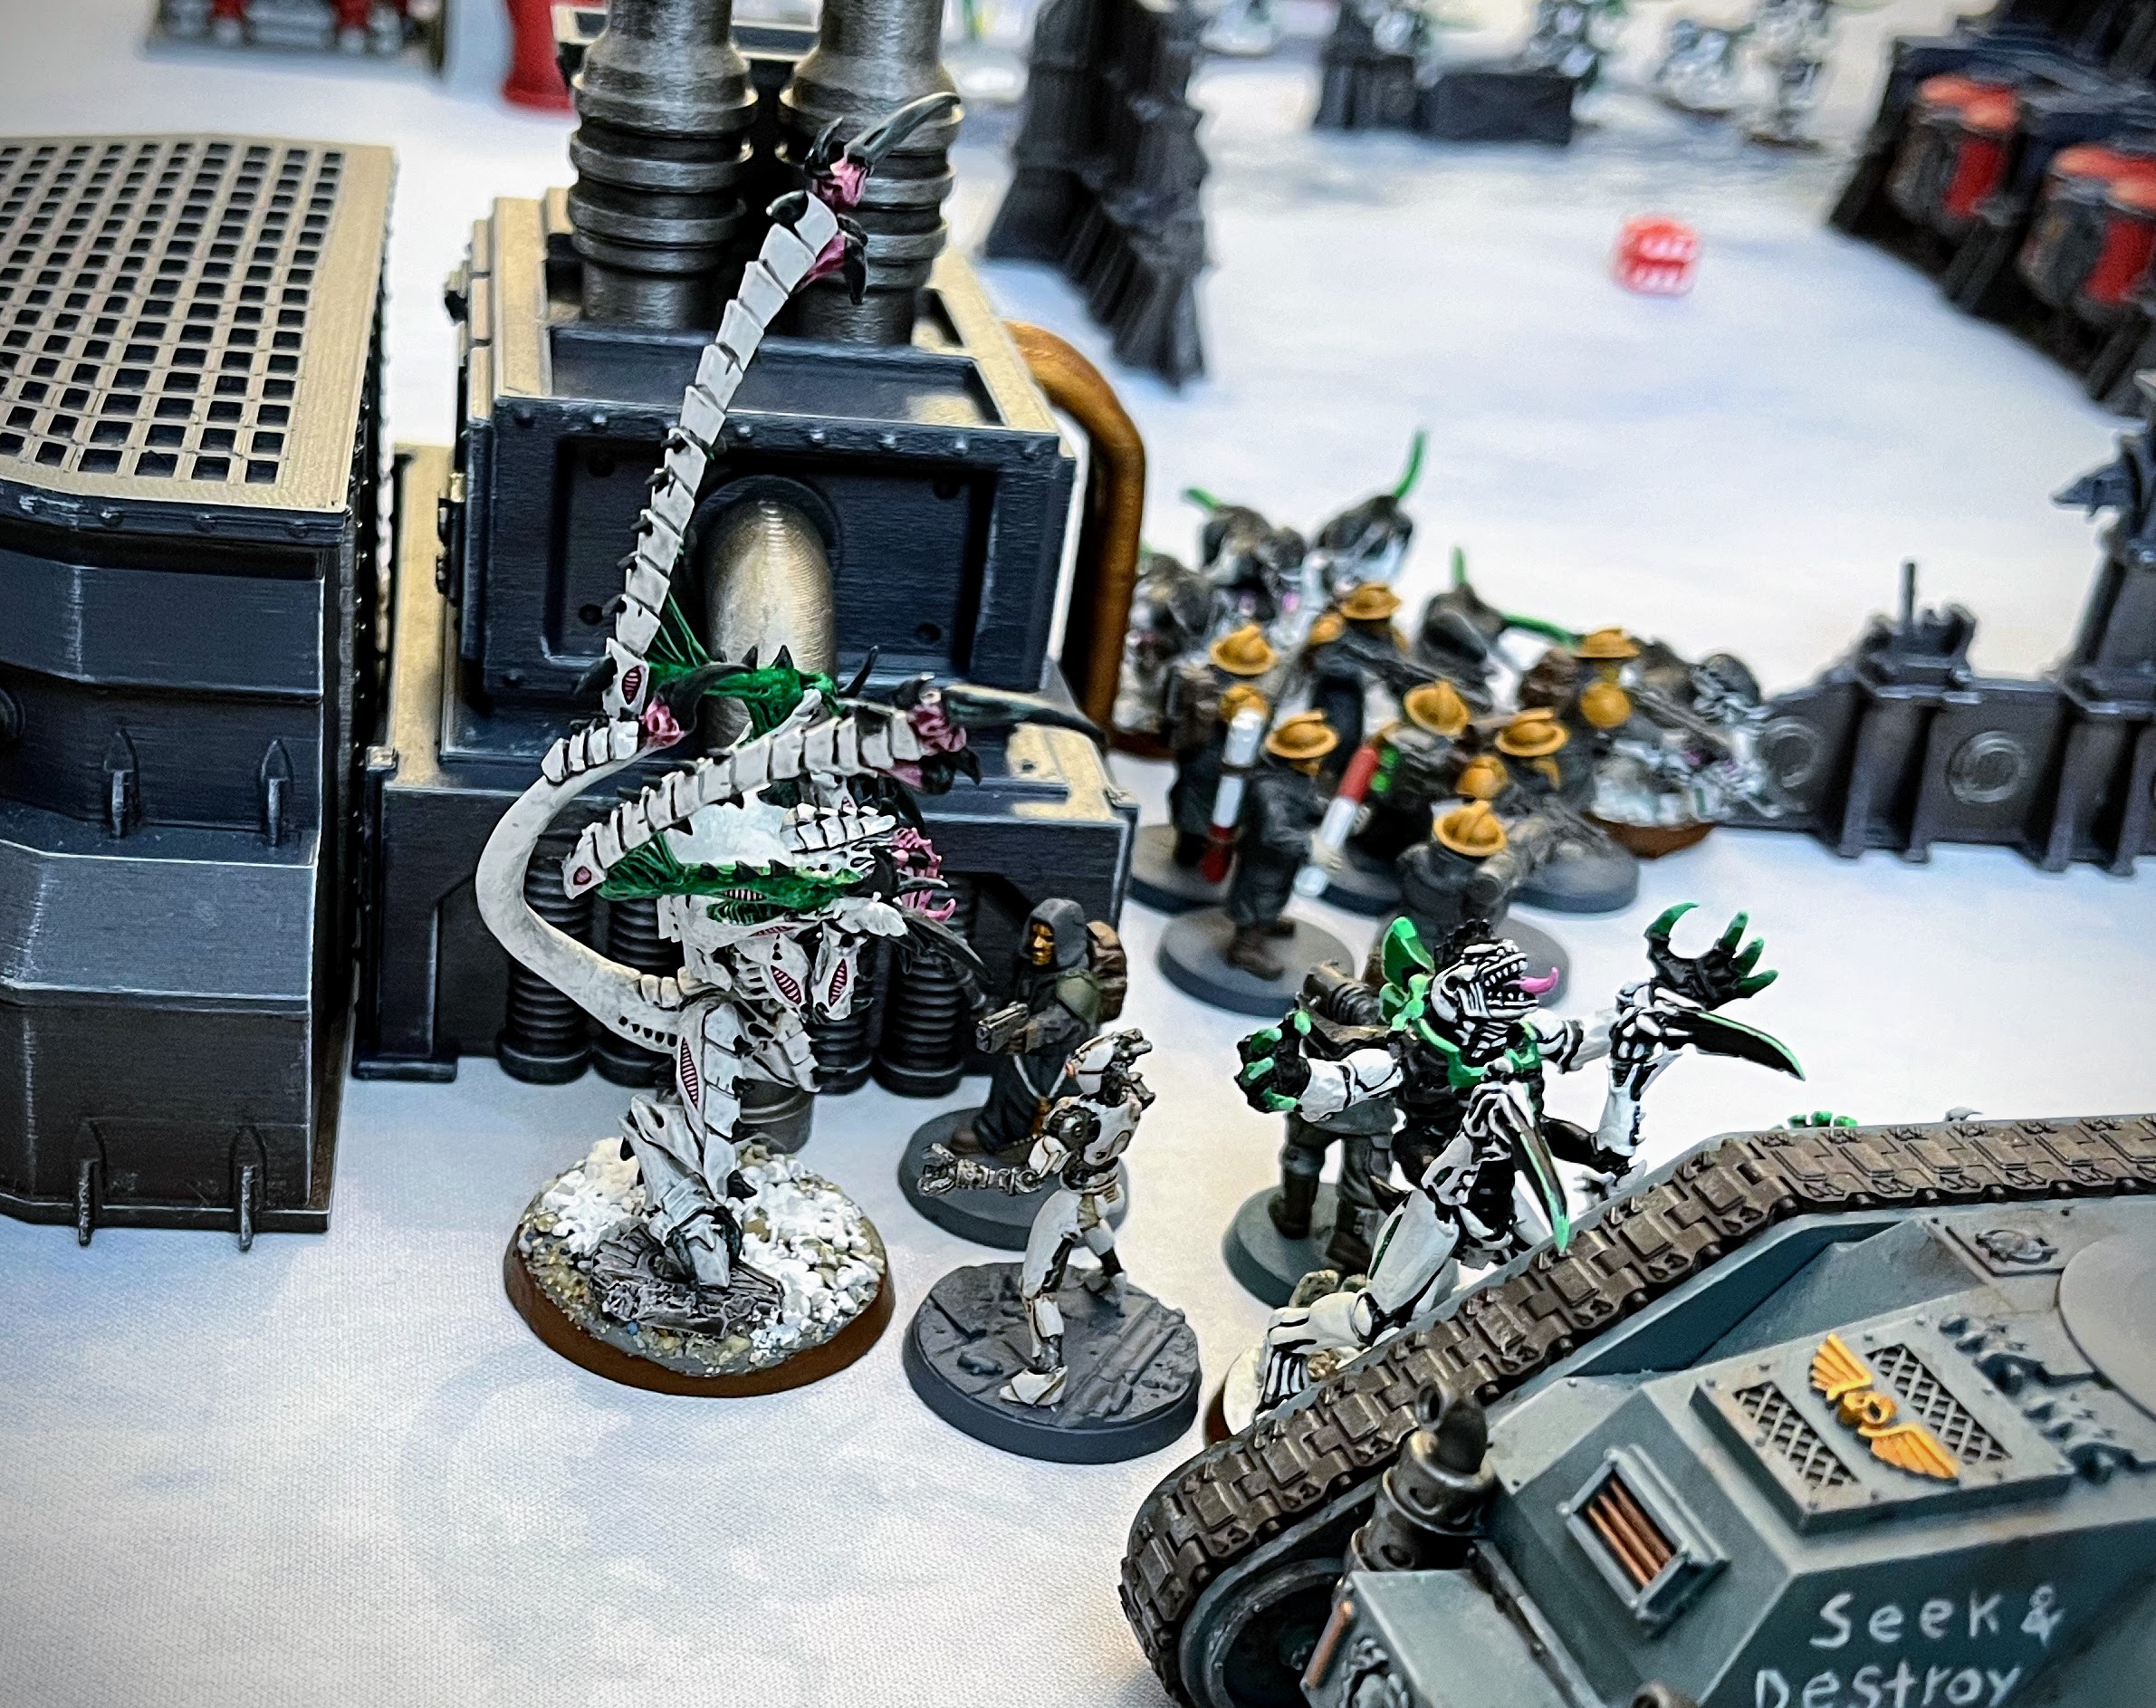
| Leaping over the shattered bodies of dead genestealers, the Broodlord makes a beeline for the PDF forces. |
 |
| The Tyranids close in for the kill. B-Platoon prepares for melee... |
 |
| The veterans find themselves assaulted by termagants. Vicious hand to hand fighting ensues. |
 |
| The Tyranids launch four assaults across the front and win them all, but the PDF holds their positions in all four cases and fights back desperately! |
 |
| The outmatched men of the PDF fight desperately with combat knives and swinging their rifles like clubs. |
 |
| The last of the hormagaunts leap onto the bunker and dive into combat with A-Platoon, creating a distraction until the main Tyranid units can close in. |
 |
| The Carnifex's massive bulk stomps forward though the snow. |
 |
| The Broodlord easily rips men in half with its rending claws. |
 |
| The terrifying Lictor strikes without warning. |
 |
| Despite heavy losses, the veterans hold their position and fight on. |
 |
| Fighting erupts at the bunker, but Lt. Gorman anchors his surviving men. |
 |
| The heavy weapons squads hold on, hoping for relief. |
 |
| A-Platoon's Lieutenant Gorman fires his autopistol into the gnashing maw of the nearest hormagaunt, while the medi-bot injects him with painkillers for his wounds. He wins combat! |
 |
| B-Platoon takes heavy casualties in close quarters fighting with the Tyranids. |
 |
| The PDF's right flank is under heavy pressure, but the center seems to be in control. After shrugging off several Demolisher shells and lascannon blasts, the mighty Carnifex is finally brought down by a volley of lasgun fire from A-Platoon! |
 |
| The Leman Russ obliterates four more Genestealers with another expertly placed shell. |
 |
| Heedless of danger, the remaining Genestealers rush directly toward the massive tank. |
 |
| The Zoanthrope sends a bolt of psychic energy into the Leman Russ Demolisher, destroying the battle tank. |
 |
| At the same time, the Broodlord rips the turret off the Leman Russ Battle Tank and roars with triumph! |
 |
| B-Platoon fights on against the Termagants, refusing to yield, even killing a few of the scuttling bugs in return. |
 |
| The Lictor finishes off the last of the heavy weapons teams. |
 |
| It then leaps down to engage B-Platoon's command squad. |
 |
| With one tank destroyed, one badly damaged, and B-Platoon fully engaged in melee, the situation begins to look desperate for the PDF. |
 |
| The PDF center under the direct command of Major Dlonra launches another salvo of heavy weapons fire, bringing down one of the Tyranid warriors. |
 |
| The tank crew throw their machine into reverse, backing up and firing their lascannon at the Broodlord, but missing. |
 |
| The center sees both sides exchanging fire. |
 |
| The melee continues, both sides refusing to yield. The guardsmen start to get the upper hand. |
 |
| B-Platoon is caught between the Lictor and the Broodlord. |
 |
| Under heavy pressure, the PDF right flank cannot hold much longer. But the center repulses the Tyranid assault. |
 |
| Genestealers pursue the tank and finish it off, climbing inside through the hole left by the destroyed turret and destroying it from the inside. |
 |
| The PDF right flank finally collapses. One squad of A-Platoon bravely advances in an attempt to claim more ground for the PDF and even kills a Zoanthrope, eliminating a vital Tyranid synapse node. |
 |
| The brave advancing infantry squad is immediately set upon by Genestealers and termagants. |
 |
| The Warriors move to the Tyranid right in order to control a quadrant of the outpost. |
 |
| Genestealers charge Major Dlonra's command squad and kill the troopers with ease. However, the Major and the Commissar strike back and kill two genestealers in return! |
 |
| It is looking increasingly desperate for the PDF as their units are engaged in melee across the entire battlefield. |
 |
| The Lictor ties up the last heavy weapon squads, eliminating the last of the PDF's firepower. |
 |
| The Broodlord makes short work of the last intact squad of A-Platoon. |
 |
| Major Dlonra singlehandedly crushes the last of the attacking genestealers! |
 |
| Despite his victory, the Major can see his forces crumbling all around him. He knows the battle is lost. |
 |
| The brave Lieutenant Gorman charges the nearest Tyranids and kills a termagant with a blow from his ceremonial censor. |
 |
| Despite a few PDF holdouts, the Tyranids control the field. |
Results:
The Tyranids win by controlling more table quarters!
Post Game:
It was fun to watch a game as an observer and photographer. Instead of worrying about the best moves to make, I could just focus on the spectacle and recording the amazing action. This battle had a bit of everything: devastating tank firepower, surprise attacks, big bugs, and heroic stands.
It was also great to go back to the simplicity of Fourth Edition. It feels like a well-designed ruleset, designed for quicker games, where unit maneuvering is meant to be key. I especially liked the way area terrain is handled and we agreed to implement that as a house rule in Horus Heresy as well.
The key to this battle seemed to be the Tyranids overwhelming numbers. Despite actually shooting pretty well, the Guardsmen could not inflict enough damage on the swarms of Tyranids; there always seemed to be another unit. By keeping the PDF pinned in their deployment quadrant, the Tyranids could use cheap units of termagants to hold multiple table quarters.
It was fun to see the Guardsmen hit back in close combat and actually win a few melees. Major Dlonra and Lt. Gorman in particular seemed to make names for themselves. But the Broodlord and Lictor were just too tough to overcome, rampaging through squad after squad.
This was going to be a tough battle for the PDF. An infiltrating Broodlord and a Lictor assaulting out of hiding are pretty tough for a squishy shooty army to deal with. We thought the Tyranids would struggle with the Imperial Guard tanks and so, in the spirit of sportsmanship, we limited them to only two. The Tyranids destroyed them both. So next battle the Guard should be allowed to take all three.
It was a fun and exciting game to witness. A great way to start the 4th Edition 40k Weekend.