Due to Pete getting in late, we only had time to play during the big kids' nap so we had to keep it quick. Hence, Combat Patrol from the Third Edition rule book! For those who don't remember, this was a set of army selection restrictions on powerful units to keep a small game relatively fair. The downside to playing Combat Patrol is that I could not use my Meganobz (no 2+ saves allowed), but I did get to use my other new unit, the Tankbustas. (Technically, the maximum combined front, side, rear armor value is 33 and the dreadnought has 34, but we were OK with that since I was planning to take my Tankbustas.)
We decided to play a simple mission with a single objective in the center of the table. Whoever held the objective at the end of the game would win. To keep the game quick, we would play four turns with a 4+ chance of a fifth turn.
The background would be that The Red Brotherhood was trying to rescue an important officer of the Planetary Defense Force who had been shot down in the uninhabited deserts of Xhorik (represented by the purple space marine model). He had crashed in one of the old cities that was destroyed in the first Ork invasion of Xhorik which had now been mostly reclaimed by the sweeping sands of the desert. The Red Brotherhood sent a small force of infantry and a dreadnought to quietly pick their way through the ruins and recover the injured officer. Meanwhile, a small band of Orks patrolling the deserts had seen the ship crash and sped toward the ruins to investigate, thinking there might be some good loot!
ARMY SELECTION: 400 Points
Da Blitzdreg Boyz: Combat Patrol (398 pts)
- 11 'Ard Boyz with nob, boss pole, power klaw (180 pts)
- 7 Tankbustas (121 pts)
- 4 Warbikers (72 pts)
- Warbuggy with twin-linked rokkits (25 pts)
I went with the theme of a fast-moving patrol where everyone was in a vehicle or on a bike.
The Red Brotherhood: Combat Patrol (398 pts)
- Dreadnought with twin-linked lascannon and twin-linked autocannon (130 pts)
- 6-man Tactical Squad A with flamer (89 pts)
- 6-man Tactical Squad B (84 pts)
- 5-man Devastator Squad with heavy bolter and missile launcher (95 pts)
PRE-GAME
Orks won the roll to select deployment zone despite Pete getting a re-roll for winning the last game.
Marines won the roll to determine who set up first and forced the Orks to set up first.
The Orks then chose to go first.
We forgot to roll for Night Fighting and we didn't use Warlord traits.
DEPLOYMENT
 |
| View of deployment from the east. |
 |
| View of deployment from the south. |
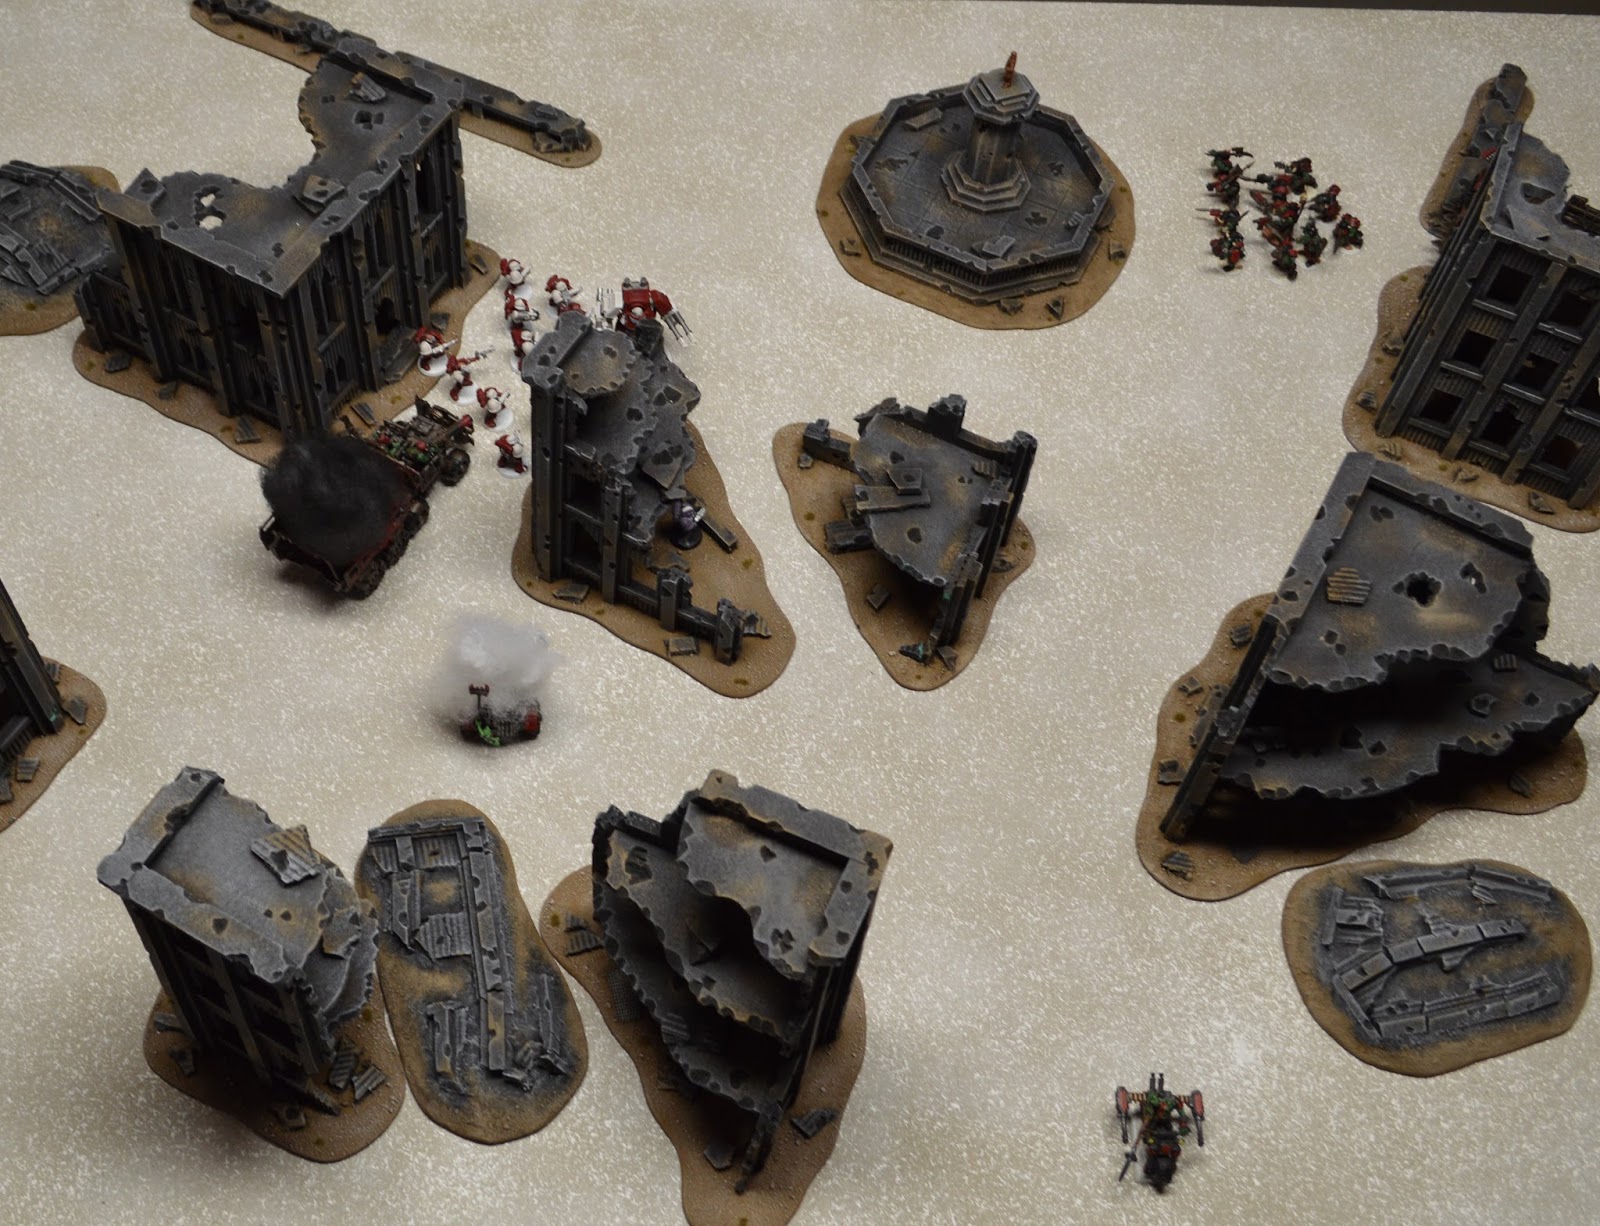
Ork Deployment and Da Plan:
Once again, I had to deploy first without knowing where the marines would be. My plan was to use the buildings to block line of sight to my trukks while I advanced. In the last game, I learned that trukks are a death trap for boyz with 6+ armor save if the vehicle explodes. I did not want to race straight ahead, have the trukss blow and the boyz lose half their number in the wreck and the ensuring mob rule checks and then get pinned out in the open. The center would consist of my shooting threats in the warbikes and warbuggy.
 |
| The Ork warbikes race through the ruins looking for any loot from the crash and spot a survivor. |
Marine Deployment and Strategy:
Pete kept his force close together and used the small tactical squads to screen his dreadnought, ensuring I could not get to it with my tankbustas. The devastators deployed in some hard cover with a good line of sight to the objective. He kept his whole army well away from my 'ard boyz.
 |
| The Red Brotherhood patrol moves carefully through the city, looking for the lost officer when they hear the unmistakable roar of Ork engines closing in. "Take up combat positions and prepare to engage the enemy. We must not falter in our sacred duty." |
Orks Turn 1:
I moved both trukks flat-out in order to keep them hidden behind ruins. I was trying to maneuver closer to the marines without leaving my trukks in the open against his missile launcher, twin-lascannon and twin-autocannon.
The bikes and buggies moved forward and opened fire. The warbuggy managed to hit the dreadnought and shake it, also taking off a hull point. The warbikers fired on the devastator squad, but only manged to bring down a single marine.
 |
| "'Ere we go! 'Ere we go! 'Ere we go!" The 'ard boyz race through the ruins, staying out of sight of the marines' guns. |
 |
| The rokkit buggy continues its un-Orky accuracy by scoring another hit, knocking a hull point off the hulking Imperial walker. |
 |
| End of Ork Turn 1. The Orks have advanced aggressively. |
Space Marine Turn 1:
Tactical Squad A moved into the ruin while Tactical Squad B moved forward to screen the dreadnought. With the Ork trukks out of sight, the marines focused their fire on the available targets: the bikes and buggies. Tactical Squad B managed to take out the rokkit buggy with their bolters while the devastator squad killed three of the Ork bikes (despite their jinking) and forced the last one to flee.
 |
| The marines advance into the alley, supported by their dreadnought. |
 |
| A withering hail of expert bolter fire destroys the oncoming Ork vehicle. |
 |
| Not to be outdone, the devastators kill three of the bikers and force the lone survivor to fall back. |
 |
| End of marine turn 1. The Ork center is decimated. |
Orks Turn 2:
At this point, I realized I was well and truly out-maneuvered. I could not get my tankbustas to their target of the dreadnought and my 'ard boyz were too far away to provide any support in the next turn. Without knowing what else to do, I decided to attack, knowing my odds weren't good.
The tankbustas disembarked, fired at Tactical Squad B and killed two before charging. I lost one to overwatch and one to melee attacks before killing a marine in return.
On the other flank, the 'ard boyz disembarked and ran to get close enough to the devastators to charge next turn. They were able to use the pillar to block the line of sight from the devastators. If I moved the trukk farther, I would not have been able to disembark and I did not want to be sitting in the trukk in the wide open.
 |
| The savage tankbustas jump out of their trukk ready to attack their giant prey, but their path is blocked by a squad of marines! |
 |
| A hail of improvised rokkits and explosive-tipped spears kills two members of the Red Brotherhood patrol. |
 |
| The tankbustas charge in, losing two of their number and taking down one more marine. |
 |
| The tactical marines provide an effective screen and prevent the tankbustas from reaching their target. |
 |
| The 'ard boyz swerve around a ruined building and disembark with their sights set on the devastators. |
 |
| With the 'ard boyz closing in and screened by the pillar, the devastators consider evasive action. |
 |
| End of Ork turn 2. The tankbustas are engaged with Tactical Squad B. |
Space Marine Turn 2:
Tactical Squad A moved to the edge of the ruin and fired at the tankbusta trukk, combining their fire with the dreadnought. Tac squad A then charged the trukk and managed to wreck it in close combat.
The devastators moved out of their ruin and charged into the melee to support Tactical Squad B, simultaneously putting a lot of distance between them and the 'ard boyz. In the melee, the Orks were wiped out in a Sweeping Advance without doing any more damage to the marines.
 |
| The devastators charge in to support Tactical Squad B in the melee while Tactical Squad A finish off the trukk in an assault. |
 |
| The result: Tankbustas and their trukk are wiped out. |
 |
| End of marine turn 2. The Ork center and left are shattered whereas the marines are at nearly full strength. |
Orks Turn 3:
The lone biker finally rallied, but all he could do was consolidate 3".
All I had left were the 'ard boyz, their trukk and the bike. I figured my best shot was to get the 'ard boyz into melee so I moved into the difficult terrain of the ruin that the devastators had occupied and ran forward, hoping that the 4+ cover save would keep enough boyz alive to make a meaningful charge the next turn.
 |
| The 'ard boyz advance and take cover in the ruins, waiting for the inevitable storm of marine fire! |
 |
| Their trukk advances and fires off an ineffective rokkit in the general direction of the enemy. |
 |
| End of Ork turn 3. The Orks continue toward the marines, but the distance is much too great. |
Space Marine Turn 3:
Everything fired on 'ard boyz. The hard cover reduced the damage, but the marines still killed four Orks, more importantly forcing a morale check which the Orks failed. I rolled a one for mob rule and forgot to use the boss pole to re-roll it, so the boyz fell back toward my table edge, right out into the open.
 |
| The marines concentrate all their firepower on the Ork 'ard boyz, killing four... |
 |
| ...and sending the rest fleeing for safety (ironically, flushing them from cover and out into the open!) |
Orks Turn 4:
The 'ard boyz rallied, but again could only consolidate, which left them sitting in the open facing the entire marine army.
The warbiker raced into the center ruin and momentarily claimed the objective for the Orks! The 'ard boyz trukk moved flat-out to get as close to the objective as possible so it could claim or contest it on the fifth turn, if there was one.
 |
| The last warbiker and trukk make a desperate push for the objective. The warbiker points his spear at the cornered Imperial officer. "You'z comin' wit us!" |
 |
| End of Ork turn 4. Despite their massive losses, the Orks hold the objective for the moment. |
Space Marine Turn 4:
Tactical Squad X and the devastator squad blasted the 'ard boyz at point blank, leaving only a single boy to fall back once again.
Tactical Squad Y and the dreadnought moved into the ruin to claim the objective and killed the ork bike despite his 3+ cover save from turbo-boosting.
 |
| The marines make short work of the remaining Orks at point blank range. |
 |
| The Red Brotherhood quickly come to the aid of the Imperial officer before the Orks can make off with him. |
 |
| The massive dreadnought stomps through the ruin, leading the advance. |
We rolled for another turn and got it.
Orks Turn 5:
The lone 'ard boy rallied and consolidated toward the objective, but he was too far away to matter.
The 'ard boyz trukk moved into the center ruin and contested the objective due to having Objective Secured as a dedicated transport to a unit of Troops.
 |
| With the biker dead, the 'ard boy truck crashes into the ruin, trying to grab the officer out from under the marines. |
 |
| Could the ramshackle vehicle possibly withstand the firepower of the entire marine army? |
Space Marine Turn 5:
The marines fired everything at the trukk and destroyed it, leaving them in uncontested control of the objective and the undisputed winners.
 |
| "Objective secured. Casualties minimal. Mission success." |
Final Result:
Space Marine Victory!
 |
| Victory for The Red Brotherhood! |
POST-GAME ANALYSIS:
Phil (Orks):
For the second game in a row, I got my ass severely kicked. My army was wiped out except for a single boy and I had only killed four tactical marines and took a hull point off the dread. The only positive to take away was that somehow I was still in the game on the last turn, contesting the objective to force a draw if Pete rolled terribly to kill my trukk (or if I had actually done a little more damage to his army during the game to weaken his firepower) or if I had remembered to roll the Ramshackle rule on my trukks...
On the plus side, it was an amazing sight to see two fully-painted armies facing off on some great terrain. The look and fee of this game was just so fulfilling.
What should I have done?
- In hindsight, I would have been better off moving the tankbustas into the center ruin with the objective where they could shoot marines and have a cover save and then used the 'ard boyz to support them or counter-charge, as needed. Of course, in hindsight, I probably would have been better off doing just about anything different as it is pretty unlikely I could have lost any worse than I did!
So what did I learn?
- I clearly don't know how to use my trukks effectively. In the last game, I raced one straight ahead and paid the price. In this game, maybe I played them too cautiously, hiding behind the ruins and the 'ard boyz never got to a position where they could charge.
- Orks are specialists that can do one thing well and need to be able to pick their battles. The tankbustas could be devestating in melee with vehicles, but are worse than regular boyz in melee with infantry. The 'ard boyz need to be in melee and have almost zero shooting ability. Just like last game, Pete was able to force my units to fight the things they were least-suited for and mopped the floor with me.
- Most importantly, I need to put my units in position to support each other rather than getting picked-off one by one.
So what do I do differently next time? After two crushing defeats, I need to go back to the drawing board, so to speak. I know I didn't take the optimum army for this game. I wanted to use units that looked good and to try out my new tankbustas to see them on the battlefield. But even so, I should have been able to at least put up a decent fight. I think I just need to better learn how to use my units. I think using an assault-oriented, specialist army is tricky, although my shooting units didn't fare any better!
In games where you have to hold objectives at the end, my orks are 1-4, but in Maelstrom games, they are 3-0 so that at least gives me some hope that I can do well in missions where board control matters and not just last man standing.


Well that went fairly well! I was worried that I would be outmaneuvered and outmanned playing such a small game of only 400 points, where my opponent would have many more units than me. I stuck to my new strategy of units supporting one another and not leaving anyone out on an island, incapable of deterring the impending onslaught of the ork advance.
ReplyDeletePerhaps the greatest reason for The Red Brotherhood's victory is that I got to set up second again. Phil and I talked about how much this dice roll can swing the game, because I knew where he was setting up his units, what their strengths and weaknesses were, and then tried to counter them accordingly. I kept my group together, but screened my most vulnerable model to the ork rocket fire, my dreadnought, with 2 tactical squads to keep him doing what he was built to do: strafe and advance while blazing two heaving weapons against open targets.
I can see the game going a lot differently if the ork bikers take out more of the devastators, or if they get charged by the 'ard boys in close combat. When the devastators were able to send the bikers packing right in the middle of the table, I knew I had a strong tactical advantage going forward for the rest of the game and could send everything else I had against my right flank and just wait for the predictable advance of the 'ard boys.
All-in-all my marines did very well at the tasks I asked them to do. The tactical marines were decent at shooting their bolters as well as in close combat (against admittedly one of the least intimidating ork units in close combat in the game). But they were solid and relied on their strength in numbers. I'm excited to finish my 3rd tactical squad as I think they are the backbone of any winning Space Marine strategy. The Dread' looked cool but actually missed a couple times with it's twin-linked weapons, which I don't see happening too often. Not having to worry about a warboss was nice for a change as well, as there was no Waaaggghh! in Phil's deck.
Terrain was probably the best part of the whole experience. Scratch that, it was the fully painted armies facing off for the first time in maybe the history of us playing this hobby. I know it was the first time I've ever reached this point and I must say that it is highly satisfying to see a good looking army on a first-rate gaming table. Big props to Phil for all his work (and Polish connection!) on the table, which adds so much to the experience.
Can't wait to come back with even more units ready for battle and to face off against some mega nobz!
Hmmm, that was rather grim. Definitely a case of the player who is second to deploy making full use of his advantage. Maybe we should consider an alternative deployment method, like back in the day in which players alternated placing units. Seeing everything your opponent has before placing a single model may just be too powerful.
ReplyDeleteSetting up first didn't help, but I am not going to use that as an excuse. My army had plenty of mobility to be able to adapt to any deployment Pete used. The biggest problem was that I didn't use my mobility properly and let him pick me apart one unit at a time.
DeleteI don't necessarily think mobility was the problem. I think you over-used mobility. You kept the trucks way off on the edges of the battle and in cover to keep them away from the dreadnought, which would blast them and likely spell the deaths of many boyz onboard. I considered the dreadnought's specialization and realized that while it is a vehicle's nightmare, it would suck at killing infantry. Imagine plinking away at a huge mob w a lascannon and autocannon. All trucks did was group up all those troops in an easy-to-explode package. Then you wasted time heading around the edge of the board instead of charging straight into the action. Your tankbustaz could have strode right up to the dreadnought on turn 2.
DeleteHmmm. In fact, I don't see much need for high mobility in a small battlefield that tightly packed w cover. The points could have be better spent on a nice bullet screen or kommandos. Your trukks are definitely awesome and I know I would want to use them in every battle but on a battlefield like this one, big vehicles have a disadvantage w having to zigzag around so much terrain.
DeleteThe game looked absolutely superb though. Both armies look awesome and the terrain is good. The dark buildings w the white ground provide good contrast and enhance the armies' colors.
ReplyDeleteWow You know, re-reading this battle has made me appreciate how soundly you got whupped. Ahem, no offense intended. But seriously, pete's army could focus it's entire attack on one small part of your army each turn and completely eliminate it. Turn 1, center. Turn 2, left. Turn 3, right. Pete specifically deployed to keep his army tight and, more importantly, to keep your 'ard boyz out of the fight until everything else was destroyed. You let that happen by sending the 'ard boyz waaaay off to the right flank and out of the battle. That's what I mean by too much mobility. If your army were largely on foot, they could have walked together up the center and hit pete w much greater might. He used the perfect strategy to divide and conquer. If anything, you should have driven the trukk towards the center or do what you did but skip the tankbustaz' and bikez' first move. Then you could have pincer attacked the hell out of him.
ReplyDeleteThat's what I mean about me not knowing how to use the trukks properly. Last game I drove one straight up the middle and if course it got blown to bits, along with half the boyz on it. This game, I tried to keep them out of line of sight as I got closer. But all that did was make it easier for Pete to focus his fire on the things he could see. Orks are an all-or-nothing army. Maybe I should have raced both trukks straight ahead along with the bikes and buggies. He would have easily destroyed a few things, but likely not everything. And anything that lived could charge Turn 2. I don't know.
DeleteBut I agree a foot slogging army would have performed better and I said that in the post-game comments. But I was mostly picking my army to use my most recent and best-painted models. Still, in theory, army selection shouldn't automatically spell victory or defeat since the points system us there to keep the armies roughly balanced. I think the army I selected could have at least performed decently if I had used it better. I just think trukks are a little harder to use correctly than a big foot slogging blob running up the center and I just needed a few games to get the feel for how to use them better. I really think I'll do better next game!