"These corridors have become tombs; these chambers crypts. Beneath the streets of Berat, there is only death."
- Sergeant Albrecht,
Death Guard Legion
Campaign To Date:
It has been about 40 years since a combined force of Sons of Horus, Death Guard, and White Scars brought the Xhorik System into compliance during the Great Crusade. The major population centers of the largest continent were quickly brought under Imperial control in the typical fashion: a series of pinpoint attacks of overwhelming force by the Legions against the enemy's strong points, followed by rapid surrender. Due to the richness of the primary planet and the strategic location of the system on a sort of crossroads of warp currents, small garrisons of the Death Guard and White Scars legions were left on the planet to oversee the tithes of men and material to the Great Crusade and to help eradicate the threat of large ork populations in the eastern wastes.
With the advent of the Horus Heresy, the Warmaster ordered that the Xhorik System be taken to act as a way station for resupply on his long march to Terra. The Death Guard and their human allies on Xhorik Prime launched an attack on the White Scars and their allies, the Stratocracy of Kozar.
In Phase 1 of the campaign, the Traitors pushed the Loyalists from the war-torn border city of Bielyr in a series of bloody street fighting.
In Phase 2, the war escalated across the badlands of the Valbaara Plateau in several pitched battles. In the end, the Brotherhood of the Wind was defeated and their leader Praetor Zherdan was killed by the Death Guard.
In Phase 3, the Death Guard marched to the major Kozar city of Berat, fighting their way through a number of Loyalist counter attacks. In the end, helped by taking control of low-planetary orbit over the city in a void battle, the Traitors smashed through the outer walls of Berat behind the might of their super heavy Fellblade battle tank.---------------------------------------------------------------------------------Phase 4 is the battle for the Kozar city of Berat. The Traitors have broken through the gates and are working their way toward the city center, block by bloody block in a brutal street fight. This Phase uses a number of special rules:
Campaign Points: CP are earned by playing games and by achieving secret secondary campaign objectives (drawn randomly each game and kept secret). They can be used to gain advantages in games. The player with the most CP at the end of the phase wins.
Normal games:
Win: 5 CP
Draw: 3 CP
Loss: 1 CP
Final Game:
Win: 10 CP
Draw: 6 CP
Loss: 2 CP
- Spend 1 CP to re-roll the die to deploy first or to re-roll the die to steal the initiative. Can only be used once per game.
- Spend 1 CP to include a unit that would not be allowed due to the Grinding Attrition or Street Fighting special campaign rules below. The point cost of the unit still counts toward the army total. Can only be used once per game.
- Spend 1 CP to re-roll the die to see if the game ends. Can only be used once per game.
(Costs are doubled for the final game.)
Due to the very dense terrain providing ample hiding places, surprise attacks are extra deadly. Units who used Infiltrate, Scout or Outflank can charge the on the first game turn or the turn they come into play. If they don’t charge, they gain an extra +1 cover save for their first turn in play (stacks with any bonuses they have already).
Street Fighting: Narrow streets, debris, billowing smoke and crumbling towers limit the ability to utilize large vehicles and artillery. Other than the final battle, a max of one total unit can be selecged with any of the keywords: heavy, artillery, flyer, or over 3 HP. In the final battle, everything goes.
Grinding Attrition: Other than Troops choices, any unit that is destroyed cannot be used in the next battle. If the next battle is the final battle, it can be taken but must start in reserves. Any unit that is selected as Troops choice can be used even if it was destroyed in the previous battle.
Named Warlord: Choose your warlord trait. Must be the same for the whole phase. Can also can always re-roll LD and morale checks. Other warlords must roll for trait.
If named warlord dies in battle, roll die:
1-2: debilitating injury: can't use in the rest of the campaign phase until final battle
3-4: major injury: can't use in next game
5: close call: no effect
6: Miraculous Recovery (Chosen of the Emporer/Horus/gods of Chaos): can use as normal and has an inspiring presence for the next battle: all units within 12" can use his LD.
The Revnent: Once warlord returns after dying in a game, he has Hatred (Traitors/Loyalists) for the rest of the campaign phase.
Our standard
Terrain Rules are in effect.
PRE-GAME AND MISSION:
We played the Search and Destroy scenario from the Zone Mortalis Assault Missions in Horus Heresy Book I. It would be a simple of battle of Victory Points earned for destroying enemy units, plus the secondary objectives Slay the Warlord and First Blood.
This battle represents a White Scars strike force trying to make their way behind enemy lines via the large subterranean labyrinth below Berat. They are attempting to reinforce a Loyalist offensive that is planned to strike at the heart of the Traitor invasion. The Death Guard and their World Eaters allies are also roaming the underground, looking to clear it of enemy forces. Both sides are spread out as they creep forward in the dark passages.
We deployed in opposite quadrants with a 6" radius no-mans land in the center. The table was 3.5' x 5' instead of 4' x 4'.
We elected not to draw Campaign Secondary Objectives given the smaller size of the game.
ARMY SELECTION: 1250 points
Traitors - Pete
Death Guard
- Preator Wolfgang: terminator armor, volkite charger, paragon blade, digital lasers, Fearless, It will not Die
- Tactical Support Squad Folterer: 7 marines flamers, sergeant with artificer armor.
- Tactical Squad Toddestraffe: 20 marines with close combat weapons, sergeant with power fist and artificer armor and Apothecary Gerhard
- Deathshroud Terminators: 5 terminators with scythes and hand flamers
World Eaters- The Red Butchers: 1 Devoured with dual chain fists, 4 Butchers with dual power axes
Loyalists - Phil
White Scars Brotherhood of the Wind
- Khan Sorqan: Paragon blade, iron halo, cyber hawk
- Ebon Keshig Blackhawks: 5 Terminators: 4 with power glaives, 1 with power fist and bolter/melta combi-weapon
- Ebon Keshig Midnight Sun: 5 Terminators: 2 with power fist and combi-bolter, 3 with power glaives
- Tactical Squad Temgar: 10 marines, sergeant has power glaive, artificer armor
- Tactical Support Squad Khoer: 8 marines with plasma guns
- Recon Squad Chono: 8 marines with bolt pistol, close combat weapons, melta bombs, recon armor; sergeant with power fist and artificer armor
++++++++++++++++++++++++++++++++++++++++++++++++++++++++++++
++++++++++++++++++++++++++++++++++++++++++++++++++++++++++++
 |
| White Scars Strike Force Jad Tseg led by Khan Goghal |
 |
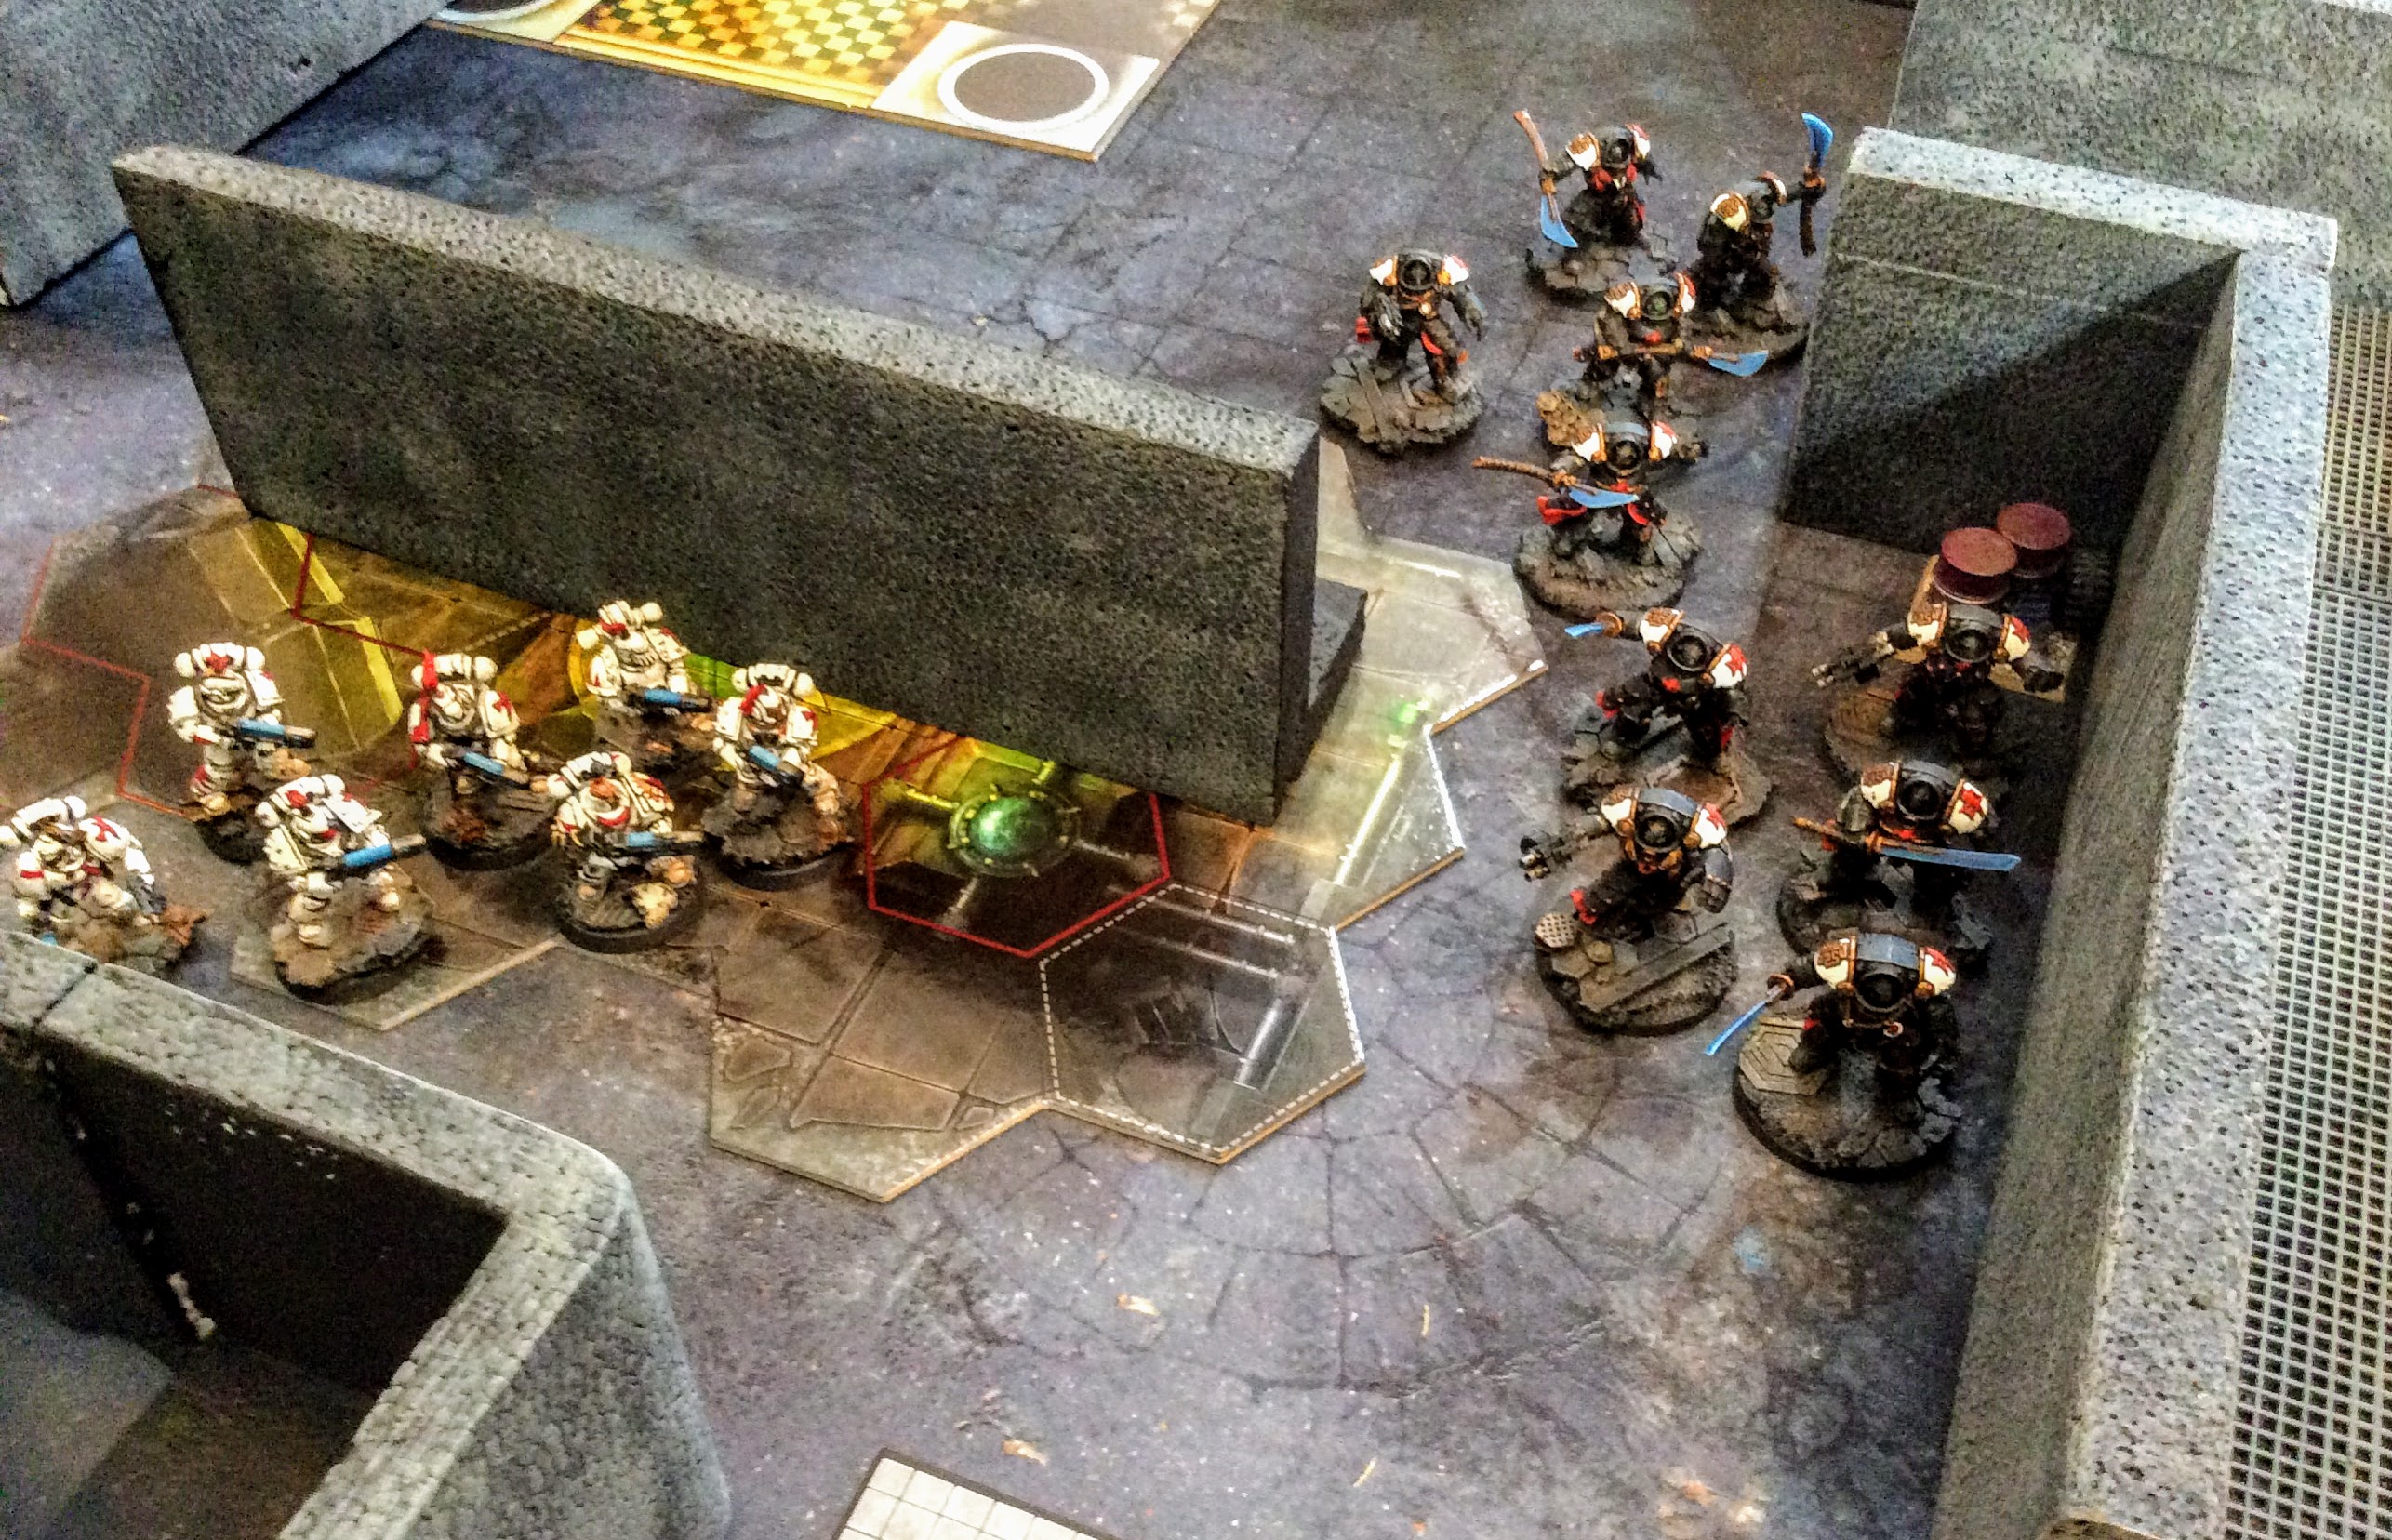
The lead elements of each side make their way through the darkness.
|
 |
The warriors of the Ebon Keshig lead the way in order to regain their tarnished honor.
|
 |
| The Blackhawks stalk the tunnels, surprisingly agile in their heavy armor. |
 |
The two squads stay close in order to support each other.
|
 |
Patrolling the darkness are the fearsome Deathshroud and the psychotic Red Butchers.
|
 |
The Traitor use Terminators for the dangerous close-quarters work of sweeping the underground.
|
 |
Gore-soaked berserkers and silent death-dealers.
|
 |
The Traitor terminators advance to the center of the catacombs while Tactical Support Squad Khoer circles warily around to the south.
|
 |
With Loyalists identified on sensors, the Deathshroud call for support and reinforcements quickly arrive from the west.
|
 |
The Traitor terminators continue to move north, splitting up slightly in an attempt to catch the Loyalists in a pincer attack.
|
 |
Reinforcements arrive for the White Scars as well, in the form of Recon Squad Chono, outflanking the Traitors from the south.
|
 |
| The Traitors march forward, while the White Scars continue to circle, looking for the right opportunity to strike the more durable Death Guard and World Eaters. |
 |
Tactical Support Squad Khoer keeps their backs against the wall in the dark corridors, trying to keep some firing distance between themselves and the deadly Deathshroud Terminators.
|
 |
| The Traitor Terminators re-converge from different passages as the large Tactical Squad Toddestraffe approaches from the east. |
 |
Terminators from both sides continue to maneuver for advantage.
|
 |
| The large Tactical Squad Toddestraffe is joined by Tactical Support Squad Folterer out of reserve. |
 |
Together they march toward the Loyalists, a mass of power armor.
|
 |
| The Traitor reserves have a lot of ground to cover. |
 |
Khan Sorqan and Tactical Squad Temgar arrive from the north.
|
 |
| The White Scars advance on the narrow corridor. Squad Khoer fires a salvo of plasma into the Deathshroud, felling two of the mighty warriors. |
 |
The warriors of the Midnight Sun move into the corridor and prepare to charge the surviving Death Guard.
|
 |
As they charge forward, Brother Tmuji finds himself covered in a burning stream of horrendous, toxic chemicals that burn through the joints and seams of his armor and into his flesh. He falls to the floor, writing in agony. The rest of the squad is held back by the wall of noxious flame.
|
 |
While they are busy fending off plasma fire and a charge from the south, the Deathshroud are also assailed from the northwest by the Blackhawks.
|
 |
| It is scythe vs glaive as the two sides clash with one warrior from each squad going down. |
 |
Although their planned pincer attack failed, the Ebon Keshig still manage to deal more damage to the Death Guard and force them to fall back.
|
 |
The Deathshroud are temporarily driven back, but the Red Butchers are at full strength and closing in. Meanwhile, the rest of the White Scars have arrived.
|
 |
With a guttural roar amplified and distorted by their armor's vox systems, the Red Butchers charge.
|
 |
The melee is vicious but the Ebon Keshig's speed is not enough to overcome the Butchers' toughness and ferocity. The White Scars are killed to a man.
|
 |
The Death Guard relentlessly continue their march toward their foes.
|
 |
The Red Butchers cut through the Blackhawks, the Deathshroud rallied and the rest of the Death Guard begin to close in.
|
 |
| The Mightnight Sun and Recon Squad Chono move forward to encircle the Deathshroud. |
 |
Tactical Support Squad Khoer fires a salvo of plasma down the passage at the Red Butchers and manage to take one out of action.
|
 |
The Ebon Keshig prepare to redeem themselves with the blood of their enemies.
|
 |
One Recon Marine is burned down with toxic flames as both squads of White Scars charge together.
|
 |
The Deathshroud are heavily outnumbered.
|
 |
The Death Guard Terminators withstand many blows but are eventually brought down.
|
 |
Overview of the battlefield: each side has destroyed one enemy unit.
|
 |
The hulking Red Butchers advance on Tactical Squad Temgar.
|
 |
The large Death Guard block consisting of squads Folterer and Toddestraffe slowly advance westward toward the center of the battlefield.
|
 |
| Squad Folterer sprays burning, toxic chemicals all over the closest Recon Marine of Squad Chono, leaving him a smoldering, decomposing pile of organic matter. |
 |
With a thunderous crash, the World Eaters and White Scars come together in brutal melee.
|
 |
| Squad Temgar are unable to bring down any of the hulking brutes. |
 |
Khan Sorgan ends the life of one Butcher with a decapitating strike from his glaive, but three survive to strike back.
|
 |
| The Red Butchers indulge in an orgy of slaughter as they cut down nine marines in a matter of moments. |
 |
The Khan and the Sergeant stand alone against the Devourer and two other Butchers. The White Scars realize they have no chance and decide to abort the attack.
|
 |
The Traitors strike a devastating blow and drive back the White Scars.
|
 |
The remaining White Scars get the message to fall back and disappear back into the dark passageways, ceding the field to the Traitors.
|
 |
The Red Butchers rage as they look around in vain for more victims.
|
 |
The forces of Chaos are victorious!
|
The Traitors scored First Blood, Slay the Warlord, and two VPs for destroying the tactical squad and the praetor (the Ebon Keshig do not give up VP for being killed).
The Loyalists scored one VP for destroying the Deathshroud.
Campaign Score:
Traitors: 8 CP
Loyalists: 6 CP
POST-GAME:
Traitor Post-Game Analysis:
Pete: Fastest game of Horus Heresy we’ve played in years! Once the action started, it was fast and brutal. It was sad to see the newly added Deathshroud get routed without doing much! They didn’t get into optimal position against power armor foes, where I’ve read they’re about as good as any unit in the
game at clearing hoards. Instead they got melted to goo by plasma and then charged with AP 2 weapons
that strike at initiative! Crap…
The MVP unit is again the ferocious Red Butchers. But still, winning and losing all came down to rolling a 9 on the charge against the White Scar’s Khan and tactical squad. If they failed that difficult charge distance, I’m quite confident they would have been shot up by multiple foes while their potential CC combatants fell back away from them. And my HQ with his sizeable tactical squad was too out of
position to have any effect on the game. I need a new HQ for my Death Guard. Too many missions
require his squad to run and he keeps holding them back.
Perhaps in the future we can take our ZM games to the next level by using tokens to represent units
when they are out of sight by the enemy and only reveal the models once they are observed. That would
better represent stalking through dark corridors unsure of what’s behind the next bulk head or around
the next corner!!
Every game is different and that’s why this hobby is so cool!
Loyalist Post-Game Analysis:
Phil: Wow, what can I say? Those Red Butchers are BRUTAL. Once again, they rampaged through my forces with ease. Even with the majority of Pete's units unable to contribute much to the battle due to their slowness, his two 2-wound Terminator squads were enough to best my army.
My plan was to catch the Deathshroud in a pincer between my two squads of Ebon Keshig and destroy them for First Blood and then have the remainder of both units available to face the Butchers. Even if all of the Keshig were then killed, I would not have given up any VP and I would hopefully have weakened the Butchers enough that I could have eventually brought down the rest by concentrating my full firepower on them while Pete's other squads slowly marched forward. Missing one of the charges with the Ebon Keshig caused the whole plan to fall apart as it left only one weakened squad to take on the Butchers and I needed another turn (and to split my forces) to finish off the Deathshroud.
But that is how it goes. Especially in a smaller-size game like Zone Mortalis, a single roll can make all the difference. I don't have much room for error in a ZM against the Red Butchers as there is just nothing in a White Scars army that can stand up to them in melee and it is difficult to employ the usual White Scars tactic of move-and-shoot while playing keep-away in a ZM game.
It was a fun change of pace to play such a fast game with a different dynamic than our normal battles. But I am looking forward to getting back on track in the next scenario!


No comments:
Post a Comment