
In an effort to work through some of the "pile of shame" and have more fun painting by getting results quicker, I have been experimenting again with Contrast and finally getting better results (see the recent White Scars Scouts, for example).
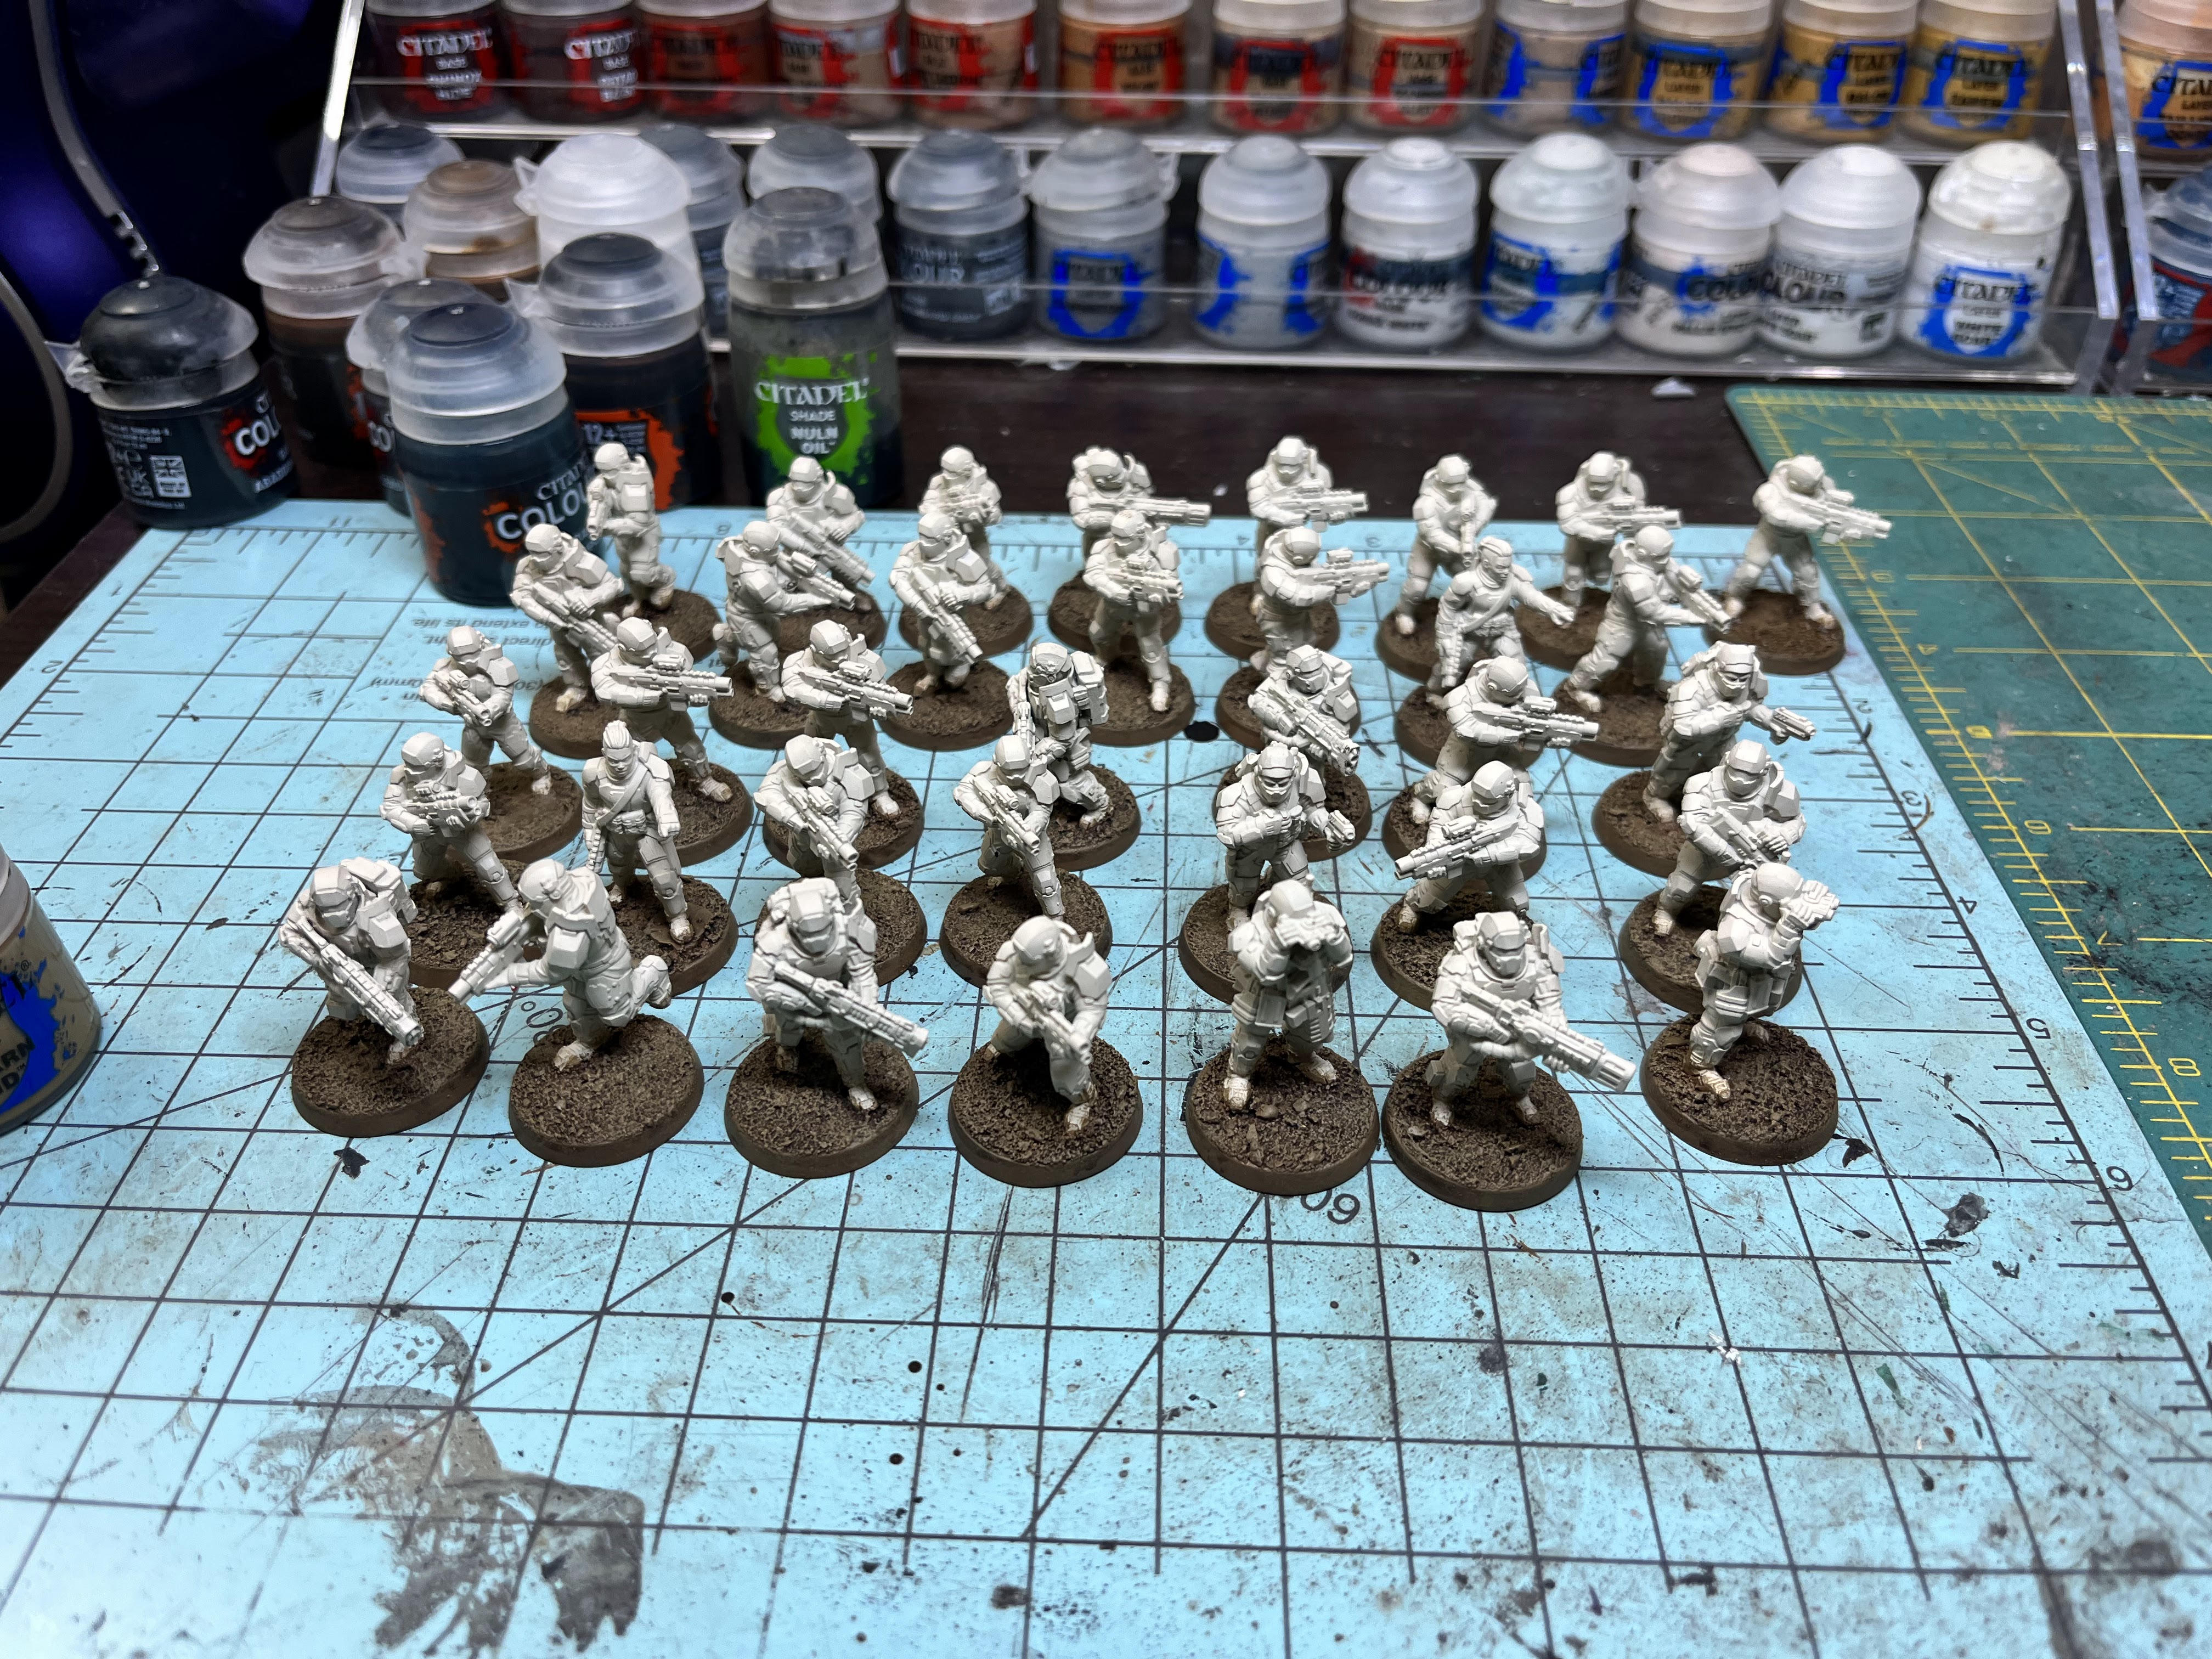
So, I have set myself the goal of painting this entire 36-man platoon of grenadiers at an average pace of one model per day, an ambitious target for me since it can usually take me at least two or three weeks to finish a ten-man squad.
Here is the test speed-painted model on the left compared to some of the models I painted in my classic-style recipe of base-shade-highlight-highlight for each color.


Day 0: I based all of the models with white glue and a mix of sands and gravels.


Day 3: Put a second coat of Steel Legion drab on all the bases and then a heavy coat of Agrax. I was painting while on hold with the auto insurance company, only for them to tell me that they do not work with the dealership because the dealer does not accept the insurance company's prices but they could find me an approved mechanic in my area... I always love how you pay for insurance for years and then when you want to use it, they do everything they can to avoid paying, or to force you into a solution that is worse for you.
The bases are ready to start dry brushing as soon as the shade dries.

Day 4 (Saturday): Got the chance to put some time in today. I know these steps do not really show up in the group photos below, but I dry brushed on the Tallarn Sand then hit it with a lighter coat of Agrax.


Day 6: I decided to paint the armor, fatigues, belts/boots and gun of another model as a second test, since the first model was not the exact same type as this big block. I figured one final test was worth it, before I got too far along painting the whole platoon. Overall, not bad, but I still wonder if I can improve on the armor. Ideally, I would like the shading to be darker and the plates to be a more uniform bone color. In order to keep the plates very light bone color, I have to dilute the Contrast quite a bit with wash medium and that then dilutes the shading as well. I decided to play around a bit more before proceeding.


Day 12: I finished the Snakebite Leather in the afternoon. Then in the evening, I started the Wyldwood on the belts, straps, gloves and boots. This step is very time consuming since I have to paint a lot of small details that are sort of under and between other colors on the model. I only got three done in a session, meaning it took me nearly 15 minutes per model. That pace will kill my goal to get all of these guys done in 24 more days. I will have to speed things up with practice and try to cram in a few extra minutes of painting each day.

 |
| Adding the darker brown. This is the slowest step, I hope. |
Day 13: I increased my pace a bit and extended my painting session a bit. It was enough to increase my output to seven models on the Wyldwood step today. If I can keep up this pace, I should still be on schedule to complete the platoon by day 36.

Day 14: Another good day of progress and I am now over half done with this step. There are plenty of small mistakes but I just slapping on paint and moving forward. 21 done and 15 to go for this step.

Day 15: A bit slower pace, but still a respectable six dudes done. Just keep on grinding.

Day 16: For the first time since the start of this challenge, I did not paint anything. Just had too much other "life" stuff get in the way. I still think I will get this step complete before Day 18, the halfway mark, which will be a good milestone and have me on track to finish in time.
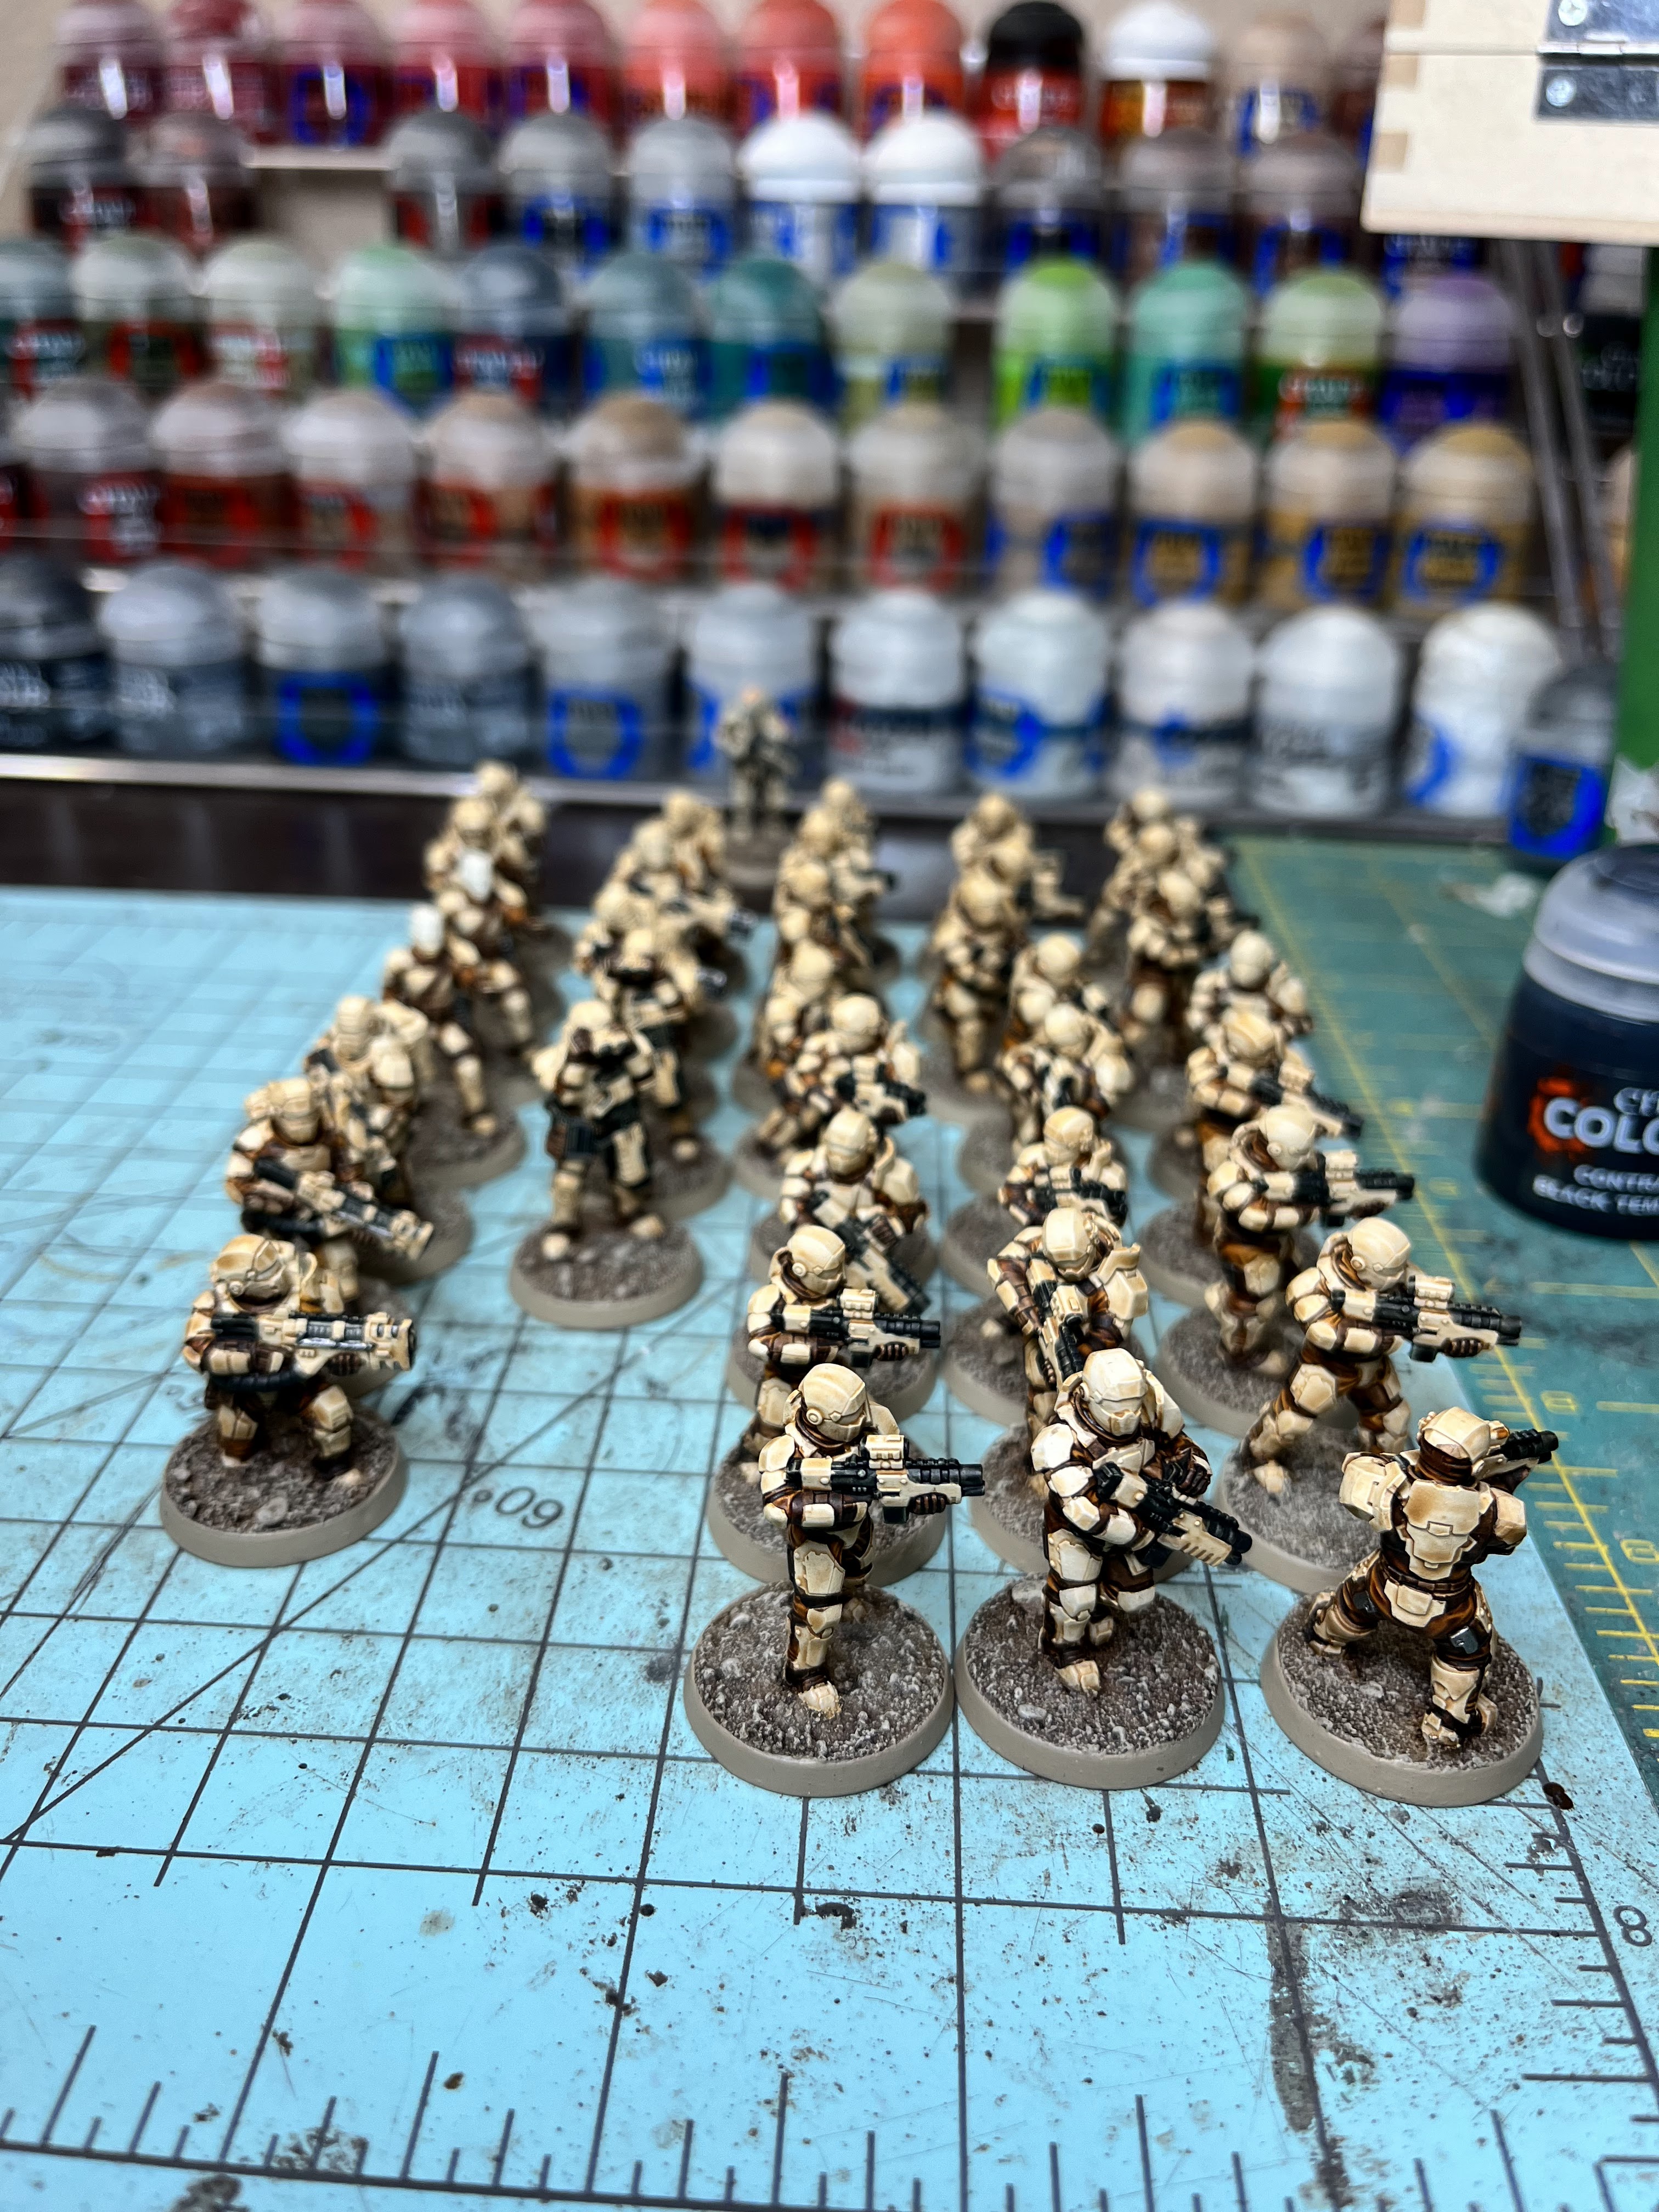
Day 17, 18 and 19: Things have been busy so I have not had a chance to post daily update photos. I did mange to squeeze in a few minutes of painting here and there to finish the Wyldwood brown straps and belts by Day 18. And then I started on the black and managed to get the 24 riflemen done. Just the 12 special models to go for this step. I always dilute the Contrast, which is why it looks a bit pale on some of them. They will be getting a black wash or a second coat of diluted Contrast later to darken it up.

Day 20: The first coat of black is finished. With that, I now have at least a coat of all the major colors finished. Next will be the very small amount of Boltgun Metal (I mean, Leadbelcher) on the leg belts. Then I may do the touch-ups on the bone before applying the washes (I mean, Shades).

Days 21 - 27: Things were busy this week and it looks like I did not post at all. I did find time to paint here and there throughout the week, so here is a recap of the progress.
I painted in the metal, which is mostly just the buckles on the leg belts but the special weapons guys have a bit more.
Then I applied a brown shade to the fatigues and belts. This brings the colors more in line with the existing models, but at the expense of muting some of the highlights on the fatigues, as seen in the photo below.
Then I applied a black shade to all black and metal areas. This was a quick step.
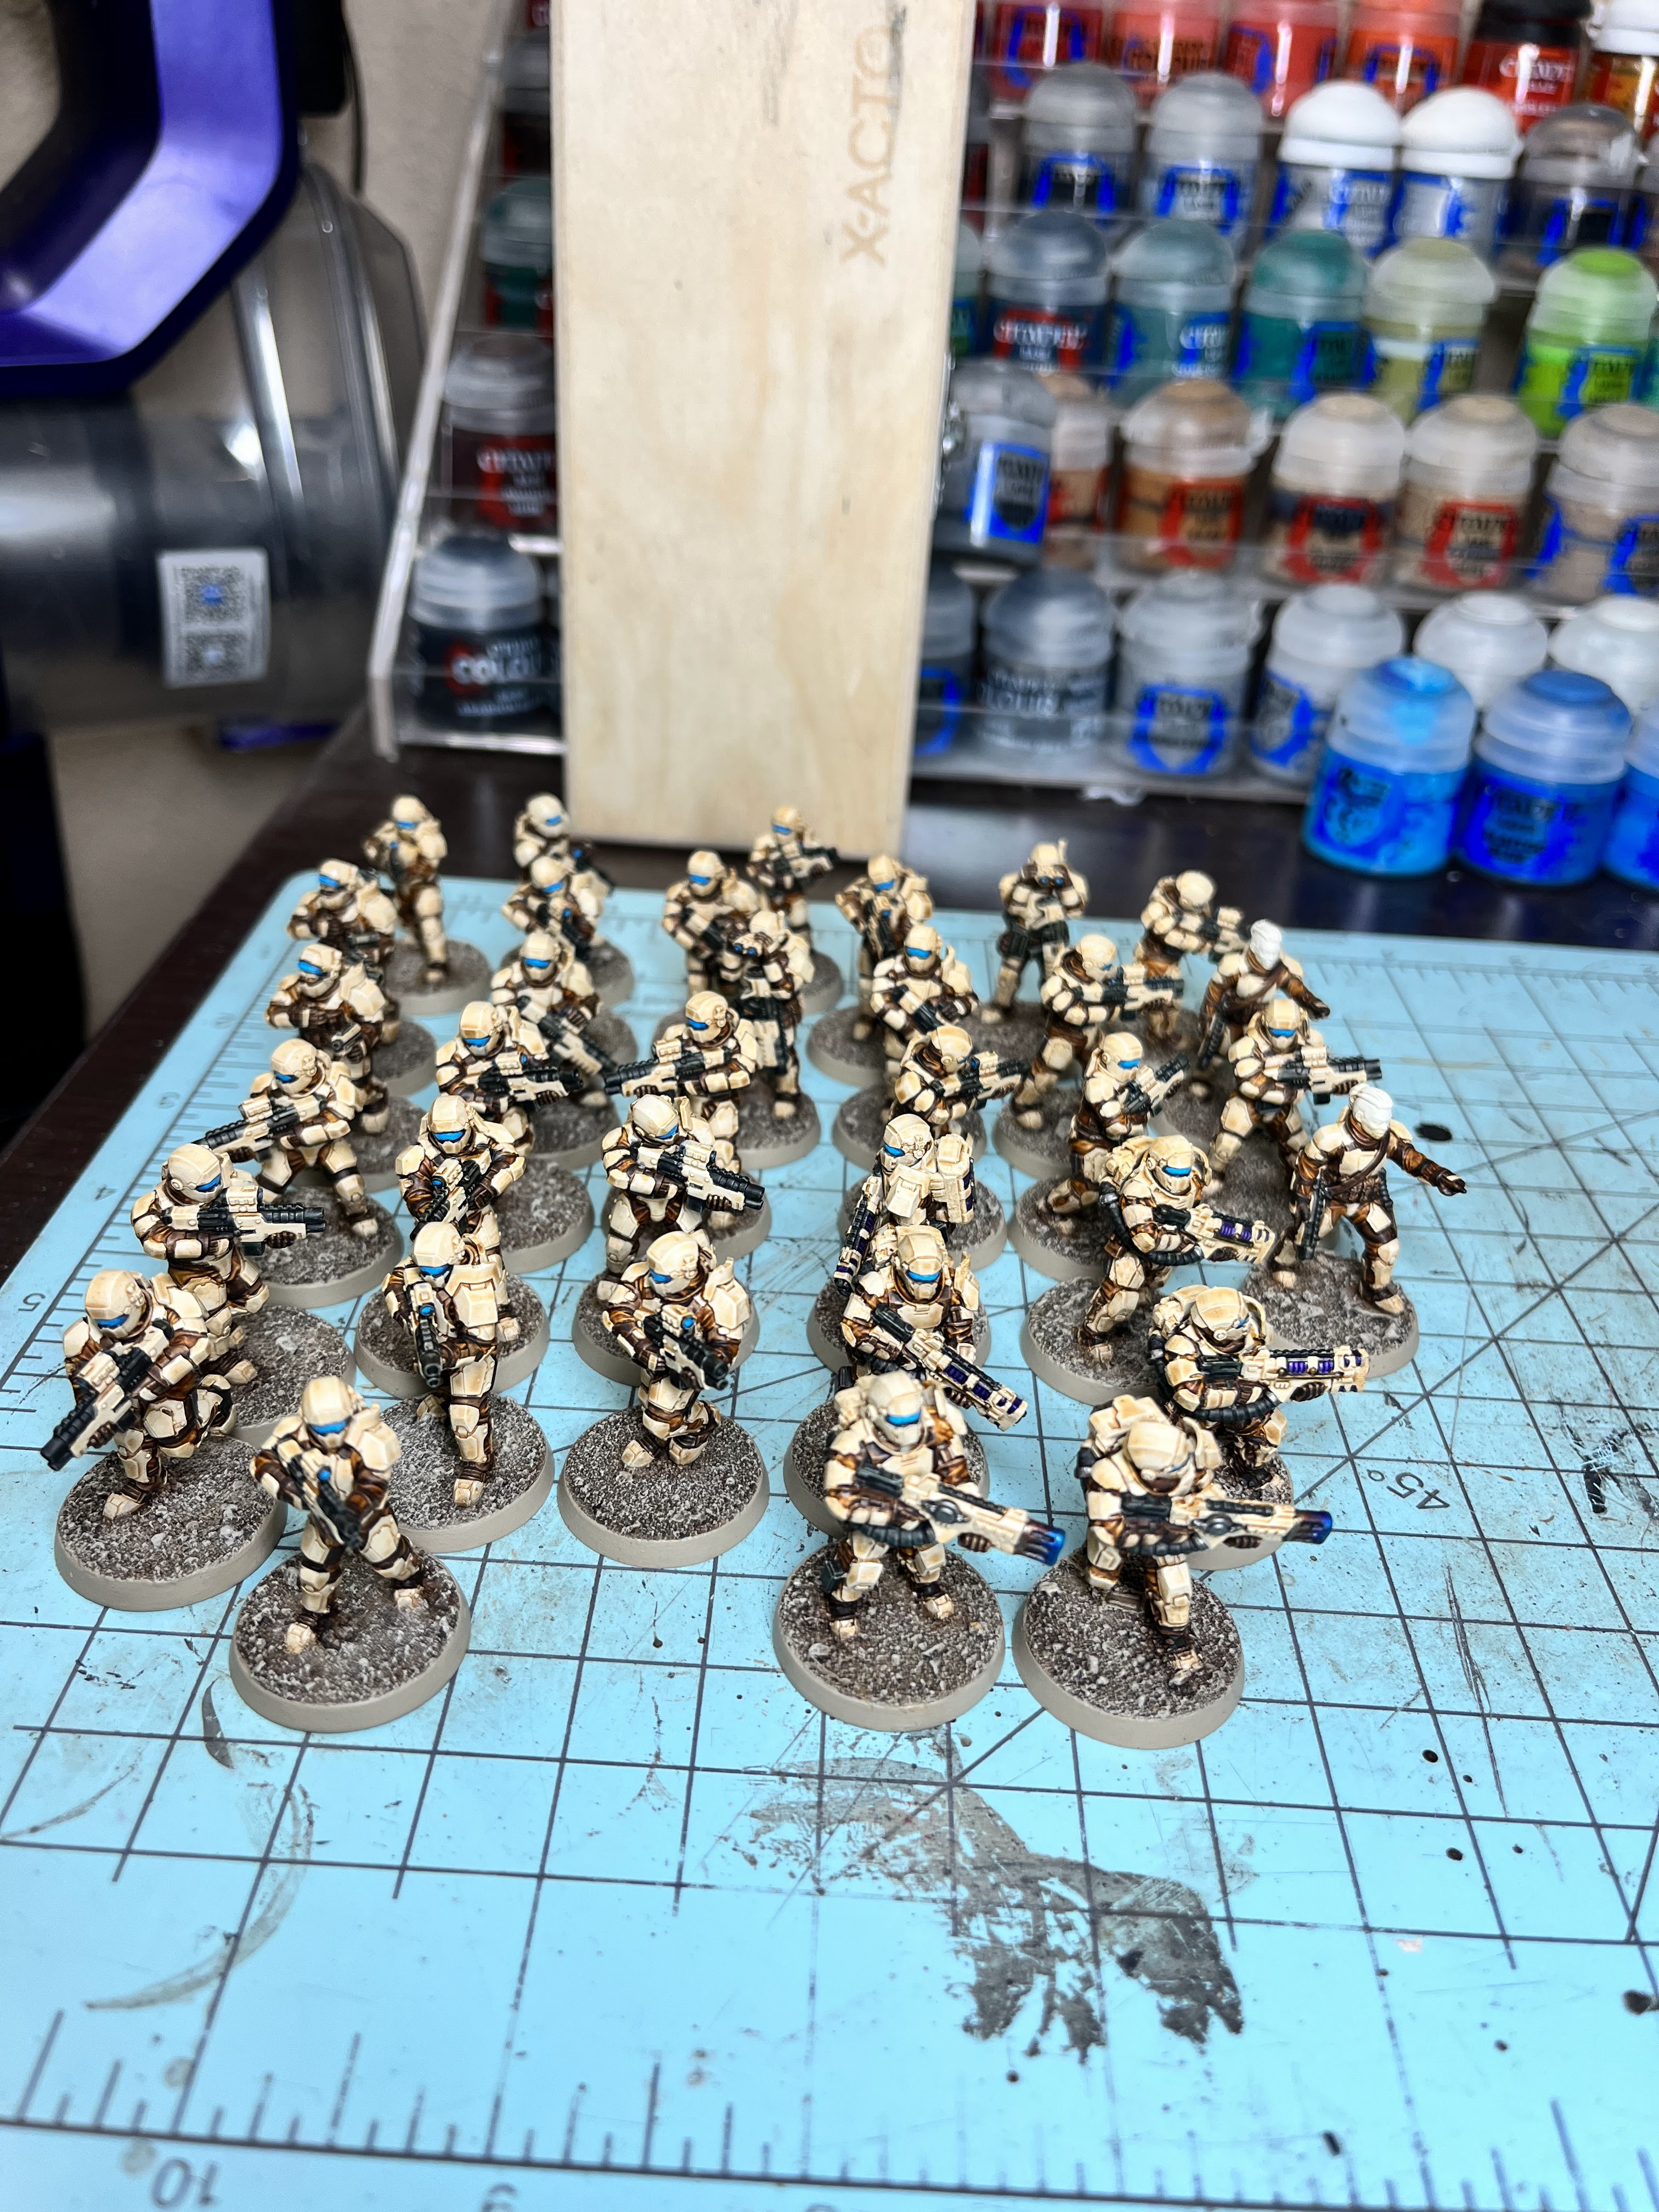
Finally, I started on the blue of the visors and scopes. I was not crazy about the blue on the test model, so I decided to stick to my original recipe of three shades of blue for the visors and lenses. It does not take much longer than the Contrast recipe I had and I like the look better and it will help tie them to the existing models better, since the face is always a focus point for a model.


 |
| Leadbelcher fully applied. |
 |
| Brown wash applied on the left vs original on the right. |


 |
| Black shade applied to all black and metal areas. |
 |
| Base blue applied to all models. Second lighter shade applied to the guys on the left. |
Days 28 - 30: OK, on the home stretch now. On day 28, I got through a lot more of the blue lenses and scopes. On day 29, I must have finished the blue and then started the special weapons, trying out purple for the guns that look like plasma or volkite. On day 30, I finished the purple plasma guns and added the heat-altered metal effect on the melta guns.
I also touched up a few areas on the bone armor where there were exceptionally large mistakes. Cleaning up mistakes is one of the weaknesses of Contrast as you normally have to go back and apply the base color and then Contrast again. Thankfully, the armor color I have with Skeleton over Wraithbone looks a lot like Ushbati Bone so I just did my touchups with Ushbati and it looks like a close enough match from a distance. Again, this is speed painting a multitude of troops and I am not going to worry about minor imperfections.
With that, the only remaining steps are the orange stripes for the regimental color and the skin on the four models with exposed or partially exposed faces. I think I am going to make my deadline.


Days 30 - 33: I painted the orange stripe with the same recipe as the rest of my drop troopers: mostly Troll Slayer with a tiny bit of Karak to mute it a bit. It takes a two to three coats to apply each stripe fully and evenly so this step takes a few minutes per model.
I then painted the skin of the four models with fully or partially exposed faces. I painted a coat of Guilliman Flesh and then threw on some sepia and flesh washes. I did not bother to paint the eyes. For the hair, I think I used Garaghak's Sewer for a different shade of brown than I had already used. The women ended up looking pretty swarthy. I think they turned out well.
I have not had a chance to paint or photograph or blog all week so I am finally getting this posted on Sept 14. I think I started this project on Aug 9 and I finished painting on Sept 10, which is 33 days including both of those days. So I finished just inside my goal of 36 days.
Here is the final platoon all ranked up into two squads.


I will try to get a few more detailed photos of individuals at some point. Maybe I will even go back and try to pain the eyes of the four models that have them. But for now, I am calling this little project complete.
It was satisfying to be able to paint such a large group in a relatively short time, for me. I definitely learned a few things about painting with Contrast, which was mostly a success but has some challenges as well. I also decided to stick with some regular paints for a few things (lenses and stripes), both for where I liked the look better and to help tie these models into the rest of the army.
On to the next one.
No comments:
Post a Comment