
"Today, we don't fight for an objective, or for a general, or for some distant Emperor. Today, we fight for our home planet and everyone we ever knew, plain and simple."
-Captain Skander Xhaer. 3rd Company, Xhorik 87th
Background:
It is the middle of the Horus Heresy and civil war rages across the galaxy on a thousand worlds. Everywhere, former brothers and sworn allies have turned against each other in a fury of betrayal and hatred. The Warmaster Horus has begun his long march to Terra, crushing all resistance before him. In his direct path is the Xhorik System, located at a strategic crossroads of Warp currents in a sector of space known for smooth transitions between realspace and the Warp. This prosperous system has become a focal point for the Traitor war effort as they attempt to seize control of the key spaceport facilities to enable a rapid refuel and resupply of the main Traitor war host as they make their way to the throne world.
On Xhorik Prime, the key trading and transport hub of the system, Traitor forces are newly victorious over those loyal to the Emperor in a massive planetary civil war that erupted along old, pre-Imperial factional rivalries. A combined force of Death Guard and World Eaters has crushed the stratocracy of Kozar and their small garrison of the White Scars Legion. The major space ports are now securely in the hands of the Traitors, although small bands of Loyalist survivors continue to wage a shadow war along the fringes of the high desert wilderness.
On Xhorik Secundus, the planetary governor has remained loyal to the Emperor and maintained control of most of the planet. As war raged on Xhorik Prime, armies began mobilizing for an invasion of the heart of Traitor territory, in the Federation of Unimund. The first phase of the invasion was codenamed Operation Downfall and called for a massive nighttime drop assault on key enemy installations in order to clear the way for the massive, lumbering landing craft that would be bringing the bulk of the invasion the next day.
Although suffering significant casualties in the war for Kozar, the Xhorik 87th Drop Troops Regiment, the Firebirds, were called upon to support Operation Downfall from Xhorik Prime, along with several dozen drop regiments from Xhorik Secundus attacking from orbit. They would be making simultaneous night drops to secure key landing zones, disable defense and communication capabilities, and clear roads and bridges to allow the Loyalist forces to move quickly out of the vulnerable landing zones, establishing a beach head.
At this point, the campaign is at a stalemate with each side claiming a win, loss and draw. With the drop troopers making some gains and being repulsed elsewhere, the success of Operation Downfall was balanced upon a knife's edge. Would the fourth battle be the tipping point?
Scenario: The Last Bastion

For something different and thematic, we decided to try a mission from one of the old Horus Heresy Black Books. The goal was to hold the bastion at all costs, and only if it becomes clear that you cannot win by holding it, to destroy it rather that let it fall into the hands of the enemy.
For our campaign, the bastion would represent a planetary shield generator that would control access from low orbit to the surface at the nearby space ports. This would be crucial to allow or prevent the Loyalist invasion force to arrive in earnest, with heavy planetary landers bringing in tanks, titans and other massive war machines.
Belligerents:
Traitor Militia: Pete
Traitor Militia: Pete
General Titus Ghoulv’s Iron Battalion:
“The Marauders of Meddeon VII”
“The Pirates of the Northern Fringe”
“The Chem Hounds”
Provenances of War: Warrior Elite, Industrial Stronghold
- Force Commander General Titus Gholv: Robber Baron, power armor, power fist, iron halo, bolt pistol, frag and krak grenades
- Discipline Master: carapace armor, refractor field, laspistol, ccw
- Discipline Master: carapace armor, refractor field, plasma pistol, power sword
- [Line] Grenadier Squad A (15)- The Tongue Collectors: bayonets, plasma gun, flamer
- [Line] Grenadier Squad B (15) - The Psycho Slaves: bayonets, melta gun, flamer
- [Line] Grenadier Squad C - Harkhathe Hammers: bayonets, 2 x plasma guns
- Fire Support A (5 teams): 3 x lascannons, 2 x missile launchers
- Fire Support B (5 teams) - Black Bombardiers: 2 x lascannons, 3 x missile launchers
- Auxilia Medicae (3): Dr. Cut and Dr. Cauterize and Nurse Hatchet
- Ogryn Brutes (5) - Dregg Nukem’s Shrapnel Eaters: boss w/ power axe, carapace armor, 2 x ccw
- Leman Russ Battle Tank
- Leman Russ Demolisher
- Leman Russ Vanquisher
- Malcador Battle Tank Chimaera
1855 points
 |
| General Titus Ghoulv leads his Marauders, in service to his Death Guard masters. |
Pete: Leading up to the battle, I spent a couple weeks re-painting my entire traitor militia force. The first time I painted them I utilized a speed painting video I found online to complete the entire army in 30 days… and the results admittedly looked like a speed painted army. I chose Death Guard green as their new secondary color and changed their backstory to be recently corrupted by the blight lord. In addition, I converted a smaller Forge World model space marine into the notorious General Titus Ghoulv himself – someone I saw as well-equipped and armed after having plundered an imperial garrison. Phil had given me a non-GW helmet with two respirators which fit the new army theme quite nicely. Then I added some spikes, wires and the skull of a planetary governor and came out with a nice force commander.
For tonight’s battle, I was relying on my 4 tanks to punish Phil’s militia army, as they’ve done in the past. Using the tanks for cover, the orkish ogryn brutes could be shielded from small arms fire and pesky bikers and sentinels while they push toward the objective. The grenadier squads would pile in and attempt to hold the objective in the rear, while the ogryns chopped up Phil’s infantry loitering around the center of the battlefield.
I placed the Leman Russ with the vanquisher cannon across from the Phil’s ordnance battery, incorrectly thinking that it could pop it open with one well-placed BS 3 shot. That dumb assumption would come back to bite me later.
The heavy weapons fire teams I tried to place in areas with some decent firing lanes. They could at least shoot at the Thunderbolt when it made its appearance.
With the mighty Malcador I hoped to drive around Phil’s flank and end up behind his army, devastating his infantry huddled up behind the bunker objective.
Loyalist Militia: Phil
Xhorik 87th Drop Troopers, 3rd Company:
"The Firebirds"
Motto: Into Hell We Go
Provenances of War: Warrior Elite, Legacy of the Great Crusade
- Force Commander Captain Skander Xhaer: Marcher Lord, power sword, cyber familiar, iron halo, blast pistol
- Discipline Master: Refractor field, power sword, bolt pistol
- Command Cadre (8) - The Sokhët: Lieutenant with refractor field and power fist; carapace armor, melta gun, militia standard, laspistols, lasguns, frag and krak
- [Line] Infantry Squad (20) - First Platoon: sergeant with laspistol and ccw; lasguns, frag grendades, flak armor, melta gun
- [Line] Grenadier Squad A (10) - The Survivors: sergeant with melta bombs; lascarbines, carapace, plasma gun
- [Line] Grenadier Squad B (10) - Stormtroopers of the 501st Company: sergeant with power sword and plasma pistol; lascarbines, carapace, frag and krak, plasma gun, melta gun
- [Line] Grenadier Squad C (10) - Stormtroopers of the 501st Company: sergeant with power sword; lascarbines, carapace, frag and krak, 2 x flamers
- Fire Support Squad (6 teams) - Stone Rain: 6 x missile launchers
- Recon Squad (5) - The Sand Snakes: 5 x sniper rifles
- Sentinel Squadron (3) - Rojets: 2 x lascannon, missile launcher
- Militia Cavalry (10) - The Hunters: laspistols, ccw, lascarbines, carpace armor
- Militia Thunderbolt Fighter - The Avenger: 4 x krak rockets, 4 x autocannon, 2 x lascannon
- Rapier Battery A: 3 x gravis heavy bolters
- Rapier Battery B: 3 x laser destroyers
- Ordnance Battery - The Spear of Heaven: Earthshaker, 4 additional gunners
1855 points
 |
| Captain Xhaer leads the Xhorik 87th in a desperate attempt to help reconquer their homeworld. |
Phil: Pete and I had been looking forward to trying the new militia army list for Horus Heresy Second Edition since we first saw the PDF. The army is full of fun and flavor, although it seems designed to be uncompetitive with Legion armies. Most infantry options, other than Levy Squads, seem to be exorbitantly over-priced compared to tactical marines, transports such as the Arvus and Cargo Hauler have no effective weapons, and the few more capable vehicles are saddled with Third Line. So we decided the only fair way to use a militia list would be to put it up against another militia list!
I tried to fit my collection to the new rules, often having to use a model as the closest available alternative, although that seems very much in line with the intent of the militia list as it is meant to represent the spectrum of irregular fighting forces from across the galaxy. To that end, I used the Avenger as a Thunderbolt, the Tarantula sentry guns as Rapier batteries, the bikes as cavalry, and the Tauros as a Sentinel, all fairly good matches. The only model that did not really have an equivalent in the militia list was the Valkyrie, so I had to leave that out for now. I suppose I could have used it as an Arvus and just ignored all of its weapons, but in an edition that is not kind to fliers, I cannot imagine what the purpose of using a weak, defenseless transport that must come in from Reserves and face Interceptor fire while carrying a unit of fragile infantry. More fittingly, I could have used it as a gun ship using the Thunderbolt rules. But in any case, I did not have the points or the fast attack slots to bring it after I already included everything that more clearly fit with the militia rules.
Another issue I ran into was that all of the artillery (Ordnance Battery and Rapiers) required quite a few models for crew, unlike the old unmanned Tarantula Sentry guns. Thankfully I have a pile of Steel Legion troopers that I could use as crew to man the guns. They actually worked quite well for this since they are on the small side and therefore make the big guns look appropriately large!
Looking at the assembled force, I decided my advantages were in numbers, with over 120 models on the table, and ranged firepower, with the three units of big guns. As I was making the list, I was surprised to see the effective gun options for the Rapiers. Their gravis heavy bolters would be extremely damaging to militia infantry with 4+ saves and with their laser destroyers it looked like I finally had something that could reliably destroy tanks, even with AV 14 like the Leman Russ. In previous games, even with more air support, I really struggled to deal with the quantity of tanks that the Chem Dogs bring so I was definitely concerned about anti-armor. Another worry was how I would handle the beastly Ogryns who could easily crush anything I had in melee. Therefore, my strategy was to keep feeding Line units into the objective area to always have someone to contest or control it, even as they suffered heavy casualties. My back line would lay down a withering hail of covering fire, while my cavalry would zoom forward and try to disrupt my enemy's supporting fire.
With the army list written, the army photo taken, and the general strategy thought-out, it was time to head to Pete's for the game. When I arrived, he had an awesome thematic table setup for the clash. He had also done some great work to improve the painting of his army by adding more color and more details and giving them their proper commander. We both knew this game would be an experiment, being the first use of the new rules for militia and their first time playing with second edition rules. We were most excited to see these fantastic painted armies lined up on table full of painted terrain and to throw some dice and just have fun with the humble militia.
Deployment:
The Xhorik 87th won the roll and elected to deploy first and take the first turn. Phil selected the southern deployment zone as the artillery bunker in the southeast corner offered an elevated position for the fire support squad. He elected to go first because with the objective being a building, it seemed critically important to get there first and occupy the building, making that unit extremely hard to shift away from the objective.


After both sides deployed, Phil deployed his infiltrators and made his scout moves with the cavalry and the sentinels. Finding themselves facing off against the Malcador, the sentinels made a move for some cover, to help them take advantage of their Skirmish rule that improves cover saves. The biker cavalry made their scout move straight ahead to close the distance to the enemy gun line.
 |
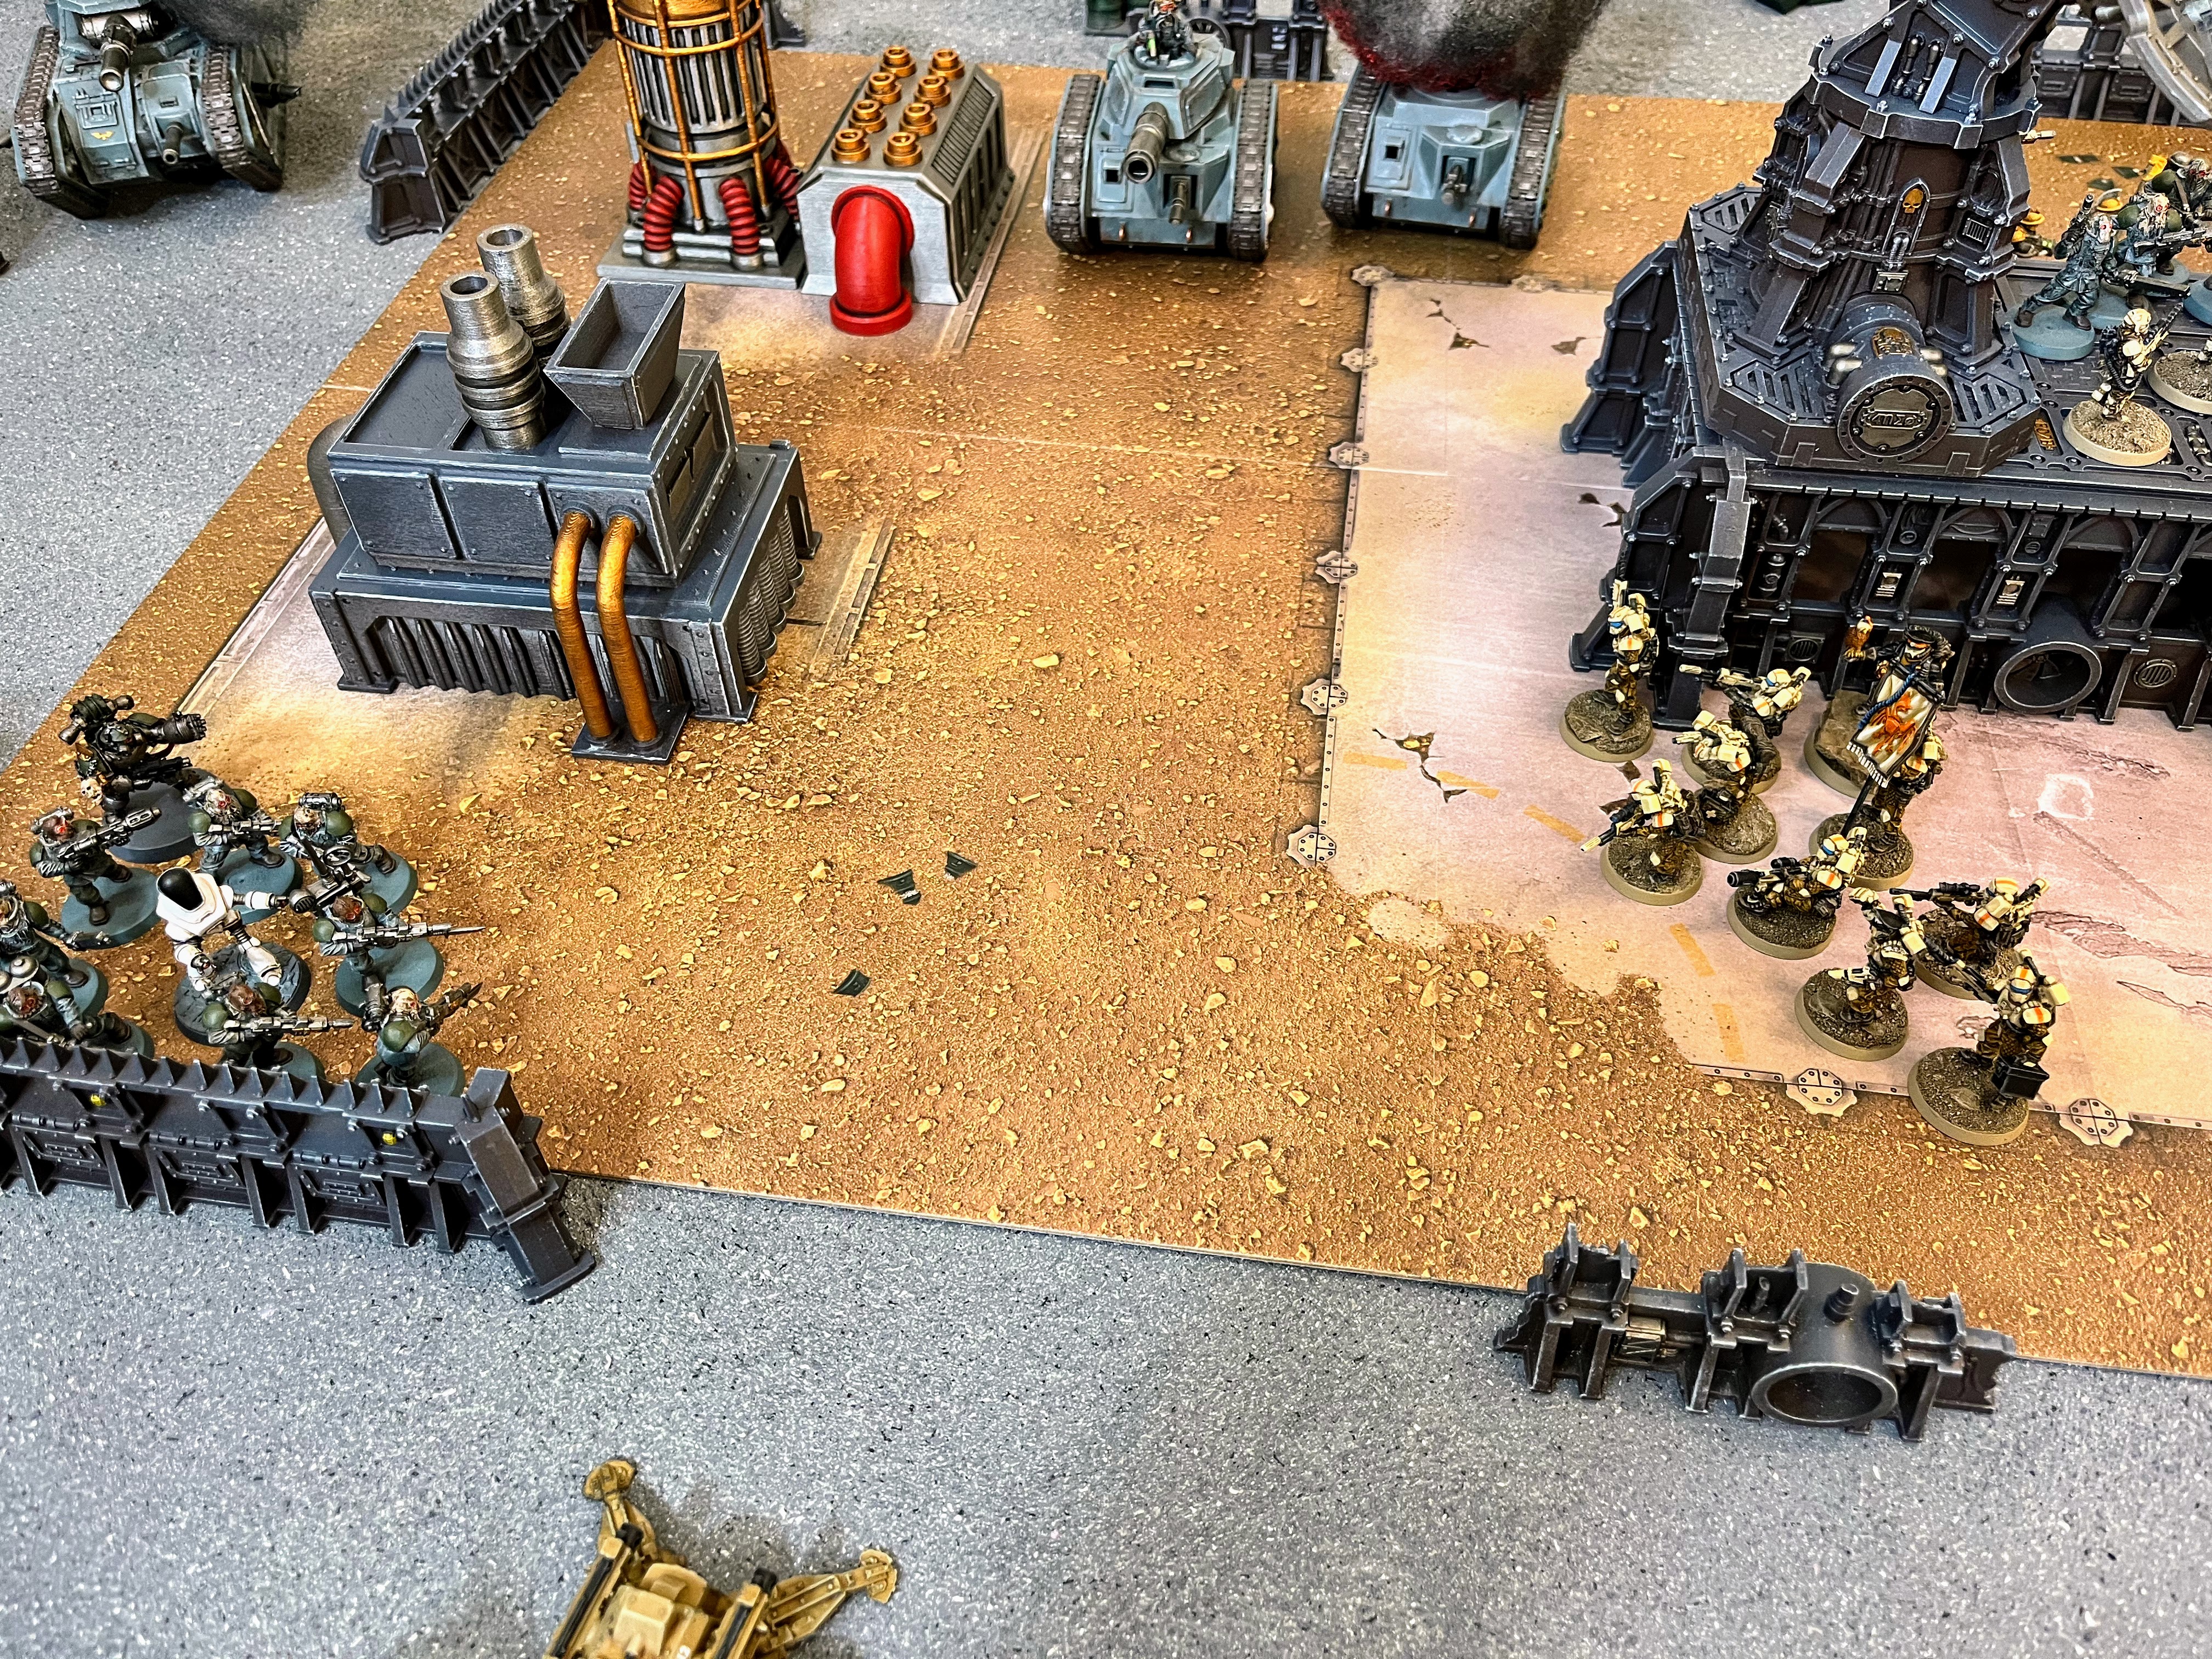
| Xhorik artillery and heavy weapons deploy around the captured planetary defenses on the right flank. |
 |
| Recon bikers prepare to race ahead of the main advance and disrupt the enemy. |
 |
| The Loyalist fire support teams cover the advance of the bikers. |
 |
| The bulk of the company advances toward the Last Bastion, housing the planetary shield generator. |
 |
| Sentinels with heavy weapons support the left flank. |
 |
| The massive Malcador anchors the Traitor right flank, facing off with the Sentinels. |
 |
| The massed grenadiers of the Traitor center are supported by rumbling Leman Russ battle tanks. |
 |
| The Iron Battalion prepares to surge into the fortified grounds of the Last Bastion. |
 |
| The Traitor left flank consists of fire support teams and a Vanquisher. |
 |
| Fire Support teams take up firing positions behind makeshift barricades. |
 |
| A second fire support team has firing lanes toward the Bastion. |
 |
| Final deployment map after Infiltrators and Scout moves. |
 |
| The Xhorik recon squad infiltrated to the Last Bastion, but they are not Line so they could not claim it or even contest it in this scenario. |
 |
| The recon bikers used their Scout move to race ahead and close the gap with the traitor fire support squads. |
Battle:
Loyalist Turn 1:
 |
| The Xhorik drop infantry surges toward the objective, supported by Stormtroopers and a command cadre. |
 |
| Xhorik artillery began their bombardment but the inaccurate shell only kills one enemy grenadier. |
 |
| The Sentinels take up firing positions behind the cover of a barricade and damage the opposing Malcador with their lascannons. |
 |
| Recon bikers unadvisedly fire into the heavy weapons, wounding one fire support team, but losing three of their own to Return Fire! |
 |
| A Xhorik sniper searches for an enemy officer in the ranks of the grenadiers. |
 |
| The Rapiers with laser destroyers had horrible firing lanes. Two guns moved to get better angles and the third failed to penetrate the front armor of the Leman Russ it targeted.. |
The rapier battery with the gravis heavy bolters fared much better and inflicted heavy casualties on the Harkhathe Hammers in the Traitor center, killing seven.
 |
| Loyalist Turn 1: Infantry advances on the objective in the center while the flanks provide covering fire. |
Traitor Turn 1:
 |
| The terrifying figure of General Titus Ghoulv urges his Chem Dogs forward. |
 |
| The Traitor forces roll forward en masse, laying down a hail of fire into the Loyalists. |
 |
| The battle cannon obliterates a few grenadiers while the demolisher cannon destroys a sentinel. |
 |
| A feared discipline master, Saghesh the Sadistic, drives his grenadiers toward the objective. |
 |
| The two fire support squads catch the Xhorik bikers in a crossfire and gun them down mercilessly. When the smoke clears, only two remain. |
The Traitor tanks struggled to do enough damage to the massed loyalist soldiers. The Vanquisher on the Traitor far left flank killed a few crew of the Earthshaker artillery but there were still plenty to man the gun. The tanks in the center combined to destroy a sentinel and kill around 5 infantry in various units.
End of Turn 1 Victory Points: Loyalists 0 - Traitors 0
Loyalist Turn 2:
Additionally, the Xhorik infantry squad moved into the Last Bastion, while the snipers took position on the roof. For the first time, a Line unit has now claimed the objective.
 |
| The Thunderbolt arrives and takes aim for the Vanquisher. |
 |
| Before it can fire, a Chem Dog fire support team manages to score a hit on the tail section. |
 |
| Despite being shaken by the hit on their plane, the crew fight through it and manage to land several hits on the enemy Vanquisher - destroying the tank! |
 |
| The last two bikers bravely launch an assault at the fire support team but are gunned down by overwatch before they can strike. |
 |
| The grenadiers in the center bravely charge the Demolisher tank and manage to destroy it using their krak grenades. |
Additionally, the Xhorik infantry squad moved into the Last Bastion, while the snipers took position on the roof. For the first time, a Line unit has now claimed the objective.
 |
| Summary of Traitor Turn 1 and Loyalist Turn 2: Battle rages across the front while the Loyalists take control of the Last Bastion. |
Traitor Turn 2:
Additionally, the Xhorik infantry squad moved into the Last Bastion, while the snipers took position on the roof. For the first time, a Line unit has now claimed the objective.
 |
| The mighty Malcador returns fire at the pesky sentinels but only manages to inflict a wound, thanks to their covered position behind the fortified wall. |
 |
| The fire teams manage to hit the Loyalist flier despite its zooming speed, destroying a weapon. |
 |
| Dregg Nukem's Shrapnel Eaters emerge from behind the wall of tanks. |
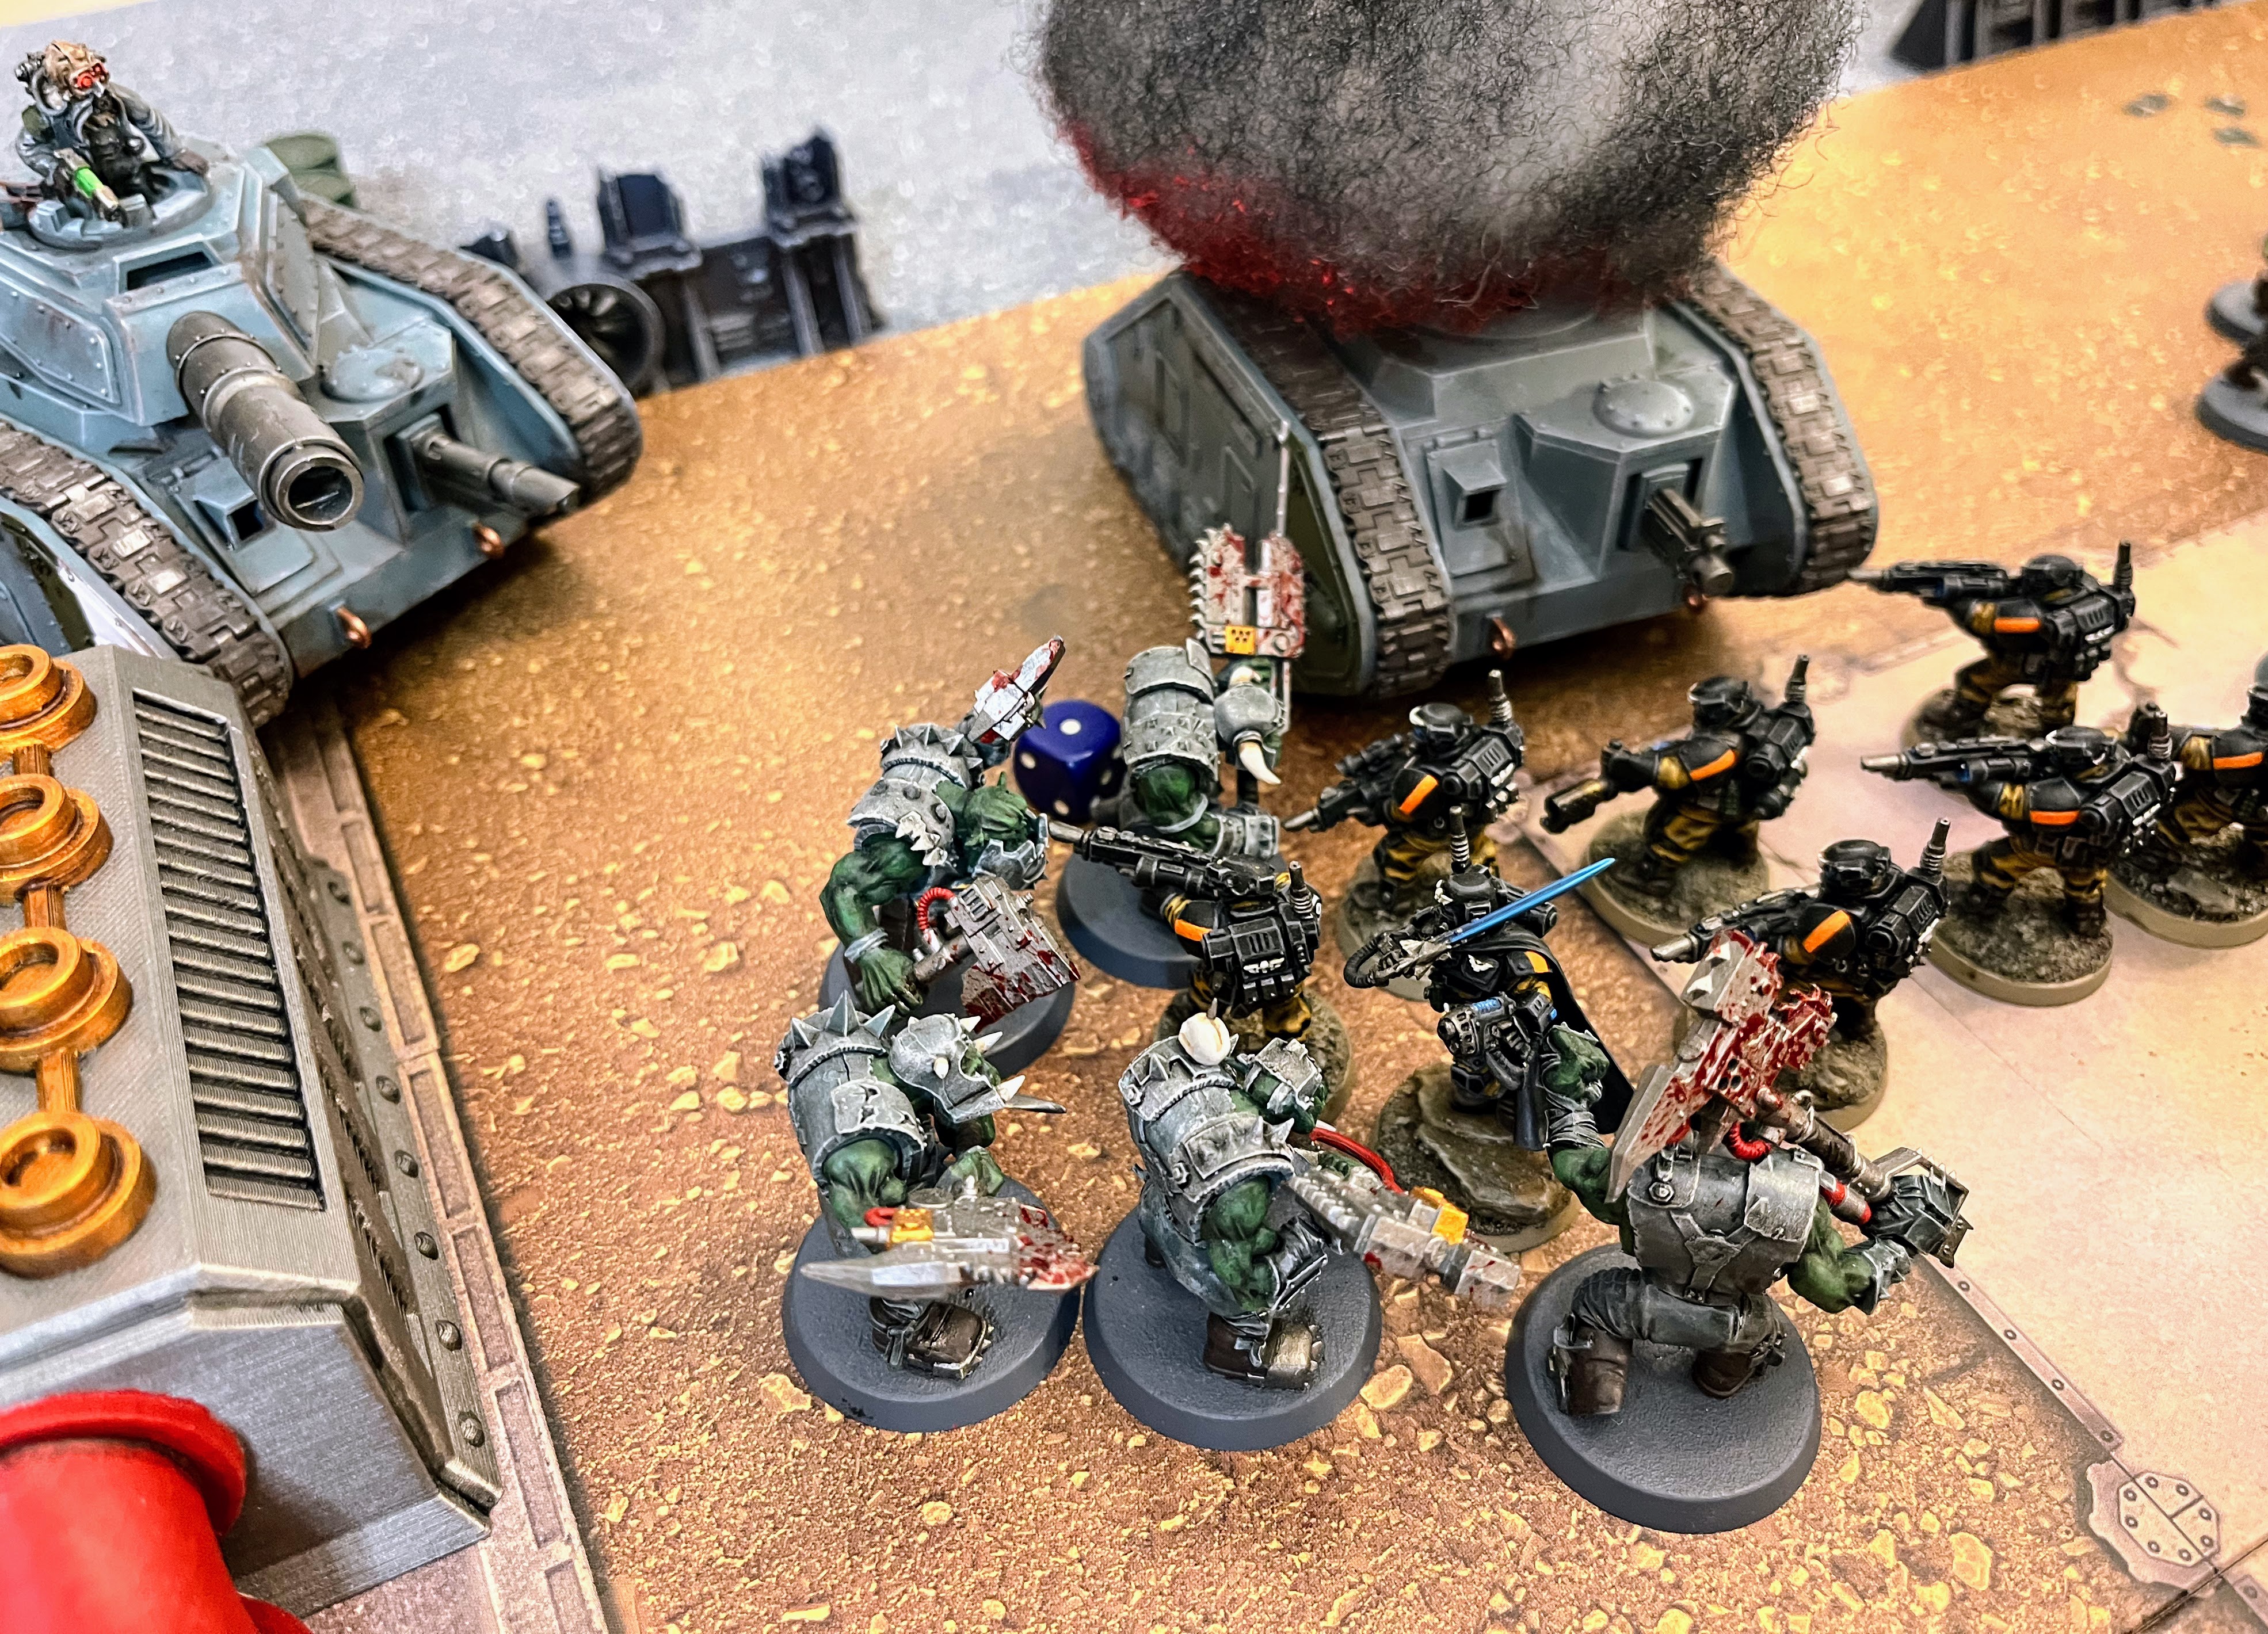 |
| The hulking brutes charge the Xhorik grenadiers. |
 |
| The ork nob mercenaries make short work of the human warriors. |
 |
| General Titus Ghlouv drives his grenadiers forward along the Traitor right flank. |
 |
| Traitor Turn 2: The Traitors push forward in the center, destroying a unit of Xhorik grenadiers and and contesting control of the Last Bastion |
End of Turn 2 Victory Points: Loyalists 0 - Traitors 0
Loyalist Turn 3:
 |
| The Thunderbolt strafes the Chem Dog fire teams but is brought down by return fire from their heavy weapons. |
 |
| The Loyalists concentrate fire on the damaged Malcador. The Sentinels fail to do any damage, but a shell from the Earthshaker siege gun manages to finish off the mighty tank. |
 |
| The Xhorik Rapiers send a torrent of heavy bolter fire into the Ork mercenaries, felling several. |
 |
| With additional fire from the Stormtroopers, Dregg Nukem’s Shrapnel Eaters are whittled down, sending the survivors fleeing for safety. |
 |
| Xhorik grenadier squad, The Survivors, approaches the Bastion from the flank, firing into the Iron Battalion. |
 |
| Loyalist Turn 3: With the destruction of the two biggest Traitor threats, the ork mercenaries and the Malcador, the Loyalists start to gain control of the field, despite losing their flier. |
Traitor Turn 3:
 |
| General Titus Ghoulv leads the charge into the Xhorik Stormtroopers. |
 |
| The Chem Dogs emerge victorious. The Stormtroopers are destroyed! |
 |
| Ghoulv consolidates his position back behind the barriers for some cover from the the Loyalist guns. |
 |
| The last remaining Leman Russ fires at the Xhorik Rapiers, killing four crew. |
 |
| The Psycho Slaves assault the Xhorik recon squad on top of the Bastion, killing two Loyalists and losing one of their own. |
 |
| Traitor Turn 3: The Chem Dogs counterattack and destroy another unit of Stormtroopers. They also continue to contest the objective, but they are running low on manpower as casualties mount. |
End of Turn 3 Victory Points: Loyalists 0 - Traitors 0
Loyalist Turn 4:
 |
| The Xhorik 3rd Company command cadre advances toward the nearby renegades to avenge their fallen comrades. |
 |
| The command cadre fires under the direction of Captain Xhaer. |
 |
| Ghoulv's Tongue Collectors are whittled down, mostly by the Rapiers with gravis heavy bolters. |
 |
| Finally, an Earthshaker shell strikes the unit directly, taking Ghoulv out of the fight. |
 |
| Near the bastion, The Survivors advance. |
 |
| Loyalist Turn 4: The Traitor warlord is slain and Xhorik units converge on the objective. |
Traitor Turn 4:
 |
| The last Leman Russ rolls forward to get a better firing angle. |
 |
| The traitor battle cannon kills three of the command cadre. |
 |
| The Psycho Slaves are victorious. They gleefully stab down the last of the Sand Snakes recon squad. |
 |
| Traitor Turn 4: The last Traitor grenadier squad clears the loyalists form the roof of the Bastion, while the Leman Russ destroys some of the command cadre. Opposing fire teams destroy each other on the eastern flank. |
End of Turn 4 Victory Points: Loyalists 1 (Slay the Warlord) - Traitors 0
Loyalist Turn 5:
 |
| The remaining sentinels and advance and destroy the final Leman Russ with lascannon fire. |
 |
| The command cadre and the grenadiers catch the Psycho Slaves in a pincer attack. |
 |
| The Loyalists destroy the last Traitor grenadier squad, ending the Traitor hopes of controlling the Last Bastion. |
 |
| Loyalist Turn 5: The last Leman Russ is destroyed by the Sentinels. The Loyalists finally gain control of the Last Bastion by destroying the Traitor grenadiers. |
The Traitors were completely wiped out at this point, with the last few survivors failing morale checks.
End of Game
Final Victory Points:
Loyalists: 3 (Slay the Warlord, Control of the Last Bastion)
Traitors: 0
Loyalist Victory!
Post-Game:
Pete: What a shellacking! The vile Chem Dogs were scattered to the cosmos by the Xhorik 87th Drop Troopers. I have myself to blame for some poor decisions, but also - wow - were Phil’s units efficient and deadly! I need to secure some rapier batteries of my own, as with the new rules those things really pack a punch. And the Earthshaker battery off in a corner, under no real threat all game, could drop dinner plates of carnage onto the Chem Dogs. I would need some flanking or flying units in my army if I was going to get after those crew manning the mighty ordinance battery. Also, the sentinels standing behind a wall for some extra survivability – those things are actually decent units now! Phil’s whole militia army just performed better than I’ve ever seen it do in the past.
My tin cans, oh I mean “tanks”, are awfully flimsy now that glancing shots are considered penetrating, and now that lascannons re-roll failed armor penetration. I’ll need to go back to the drawing board and diversify this army if it is going to be competitive against even militia armies.
Sadly the ogryns couldn’t make it past the rapier batteries once they splattered the one squad in their path. Usually they’re a real handful, but they don’t have much defense against concentrated fire from the opposing army. Good to see them get a kill though - very satisfying.
But as always, the game was a blast, win or lose. Even with a bad loss like this one, it’s still so awesome to see beautifully painted armies scrap it out over a couple of beers on a Saturday night. This hobby is hella cool. And hats off to Phil, who was the superior general on this battlefield. Well done, well done.
Phil: Putting this battle report together, I am still a bit in shock at just how dominant my militia was in that game. I am far more used to them failing to cause any significant damage before being swept away like leaves in the wind. So why was the outcome so different this time?
For starters, this was our first game with the new army list and the new Second Edition ruleset. This changed the way our armies and units played. For starters, Sentinels are more survivable now (T6 and 3 wounds vs AP10 and 2 HP with "open-topped" previously), making them much harder to kill with one shot, especially with mine well-positioned behind cover. And their lascannons are better able to penetrate armor in the new edition, making my Sentinels a match for Pete's tanks in this edition, when they were hopelessly outclassed in the last edition.
Taking fewer fliers probably also helped. Despite the Zoom rule making them harder to hit, the Interceptor reaction is just deadly. In this game, Pete was able to stun my crew before I could fire. I was lucky my "Thunerbolt" (the best proxy for my Avenger model) destroyed his tank before being brought down.
But the undisputed star of the new list is the Rapiers. They are so much better than the Tarantulas were in the last edition. Their gravis heavy bolters and their laser destroyers were my two strongest weapons. Their large firing crews meant they could absorb a few hits before dying. Especially with the rules change that the defender picks which model takes the wound instead of closest first, meaning you could kill off two crew from each gun before you lose the ability to shoot any guns. Pete's army is mostly high strength weapons, which are wasted on weakling militia crew members, and he does not have a lot of mass anti-infantry like heavy bolters that would have wiped out those units quicker. Reducing the blast marker size for his tanks' heavy weapons was also a huge nerf that made the Russes really struggle against my army of over 100 models. Pete did a great job during deployment to hide his tanks from my laser destroyers, mostly nullifying them, or this game could have been over in three to four turns. As it was, it was the gravis heavy bolters that controlled the game, being deployed with direct firing lanes through the central objective area. They killed something like 16 grenadiers and four ogryns/ork mercenaries through four turns, and still had all three guns operational at the end of the game!
Tactically, the plan to go first and claim the objective was sound because once my militia infantry unit was in the Bastion, it was going to be very difficult for Pete to ever remove them. I made some mistakes with the cavalry (bikers) by shooting at the fire team and enabling Pete to use the Return Fire reaction to do far more damage to me than I did to him. By the time they charged and took Overwatch, they did not have enough numbers to even tie up the fire teams in melee. Keeping the Sentinels behind cover to hold the flank against Pete's tanks worked better than expected. I erred in my positioning of the Earthshaker, leaving it exposed to Pete's shooting along the flank, when I could have hidden it almost completely behind the artillery bunker terrain piece. Finally, sacrificing a grenadier squad to destroy a Leman Russ with krak grenades, while also drawing the Ogryns out into the open, was a good trade. It was made possible by the covering fire of the Rapiers keeping Pete's infantry from screening his tanks and the tanks' guns being nerfed so much that they could not wipe out my squads in a single shot like they could in the old edition.
As I said, Pete did a great job with his deployment to mostly neutralize my slow-moving Rapiers with laser destroyers. He also shielded his infantry from my heavy bolter Rapiers about as well as he could, but eventually they had to attack and then they could be gunned down. Despite things looking bleak for him after the first few turns, he hung in there and continued to battle it out to the best of his militia's ability and make it fun. And the additional painting he has done on that army makes them even more flavorful and fun to play against than before.
We both learned a lot about how the militia list works in the new edition. One of the most enjoyable parts was watching the futility of both sides as units continued to whiff on tasks you felt were a sure thing based on mostly playing space marines. We both agreed that this list would not stand a chance against a Legion army, which is unfortunate because the militia army list has a ton of customization and flavor, and both of our armies' models have a lot of character. I would love to see them get on the table more often, but it would be hard to justify them playing against anything except other militias.
No comments:
Post a Comment