"I got a bad feeling about this one."
"When was the last time you felt good about anything?"
- Exchange between veterans of the 2nd squad, 1st platoon, 4th company of the Xhorik 87th,
prior to the battle for Alteron Bridge
Campaign To Date:It is the middle of the Horus Heresy and civil war rages across the galaxy on a thousand worlds. Everywhere, former brothers and sworn allies have turned against each other in a fury of betrayal and hatred. The Warmaster Horus has begun his long march to Terra, crushing all resistance before him. In his direct path is the Xhorik System, located at a strategic crossroads of Warp currents in a sector of space known for smooth transitions between realspace and the Warp. This prosperous system has become a focal point for the Traitor war effort as they attempt to seize control of the key spaceport facilities to enable a rapid refuel and resupply of the main Traitor war host as they make their way to the throne world.
On Xhorik Prime, the key trading and transport hub of the system, Traitor forces are newly victorious over those loyal to the Emperor in a massive planetary civil war that erupted along old, pre-Imperial factional rivalries. A combined force of Death Guard and World Eaters has crushed the stratocracy of Kozar and their small garrison of the White Scars Legion. The major space ports are now securely in the hands of the Traitors, although small bands of Loyalist survivors continue to wage a shadow war along the fringes of the high desert wilderness.
On Xhorik Secundus, the planetary governor has remained loyal to the Emperor and maintained control of most of the planet. As war raged on Xhorik Prime, armies began mobilizing for an invasion of the heart of Traitor territory, in the Federation of Unimund. The first phase of the invasion was codenamed Operation Downfall and called for a massive nighttime drop assault on key enemy installations in order to clear the way for the massive, lumbering landing craft that would be bringing the bulk of the invasion the next day.
Although suffering significant casualties in the war for Kozar, the Xhorik 87th Drop Troops Regiment, the Firebirds, were called upon to support Operation Downfall from Xhorik Prime, along with several dozen drop regiments from Xhorik Secundus attacking from orbit. They would be making simultaneous night drops to secure key landing zones, disable defense and communication capabilities, and clear roads and bridges to allow the Loyalist forces to move quickly out of the vulnerable landing zones, establishing a beach head. The target of the 4th Company was the Alteron Bridge. They were to secure it in the night and hold it against any and all enemy counterattacks to enable the landing forces to quickly breakout of their landing zones and establish a controlled perimeter.
Pre-Game and Mission:
The scenario would be simple. We would play the
Bridge Assault scenario posted previously, except with the victory condition that whoever controlled the bridge at the end of the game would win.
Army Selection:
Traitor Counterattack Force - Pete
General Titus Ghoulv’s Iron Battalion – “The Marauders of Meddeon VII”, “The Pirates of the Northern Fringe”, “The Chem Hounds”
- Force Commander Saghesh the Sadistic: power sword, plasma pistol, refractor field, Alchem-Jackers, Warrior Elite
- Squad Alpha - The Tongue Collectors: 15 Grenadiers with plasma gun, flamer
- Squad Beta - The Psycho Slaves: 15 Grenadiers with melta gun, flamer
- 2 Auxilia Medicae: Dr. Cut and Dr. Cauterize
- Leman Russ Battle Tank
- Leman Russ Demolisher
- Leman Russ Vanquisher
- Malcador Battle Tank Chimaera with armored ceramite and flare shields
Death Guard Allies
- Tactical Squad with vexilla and sergeant with power fist
- Tactical Support Squad with flamers and Rhino with heavy flamer
- Deredeo pattern dreadnought with Arachnus heavy lascannon battery, twin-linked heavy bolter, Aiolos missile launcher, and helical targeting array
Xhorik 87th Drop Troopers, 4th Company - Phil
This battle would be a tougher task for my airborne infantry than the last scenario. Holding an open objective in the center of the table would be suicide for an army without any solid armor so I knew I would have to utilize some fortifications in order to have a chance. I took an Aegis defense line along with some tank traps to represent the drop troopers' taking the time to establish a fortified position on the bridge. They had arrived in the night and had time to prepare, after all.
I would be using all of my Xhorik 87th regiment that I had painted, which would give me some firepower in the form of the three fliers: the Valkyrie transport, the Lightning attack fighter, and the newly-arrived Avenger strike fighter. My plan was to use my veterans to establish a solid line at Pete's end of the bridge to stall him, while deploying a second rank at the other end of the bridge to hold the objective later in the game when the first rank was inevitably destroyed. I would use my reserves to attack Pete's militia on their side of the bridge, pinning them down and striking at any exposed rear armor I could see and generally causing chaos. From previous experience, I knew Pete would hesitate to rush the bridge with everything he had in his first few turns as long as the threat of my reserves striking his rear was still viable. I knew I could not destroy his much tougher force, but with any luck, I could tie him up on his side of the bridge and use my air support to destroy anything that tries to cross the open space of the bridge toward my second rank. I would be asking my lightly-armed paratroopers to stand against a wall of tanks and a few squads of superhuman space marines, but I knew they were up to the task. To die in defense of the Empire of Man is their duty!
**WH40k Taros Campaign army list with 15% discount
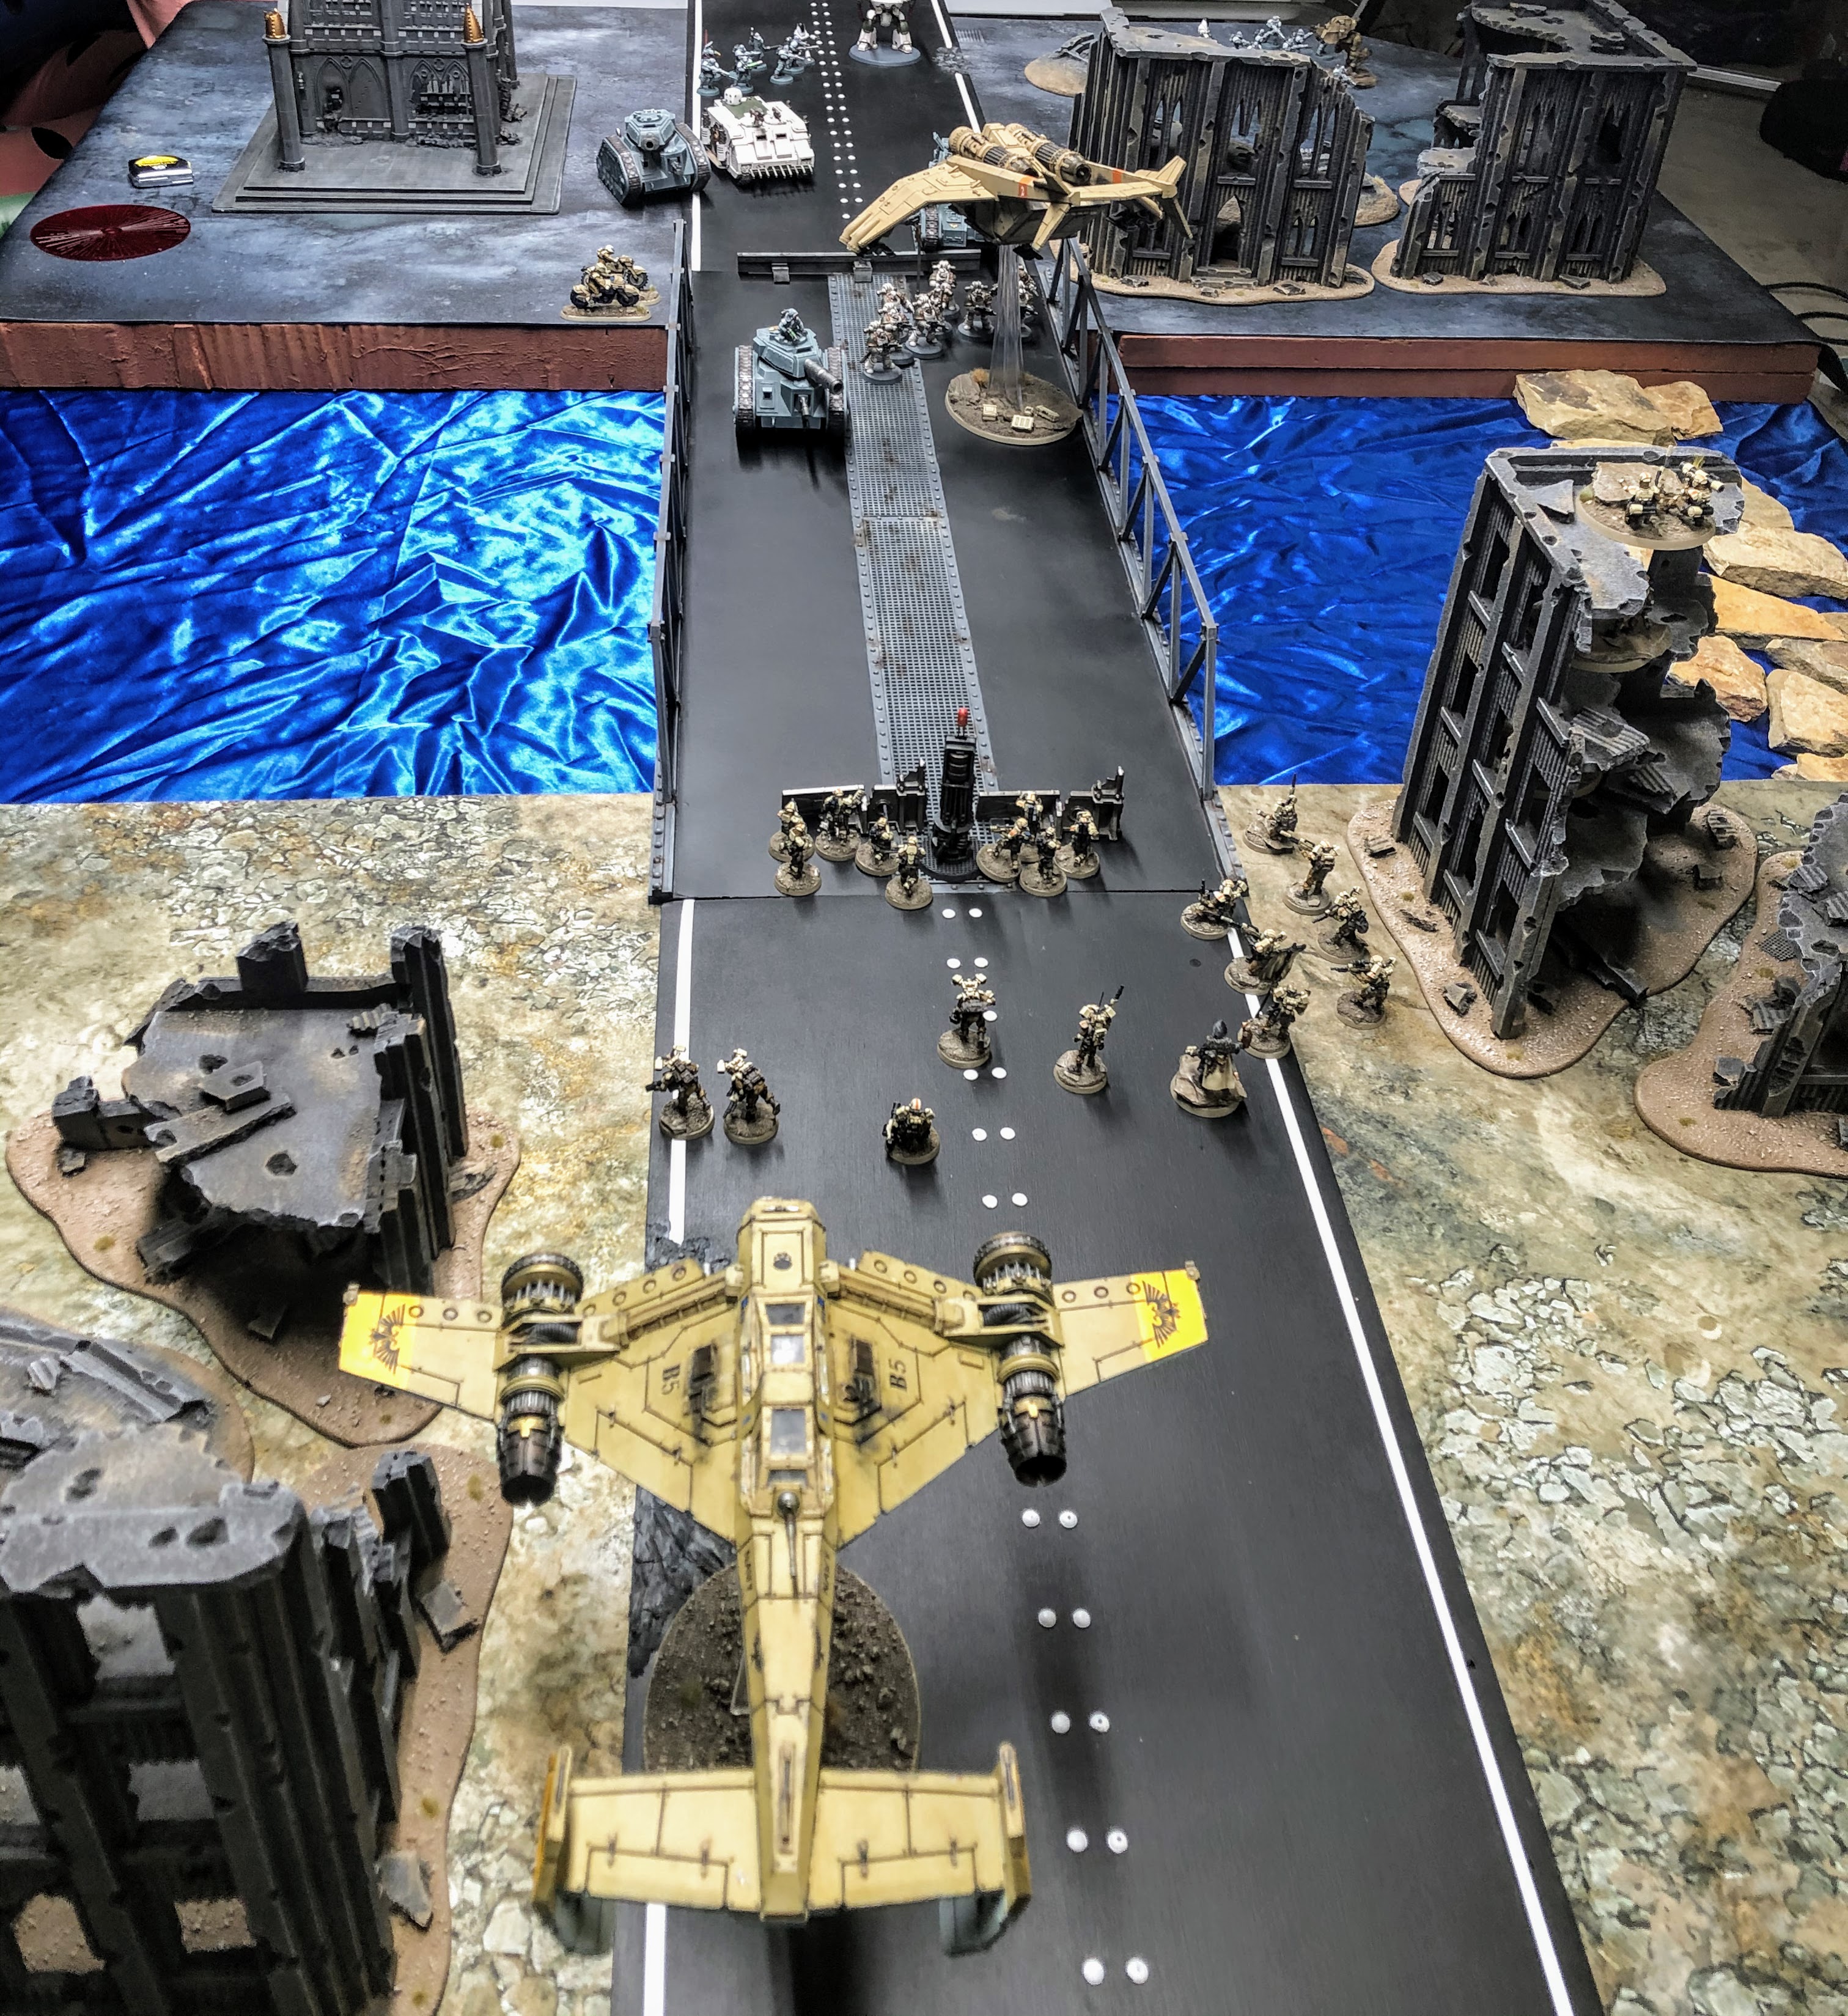
Battle:
 |
| The lead elements of the Xhorik 87th 4th Company fortify the Alteron Bridge, hoping reserves will arrive before the inevitable Traitor counterattack. |
 |
| Two veteran squads of the first platoon set up Aegis defense lines, tank traps and Tarantula sentry guns. In the ruins, a heavy support squad armed with missiles takes up firing positions. |
 |
| These Pathfinder elements have setup a portable comms relay in order to direct the reserve elements to the drop zone. |
 |
| The lead veteran squad and a Tauros assault vehicle hold the hostile side of the bridge where the enemy attack is expected to fall. |
 |
| A large force of Chem Dogs militia, supported by elite Death Guard marines advances on the bridge. |
 |
| The Traitor assault includes three battle tanks, a super heavy, a space marine transport and a Deredeo dreadnought. |
 |
| The Traitor right flank is anchored by the heavy infantry of the Death Guard. |
 |
| Commander Saghesh and the Chem Hounds advance behind a wall of tanks. |
 |
| The Traitor tanks roll toward the meager Loyalist line. |
 |
| The Drop Troopers rely on the their tank traps and Aegis defense line to hold against the tanks until their reserves arrive. |
 |
| The Traitor tanks roll forward, while the infantry hold back to guard against a rear attack. |
 |
| The men of the Xhorik 87th Drop Troops hope to stall the enemy advance long enough to allow reserves to arrive. The Tauros hopelessly confronts the mighty battle tanks. |
 |
| The Tarantula sentry guns, Tauros, and tank traps are knocked out by the Chem Hounds' big guns. |
 |
| Traitor forces close in on the bridge but the stalwart veterans hold their ground, thanks to the protection of the Aegis defense line. |
 |
| The first of the Drop Trooper reserves start to arrive. Storm Troopers attack the flank of the Death Guard advance. |
 |
| Drop Sentinels support the Storm Troopers by attacking the nearby militia grenadiers. They are unable to reach their primary target, the tanks, due to the screening militia units and are forced to attack the infantry. |
 |
| The 2nd platoon, the drop troop insertion force, arrives and strikes the rear armor of the Leman Russ tanks with their melta guns. Meanwhile recon bikers launch a flanking attack. |
 |
| The drop platoon manages to knock out the Vanquisher with melta fire. Aircraft arrive on the Loyalist side of the bridge and add their supporting fire. |
 |
| The brave drop troopers are caught in the open after launching their strike and many are cut down by the Traitor tanks. |
 |
| The Death Guard dismount from their Rhino and attack the Drop Trooper veterans with their flamers. |
 |
| The Death Guard tactical marines return fire into the Storm Troopers, whittling down several of the elite Loyalists. |
 |
| The Traitors eliminate several drop trooper units but they have not yet broken through the Loyalist line onto the vital Alteron Bridge. |
 |
| A Xhorik 87th Valkyrie transport soars over the river rocks, bringing fresh troops to the front. |
 |
| The Loyalist fliers zoom forward to attack, but do little damage to the heavy tanks. |
 |
| Milita tanks roll forward under heavy fire from the Loyalists. They take minor damage but continue the advance. |
 |
| The Death Guard advance and clear out the drop troopers with the vile chemicals of their flamers. |
 |
The Traitors continue to push toward the bridge and finally eliminate the last of the drop trooper veterans holding the Aegis defense line on their side of the bridge.
|
 |
| Melee rages between Saghesh and his grenadiers and Loyalist recon bikers. The bikers are eventually cut down, but they keep the grenadiers busy and away from the bridge. |
 |
| Chem Hound grenadiers fight back against the the drop sentinels. Again, the Loyalists sacrifice their lives to keep the Traitors from reaching the bridge, buying time for their side. |
 |
| On the Loyalist side of the bridge, all the reserve units arriving by grav chute drop move forward toward to secure the bridge. |
 |
| The captain of the 4th company and his men move toward the bridge. |
 |
The Avenger attack fighter makes a strafing run with its Avenger bolt cannon, cutting down several traitor space marines, to the cheers of the drop troopers below.
|
 |
| The 1st Squad, 2nd Platoon makes a combat drop from their Valkyrie onto the bridge, right in front of the enemy line in an attempt to hold them back. |
 |
Death Guard tactical marines fire into the drop troopers before launching an assault to clear them from the bridge.
|
 |
| Drop troopers face off against space marines on the crucial bridge. |
 |
| The men of the Xhorik 87th are no match for the superhuman Death Guard in their power armor and are cut down to a man. |
 |
| The Traitors finally advance onto the bridge in force. |
 |
| Loyalist fliers and bikers make a final push to clear the advancing Traitors from the bridge, but the tanks and marines prove too tough. The battle ends in a draw with neither side able to take decisive control of the bridge. |
Result: Draw
post-Game:
It was pretty spectacular to finally play our first battle using a bridge and a large river. The new terrain added an interesting visual dimension and a cinematic feel to the scenario. At times it felt a bit like the battle for Alamo bridge in Saving Private Ryan with my lightly-armed infantry trying to stop enemy tanks from crossing the bridge. Unfortunately, my men did not have "sticky bombs" for taking out the tanks' tracks and my air support was not as deadly!
We made a few mistakes with how we interpreted the rules for the Deredeo dreadnought, which mistakenly led to it shooting down the Lightning before the Lightning could strike it. But ultimately, it did not make a difference as the Drop Troops struggled to inflict much damage on the tanks or space marines, as usual. In the entire game, I only destroyed one vehicle and one infantry unit.
For me, the star of the game was definitely the Aegis defense line. The cover save enabled my veterans to survive quite a bit of tank cannon fire and hold the enemy side of the bridge for a couple of turns before Pete was finally forced to assault them with his flamer marines. The Avenger performed OK in its first outing, using its Avenger Bolt Cannon to whittle down the marines on the bridge, one of the only things in the army capable of reliably taking down power armored foes. Overall, I was able to keep Pete's forces pinned on his side of the bridge for a good chunk of the game so he could never force my infantry off the far side and claim the bridge. Realistically, against space marines and a super heavy tank, this was probably the best outcome the Drop Troopers could have achieved.


Really spectacular pics! I felt like I was viewing still frames from some movie on par w 'Private Ryan'. You both played a great game!
ReplyDelete