Welcome to our first battle report of the second edition of Horus Heresy. To draw attention to certain aspects, I've used a few notations:
That's New! to highlight significant changes from the last edition.
Reaction! to highlight interesting uses of the new Reaction mechanic, the key difference in this edition.
Oops! to point out areas where we later realized we got the rules wrong or forgot about special rules.
Background:
The Traitors have taken control of Xhorik Prime after a grinding, vicious campaign against the White Scars and the Kozar army. The remnants of the Brotherhood of the Wind are now in hiding in the Eastern Wastes and mountains to the north and east of Kozar, terrain too remote and hostile for the large, mechanized Traitor armies to ever search thoroughly. However, just as the victory parades were wrapping up, Loyalist forces from Xhorik Secundus launched their counterattack with an interplanetary invasion, beginning with Operation Downfall, a series of attacks by Xhorik Drop Troopers, in order to clear the way for the major landings to follow. (See The Xhorik Campaign for a list of the previous battle reports.)
Although cut off from all communications with these Loyalist allies, Turan Jorma, Khan of the Brotherhood of the Wind, decided to take advantage of the disorder to launch a series of raids to assist the Loyalist attack. He led a highly mobile band of his remaining marines deep behind enemy lines to strike at critical infrastructure and planetary defense systems. After a number of successful attacks against weakly-defended installations, a Traitor force had been sent to eliminate this disruption and to reinforce the armies under attack at the landing sites. Khan Jorma found himself becoming slowly enveloped by heavier forces. He decided he needed to breakout of the trap before it could fully encircle and trap his raiding party.
At the same time, Praetor Wolfgang decided to bring his own Death Guard Great Company to bear against the Loyalist forces attempting to land on his newly conquered planet. When his intelligence reported that his longtime foe, Khan Jorma, was raiding near the enemy landing zones, he realized this was a unique opportunity to crush the White Scars, breaking their remaining strength while pushing his men through them to the front lines.
Thus, the stage was set for both armies to try to break through the enemy lines and attempt to inflict a shattering loss to their hated enemies while doing so.
Scenario: Onslaught
Game Length: 6 turns
Primary Objective
Control the objective you place in the opponent's deployment zone: 5 VP
Each unit destroyed in the first turn: 1 VP
Secondary Objectives
Slay the Warlord: 1 VP
Attrition: 1 VP for whoever destroyed the most units
That's New!The new edition brings a major change to the way objectives are claimed and denied. Only units designated as "Line" can hold an objective. Unless you are employing a special rule or Rite of War, the only Line units are Tactical, Despoiler, Breacher, Assault and Recon squads. Most units qualify as Denial, enabling you to contest an objective, except vehicles have lost the ability to even deny objectives.
I really like the change to prevent vehicles from denying objectives. It is never fun when an opponent parks a nearly un-killable heavy tank over an objective marker. The big reduction in scoring units is interesting and I will have to see how it plays out. It seems to reduce the value of the troops choices designated as Support, as well as units like Veterans and Terminators that used to benefit from being scoring. Of course it greatly increases the incentive to take the core Troops units as they are the only scoring units, so I think it will be a good thing overall, once we adjust our armies to it. In the short term it means that Scoring units will be at a premium as we each have only a few.
Strategy and Army Selection:
White Scars: Phil
I am excited to try out the new rules and to get out my old White Scars, who have only seen one battle in the last 18 months, ever since their ignominious defeat in the four-part campaign for Xhorik Prime. We decided to play a 2000-point game on a 6' x 4' table using one of the basic missions from the rulebook as a good, "standard" test of the new rules. Since we just played Blood Feud in our last game, we went with the second mission, Onslaught. This worked well because we wanted to test how the new Line rules would impact a game with objectives.
Reading the new rules for the White Scars Rite of War, Chogorian Brotherhood, I sadly realized they removed the option to take a single Heavy Support choice that was present in the old edition. Since I did not have enough core troops choices to use the standard Force Organization Chart, it meant I could not try out the new rules for my Sicaran Omega. The good news was that my Skyhunters and Outriders would be considered Line troops so they could calim an objective.
Looking at the models I had available and adding up their costs in the new rules, I realized I had a bit more than I could afford to take, even with leaving out the Sicaran Omega, and I had a few choices to make on how I configured my units. With the changes to the Primaris-Lightning (reduced effectiveness and increased cost), the changes to Reserves rules, and the presence of Pete's Deredeo dreadnought and missile launcher squads with Skyfire, I decided the tank-hunting flier would be the other unit to leave out in order to stay within my points limit.
The next decision was how to use the transports I had available: the Rhino and the Dreadclaw. Initially, I was thinking a 5-man squad of Ebon Keshig charging out of the Dreadclaw would be great for disrupting Pete's back line of heavy guns (his Deredeo and heavy weapons squads) but then I realized that the Dreadclaw lost the Assault vehicle status, making it unsuited for delivering a melee unit. So, after re-reading the mission rules, I decided to use the Dreadclaw to transport my vulnerable 10-man tactical squad to the objective with a bit more protection. This would leave the Rhino free to ferry the plasma support squad to where they could try to inflict some damage on Pete's hard targets like dreadnoughts or terminators. (Only later did I realize they removed the ability for an embarked unit to shoot from fire points.)
The plan was to use the plasma units (Outriders and Tactical Support) and Sabre Strike Tanks against his heavier units while my Skyhunters and tactical squad headed for my objective. The Ebon Keshig would launch a flanking attack to try to stop his units from reaching his objective. Finally, the scouts would try to disrupt his gun line a bit to help give my other units a chance to survive. That was the plan anyway. Let's see how it works out!
Opposing Forces:White Scars: Phil- Khan Turan Jorma: jetbike, paragon blade, cyber hawk
- Centurion Champion Subotei: paragon blade, refractor field, bolter, combat shield, artificer armor
- [Line] Skyhunter Squadron Khujaa: 6 jetbikes, 2 x volkite culverin, sergeant with power weapon
- [Line] Outrider Squad Tsujen: 5 Outriders with twin-linked plasma, sergeant with power glaive
- [Line] Tactical Squad Temgar:10 marines with bayonets, sergeant with power glaive and artificer armor
- Tactical Support Squad Khoer: 9 marines with plasma guns, sergeant with power sword
- Rhino with pintle-mounted multimelta
- Recon Squad Chono: 10 marines with recon armor, chainswords and bolt pistols, nuncio vox, sergeant with power fist
- Anvilus Dreadclaw Drop Pod
- Sabre Strike Tank Squadron Ikhruud with snub autocannons, heavy bolters, and sabre missiles
- Ebon Keshig: 10 terminators, 7 power glaives, 3 power fists, 1 combi-melta, 2 combi-bolters
Total: 1995 points
Death Guard: Pete
- Praetor Wolfgang: Catphractii terminator armor, volike charger, paragon blade, rad grenades
- Deathshroud retinue: 4 terminators with hand alchem-flamers, power scythes and rad grenades
- Tactical Support Squad Folterer: 8 marines with flamers and melta bombs, sergeant with artificer armor.
- Rhino with pintle-mounted heavy alchem-flamer.
- [Line] Tactical Squad A: 14 marines with chainswords, sergeant with power fist and artificer armor and Apothecary Gerhard
- [Line] Tactical Squad B Toddestraffe: 10 marines with chainswords, sergeant with power fist and artificer armor.
- Tactical Support Squad Blitz Schock: 7 marines with volkite calivers and apothecary
- Heavy Support Squad Feuer Sturm: 7 marines with missile launchers
- Predator Mittel Panzer 021 with Predator Autocannon and lascannon sponsons
- Contemptor Dreadnought Jürgen: Gravis melta cannon, melta gun, Gravis power fist
- Deredeo pattern dreadnought with Arachnus heavy lascannon battery, twin-linked heavy bolter, Aiolos missile launcher, and helical targeting array
Total: 1990 points
Battle:
DeploymentThat's New!We rolled to see who got the choice to deploy and go first. As part of their new Legion rules, the White Scars get to roll two dice and select the highest. Unfortunately for me, I rolled two ones. Pete elected to deploy second and go second, figuring it would be more important to have the last turn to ensure control of his objective and denial of mine.
This scenario uses staged deployment where each side takes turns deploying one unit at a time so no one gets the big advantage of seeing the entire enemy deployment and being able to counter it. Since I had units in reserve, I finished deploying first and then Pete deployed his last few units. Finally, I elected to place the Scouts on my far left flank where they could help with my assault on my objective.
 |
| Deployment |
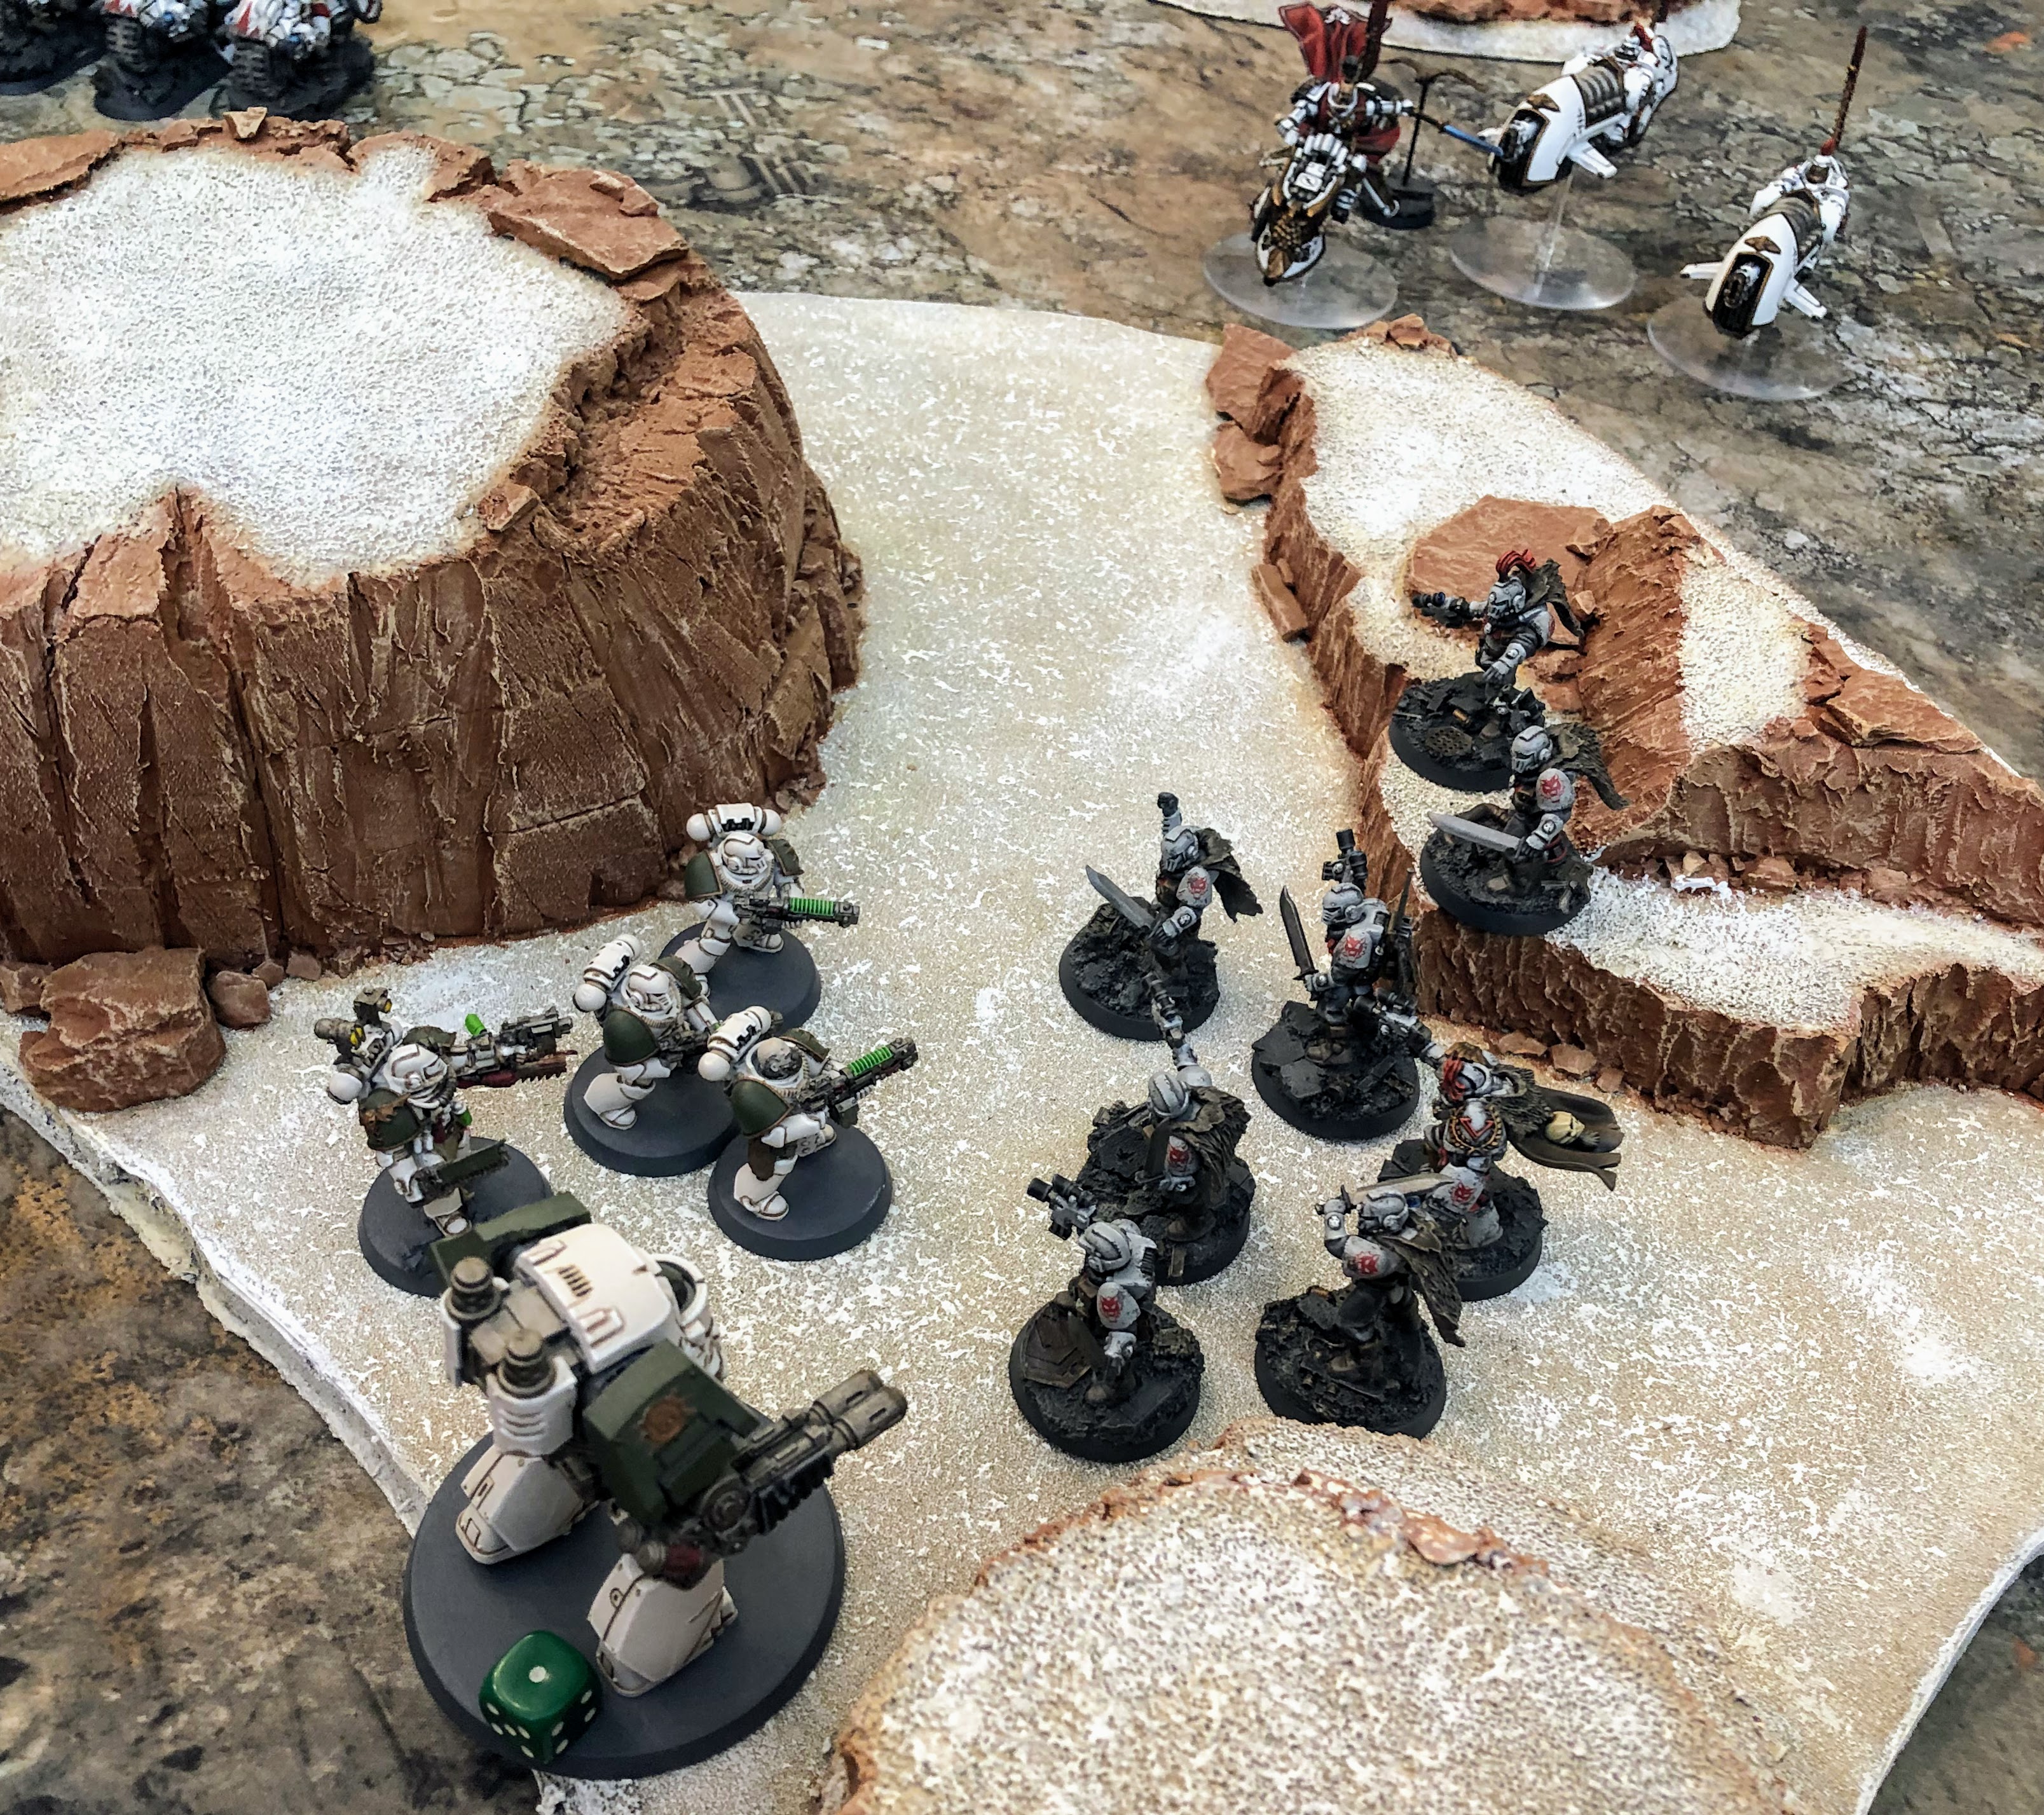
White Scars Turn 1
I decided to focus my firepower on the center and left flank where my objective was. I would count on the Ebon Keshig to hold the right flank when they arrived until I could afford to send help.
Reaction!
Right away during our first movement phase, we got to try our first Reaction. I moved my Scouts toward the Volkite Support Squad in the hope of firing a few pistol shots and then charging next turn. But this enabled Pete to scoot his unit 4" away, taking most of them out of line of sight of my Skyhunters! We quickly realized that you better account for potential Reactions before you do anything. An attempt at some likely-useless bolt pistol shots cost my Skyhunters the chance to shoot more of the enemy.
 |
| White Scars scouts advance over rough terrain toward the Death Guard tactical support squad. |
The victory conditions rewarded killing enemy units on the first turn so I decided to concentrate my anti-tank firepower on the Predator. The two Sabre Strike Tanks fired their Anvilus Snub Autocannons and all their Sabre Missiles but only managed to knock off two hull points so I had to use the Rhino's multi-melta to finish the job and earn my VP. The tank movement blocked the Outriders from dramatically racing down the ramp like I intended, so they moved sideways to fire at the Contemptor.
Oops!
I lost one to a difficult terrain check but later realized I should not have taken the check due to my warlord trait, Born to the Saddle. They were only able to take one wound off the mighty dreadnought. I also realized I had forgot to make their Scout redeploy move that could have put them safely off the hill and allowed them to advance to within 12" to get double the shots.
Reaction!
My Skyhunters fired at the few Volkite Support marines they could see and killed them. But Pete used his Reaction to fire back and kill one of my jetbikes in return. Not something you used to have to worry about in your own shooting phase!
Overall, it was not a terrible first turn since I killed a unit to earn a VP, but losing an Outrider and a Skyhunter in my own turn stung.
 |
| White Scars Turn 1 |
Death Guard Turn 1
Reaction!
Pete moved his Contemptor toward my left flank to protect his Volkite squad from my Scouts. With his high movement of 8" his Contemptor got so close, I decided to use a Reaction to move my Scouts away, out of charge range. Pete also moved his big infantry blocks forward and I used my bonus Reaction in the movement phase (thanks to my Warlord trait) to move my Sabres back. I knew an assault from a squad armed with krak grenades would be the end of those tanks with their rear armor of 10.
The Death Guard shooting phase was downright deadly. The Deredeo used its Aiolos missiles and Arachnus heavy lascannons to destroy one Sabe and destroy the weapon on the other as well as removing two hull points. The heavy support squad sent a salvo of krak missiles to destroy my Rhino, forcing the plasma support squad to disembark. I tried to hide them mostly behind the tank, but his tactical squad was still able to kill two of them.
 |
| Tactical Support Squad Khoer disembark from their wrecked Rhino. |
 |
| White Scars tactical support marines leap from the burning wreckage. |
Reaction!
On my left, the Volkite squad and Skyhunters exchanged fire again, each losing two due to my use of the Reaction Return Fire. The Contemptor killed a Scout with his Gravis melta cannon.
 |
| Death Guard Turn 1 |
White Scars Turn 2
I started by rolling for Reserves. My Ebon Keshig arrived for their Flanking Assault but my Dreadclaw drop pod with my tactical squad and Consul Champion did not. The Flanking Assault was not disordered so I had my Ebon Keshig terminators arrive right in front of the Death Guard objective, ready to hold the line until death, if needed, in order to regain their lost honor.
 |
| The Ebon Keshig arrive, ready to face death. |
My center had taken a pounding during Pete's turn and I realized I could not come close to matching the firepower from "heavy weapon hill" with his Deredeo and heavy support squad. With my remaining Sabre tank down to only a heavy bolter, I decided to try a ram attack to see if I could cause any damage that way. Unfortunately, Pete made all his saves and did not try a Death or Glory Reaction.
The plasma support squad and plasma-toting Outriders closed in on his flamer support squad in the Rhino. I was hoping to destroy the tank with one unit and kill a good chunk of the infantry with the other. But when I moved the Outriders forward into rapid fire range, Pete used a Reaction to move his Rhino back. This also meant that when I destroyed the tank with plasma fire from the Outriders, the unit inside could safely disembark out of the line of sight of my plasma support squad. So I fired at the distant missile launcher team instead but only managed to kill one. The downgrade to plasma was becoming painfully clear to me. My attacks were weaker against infantry but I still lost an Outrider to Gets Hot.
Reaction!
My Skyhunters decided to fire everything at the Dreadnought in the hopes that 10 S6 and 8 S5 shots could inflict at least one wound. Unfortunately, I learned how tough the Contemptors are when I failed to do any damage at all. Even worse, Pete used Return Fire to kill one of my Skyhunters! That was just painful. It made me realize that you may not want to take low-probability shots if it enables your opponent to trigger a Reaction that will do more damage to you than you do to him.
The one highlight of the turn was launching our first assault of the new edition when my Scouts charged the Volkite support squad. I lost a few marines to Overwatch but made the charge and won combat. The Traitors passed their morale check, doubtless seeing the mighty Contemptor nearby and waiting for it to come to their aid!
 |
| Scout Squad Chono suffers the Volkite overwatch in order to charge the Death Guard tactical support squad Blitz Shock. |
 |
| White Scars Turn 2 |
Death Guard Turn 2
Pete moved his left flank forward toward his objective but only inflicted a single wound on the Ebon Keshig standing in his way. He positioned his tactical squad in front of his Deathshroud so they would be the recipients of the inevitable assault from the White Scars.
In the center, his large tactical squad assaulted the crippled Sabre and finished it off with krak grenades.
That's New!
The Death Guard special rule disallows running but enables you to ignore anything that would slow you down, such as difficult terrain or even being pinned. It also allows you to move and shoot heavy weapons without needing to fire snap shots. In this case, he moved his heavy weapons squad forward and wiped out my Outriders. Losing their ability to jink means that a salvo of krak missiles is game over for them.
 |
| Death Guard tactical marines assault the Sabre and destroy it with krak grenades while the heavy support squad moves down from the hill and eliminates the Outriders. |
On his right flank, he charged his Contemptor into the melee. My scouts finished off the Tactical Support squad but were all killed by the Contemptor except the sergeant. He hit back and inflicted two wounds on the dreadnought. Seeing three of his squad mates get flattened by the Contemptor made the sergeant understandably concerned and he ducked out of combat, managing to escape the Sweeping Advance, so he could live to fight another round.
 |
| With his squad cut down around him, Sergeant Qamar strikes back and injures the Contemptor. He then wisely decides to break off combat before he is pummeled to paste. |
 |
| Death Guard Turn 2 |
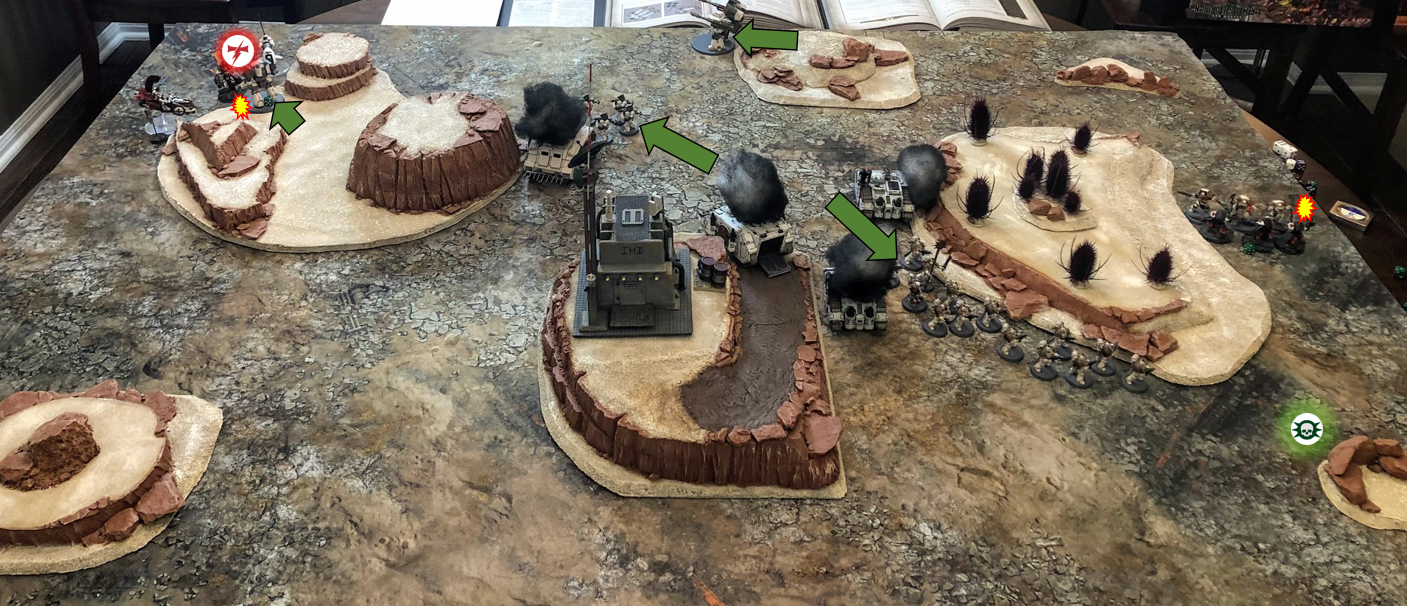
White Scars Turn 3
I rolled for my reserves and once again my Dreadclaw and tactical squad did not arrive. This was not strictly a bad thing since I figured the fewer turns the tactical squad was on the board, the better chance they had of surviving until the end of the game. On the other hand, my greatly diminished force could definitely use some extra help as I was heavily outnumbered at this point. Things were looking grim for the Loyalists with a Contemptor guarding my objective and no real firepower left, but I thought if I could deny Pete his objective then it would come down to tiebreakers and I might still have a chance.
I was able to rally my plasma support squad and they tried to fire at Pete's big 14-man tactical squad but I only managed to kill one of my own guys due to Gets Hot and do no damage to the Death Guard.
Reaction!
On my left flank, I had the Skyhunters shoot at the tactical support squad with flamers. I had learned my lesson shooting at the Dreadnought and so I decided to shoot something that was too far away to return fire! However, Pete used his Death Guard Advanced Reaction to give his unit a 4+ Feel No Pain for the turn, which resulted in him losing only one marine, and then it allowed the unit to make an extra move, which he used to get closer to the White Scars objective.
After a futile shooting phase where I lost a more expensive model than my opponent, I was eager to start the assault phase now that my Ebon Keshig were on the board. In past games, I felt like they never really got a chance to shine. They were always going against a Super Heavy tank or the Red Butchers and always got wiped out without doing much of anything. I was excited to see how they would perform in a new edition against new foes.
Reaction!
After declaring the charge, Pete's tactical squad fired overwatch at full ballistic skill, which was enough of a hail of bolter shots to kill one of the Ebon Keshig. I easily made the charge. In the melee, the White Scars killed 9 tactical marines, but lost 3 terminators in return, a trade I am sure Pete would take anytime. Going to two wounds each is a nice buff to make terminators more resilient but they still go down easily against power fists due to Instant Death.
I must have won a Sweeping Advance because the tactical squad was gone from the photos at the end of the turn. That was one of his two scoring units destroyed. My only chance at this point was to hope to somehow defeat the Deathshroud and the Praetor and then have enough guys left to run back and fight off his other tactical squad that was making its way to the objective around the spiked forest. It seemed very unlikely, but I had to try.
 |
| The Ebon Keshig charge the Death Guard tactical squad while the Deathshroud patiently await their turn. |
 |
| White Scars Turn 3 (view from the Traitor board edge) |
Death Guard Turn 3
Reaction!
Pete moved his Contemptor forward with the intent of assaulting my Skyhunters. I used the White Scars Advanced Reaction Chasing the Wind to move both my Skhunters and my scout sergeant their full move distance away and out of his charge range. My smile quickly faded when he just lined up his Dreadnought's gravis melta cannon and melta gun to shoot the jetbikes instead. I used the Evade Reaction to save one but still lost another Skyhunter.
Pete's big tactical squad continued their long march to the objective and shot the last two plasma marines on their way. On the Traitor left flank, the Deathshroud bathed the Ebon Keshig in burning, noxious chemicals, killing one of the Loyalist terminators. The Traitors then prepared to assault the survivors.
Reaction!
The Ebon Keshig are the first to try the Hold the Line Reaction, the only one that requires passing a morale check, which they do thanks to their stellar Leadership value of 10.This causes the Deathshroud charge to be disordered, meaning they do not get their bonus attack for assaulting.
Oops!
We later realized Pete has forgot all about the -1 Toughness effect of his rad grenades in this crucial first round the melee. As it turned out, the Ebon Keshig barely won the combat thanks to some poor rolling from Pete for his Praetor's attacks.
That's New!
I initially thought the Ebon Keshig had a good chance of winning this combat thanks to their Power Fists giving them S8 and so the ability to take out the multi-wound Deathshroud in one hit. However, the Deathshroud have a cool special rule that counts their toughness as one higher than it is for determining Instant Death, meaning a S10 hit. Not only that, but they have 3 wounds each and a Weapon Skill of 5. In the new edition, a model with a WS of 4 requires a 5+ to hit a model with WS 5, meaning my Ebon Keshig had a very tough time landing hits and they had to dish out three wounds to kill just one Deathshroud!
 |
| Praetor Wolfgang and his Deathshroud retinue face off against the depleted Ebon Keshig. |
 |
| Death Guard Turn 3 |
White Scars Turn 4
All reserves automatically arrive in Turn 4 if they have not arrived already. Despite all the units I typically keep in reserve, I don't think I ever got to Turn 4 with the old White Scars rules where you got a bonus to your first reserve roll of each turn. I decided to bring the Dreadclaw drop pod down right on the objective, right next to Pete's flamer squad, using its heat blast to do some damage and it killed a few guys thanks to some poor armor saves by Pete.
That's New!
In the new edition, you cannot disembark from a drop pod the turn you arrive, unless you are using the special Drop Pod Assault Rite of War. Since a Dreadclaw is a flier, I decided it would enter play Zooming to make it harder to hit for anything without Skyfire. My hope was the pod would protect the tactical squad for a turn and then they could disembark and claim the objective on Turn 5. As it turned out, Pete used the Interceptor Reaction to shoot the pod with his Deredeo. He knocked off all three hull points which meant my Zooming flier crash landed, inflicting S10 AP2 hits on everyone on board!! A lucky refractor field roll saved the Champion and a roll of a 1 to wound saved the sergeant. The Dreadclaw and the rest of the squad were obliterated by one salvo of shooting from the impressive Deredeo! In the old edition, they could have disembarked during my movement phase, before Interceptor reactions.
 |
| The Dreadclaw finally arrives and is dramatically shot down in a burning wreck that kills 9 out of 11 passengers! |
Well, my reserves literally went down in flames, which pretty much finished off any chance I had of claiming my objective. But if I was going down, I was going down swinging! I brought up my Praetor and last Skyhunter and my Scout sergeant to join the crash survivors. These five models were the ragtag remnants of three units and they took their vengeance on the remaining flamer tactical support squad and finished them off. Of course, this still left the Contemptor lurking perilously close...
 |
| The White Scars claim their objective with the few survivors of the left flank. But the mighty Contemptor awaits just out of frame. |
In the heavyweight bout on the other side of the battlefield, the Death Guard begin to get the upper hand as Praetor Wolfgang takes down one Ebon Keshig and the Deathshroud kill another. In return, the White Scars inflict two wounds, not enough to kill one their incredibly tough foes. The Ebon Keshig pass their morale check to hold their ground and fight to the bitter end as they seak their redemption.
 |
| White Scars Turn 4 |
Death Guard Turn 4
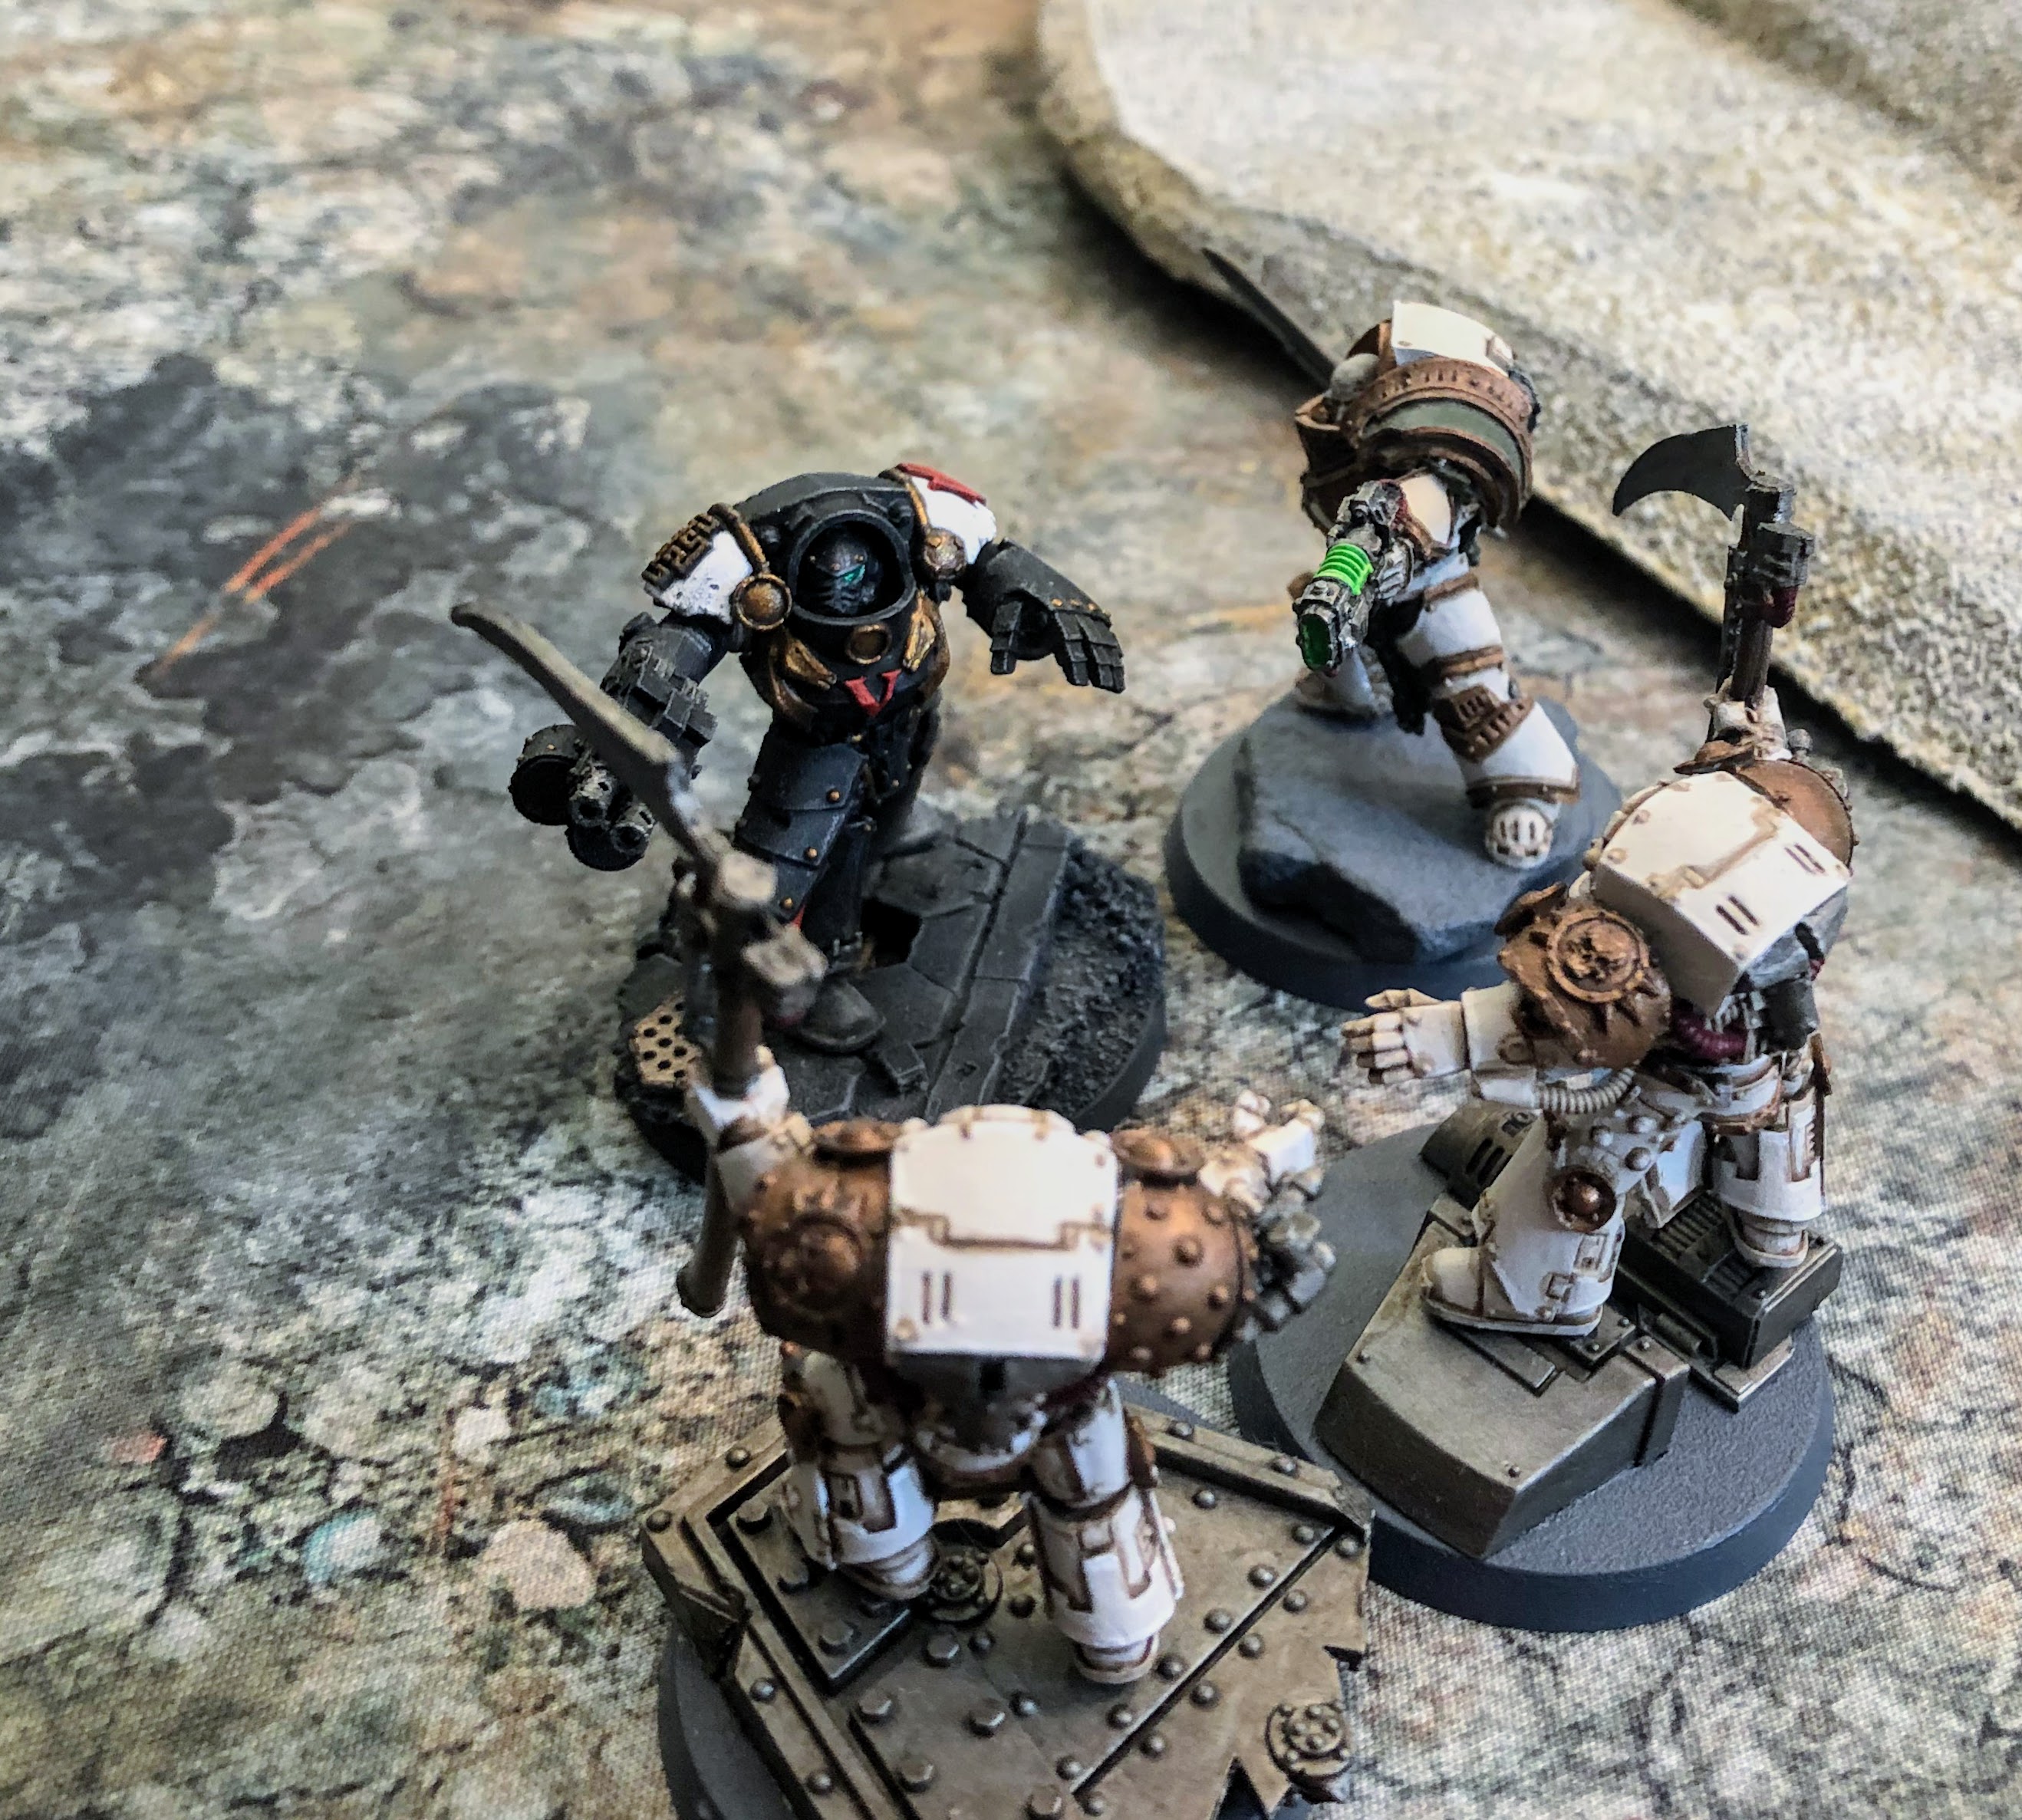
I was hoping my Scout Sergeant would act as a human shield to absorb the Contemptor's shooting and assault, leaving the rest of my meager force free to charge the dreadnought in my next turn. But Pete was able to reposition his missile launchers and use them to pick him off! (I kept forgetting his heavies could move and fire.) The Contemptor fired at my tactical sergeant and the Champion, killing the sergeant. I cringed as I prepared to receive his assault but Pete rolled a '4' and applying the -2" for difficult terrain, he failed the charge! Ha, my Champion stared down death and lives for another round!
 |
| The Contemptor kills the tactical squad sergeant with his Gravis melta cannon and then charges, but gets slowed by the rocky terrain and does not reach the White Scars Champion, Subotei. The combatants face off and prepare for the inevitable melee. |
In the center, Pete's tactical squad continued toward the objective and, with no more reason to remain on sentry duty, the Deredeo moved for the first time and headed toward the White Scars objective.
On my right flank, the Ebon Keshig rolled amazing saving throws and attack rolls and were able to inflict two wounds on the Traitors, finsishing off one Deathshroud, without taking any themselves! The Death Guard passed morale and the turn passed back to me.
 |
| Death Guard Turn 4 |
White Scars Turn 5
At this point, it was pretty clear my Ebon Keshig would not win their combat. And even if they somehow did, they would not have the time or the numbers to stop Pete from claiming his objective. So in order to win or force a draw, I would need to claim my own objective and I only had one scoring model left, facing the Contemptor as well as the advancing the Deredeo and missile launcher squad. With no chance of surviving all of that for two turns, I decided I would rather go down swinging in melee than cowering on the objective hoping my opponent miraculously failed all of his to-hit rolls for the next two turns! After all, I had a score to settle with that dreadnought...
I broke off the last Skyhunter from my Praetor so I would have three separate units to charge and minimize the damage the Contemptor could do with Overwatch. The Skyhunter declared the first charge and died to overwatch, as expected. The Praetor and Champion then charged in. I had two characters with WS6, S5, AP2 and the Murderous Strike special rule (both had Paragon blades) against a Contemptor with 3 wounds left, along with T7 and a 5++ invulnerable save. I figured I had a decent chance of success. I rolled up a few hits but could not get the '6' I needed to wound. In return, the Contemtpor killed both characters with a single hit to each from his Gravis power claw. So that did not work out according to plan!
On the other flank, the Death Guard Praetor and his retinue killed two more Ebon Keshig, leaving just a single White Scars model on the table. In Pete's turn 5, he moved his tactical squad to the Death Guard objective and claimed a resounding victory.
 |
| The Ebon Keshig fought bravely against Wolfgang and his Deathshroud over four rounds of combat, but eventually they were cut down to only one survivor, the last remaining White Scars model on the battlefield. |
 |
| White Scars Turn 5 |
 |
| Finally, the Death Guard tactical squad reaches their objective. They have broken through the Loyalist lines and win the battle. |
RESULT: DEATH GUARD MAJOR VICTORY
7-1
Post-Game:
White Scars: Phil
I really enjoyed the new rule system and the increased tactical depth that comes with the Reactions mechanic - you really need to think more carefully about your moves and the order in which you activate your units. It also keeps you very engaged during your opponent's turn as you try to decide when to use your precious Reaction allotment. I also like a lot of the simplifications made in areas such as terrain and the elimination of dumb rules like Look Out, Sir! and the complex psychic phase (not that it played a role in this game). One of my favorite changes is that the player suffering the casualties decides which models to remove, just like it was back in 3rd edition 40k, rather than being forced to take the closest model. Finally, sergeants can lead from the front again and you don't have to carefully micromanage your moves to preserve special weapons and equipment.
On the other hand, I was frustrated with the continuation of what I felt was the biggest problem with the last edition: the imbalance between heavy units and everything else. I don't want to jump to any conclusions after only one game, but in this battle, the two dreadnoughts dominated the board. Where most of the light, fast units favored by armies like the White Scars got dramatically toned down in power (jetbikes, Outriders, Dreadclaw drop pod, etc.), the dreadnoughts seem stronger than ever. Even with the rules in the last edition, I could never compete with Pete's armies in a straight up battle for kill points and the Scars could only win when we deliberately setup scenarios for them to have a chance. I fear this edition will be more of the same if I don't change up my army significantly.
Of course, I could have played much better as well! (I can't put all the blame on the rules.) I needed to concentrate all of my plasma fire on one of the dreadnoughts early. But I forgot about my Scout move with my Outriders and I did not realize until the game got going that my embarked plasma gunners could not fire from the Rhino, as in the old edition. These mistakes meant I was not able to take advantage of the first turn to hurt the Contemptor worse. I also did a poor job of anticipating the Reactions on my left flank where I consistently took more damage in my turns than I dished out. I ended up losing 20 models (40% of my army!) during my own turns to Reactions, Gets Hot, and dangerous terrain (not including guys lost in melee in my own turns). That is more than the number of Death Guard models that I killed in my own turns (13), not including melee. Ouch!
The unit that probably performed the best was the Ebon Keshig. They arrived right where and when they needed to, destroyed a crucial scoring unit, and then held up Pete's deathstar for the rest of the game. They never inflicted much damage on the super-tough Deathshroud but their combination of 2+/5++ save, 5+ Feel No Pain, Leadership 10, and Stubborn means they are extremely tough to shift in melee. Even though half of them were already dead before the big melee with the Deathshroud started, they held on for a long time. If I had the full squad, they may have been able to win.
Additionally, the Scouts did what they were supposed to and provided a disruption to Pete's lines and finished off a weakened tactical support squad. The sergeant even inflicted a few wounds on the Contemptor, which is more than my Praetor or Consul Champion could do! Considering they were 130 points, they performed OK.
The rest of the army was pretty underwhelming. The Sabres could not take down the Predator on their own and needed the Rhino to help, and they were then easily dispatched by the Deredeo. The plasma tactical support squad and plasma Outriders each killed at least one of their own with Gets Hot and never inflicted any serious damage. The Skyhunters were only able to kill a few marines and could never harm the Contemptor. The Dreadclaw was the worst: when it finally arrived, it got shot down immediately and killed nearly the entire squad on board! The Consul Champion and Praetor could not combine for a single wound on the Contemptor before being easily dispatched, which was disappointing considering the two of them together cost 100 points more than the dreadnought. In the end, my army was tabled while Pete had over half of his force remaining.
I like the new edition and I think it will be a lot of fun, as long as we can balance the armies better. I clearly need to put some serious thought into how to improve this army so that we can have some competitive games that are not already decided with 3 turns left to play. I should probably start with some dreadnoughts and then consider ditching my unique Right of War and leaving most of my Fast Attack in their case so that I can take Heavy Support choices instead. At least the game looked amazing with our fully painted armies going toe to toe for the first time in a long time. Time to regroup and prepare for the next one. Many foes believe they have dispersed a White Scars army only for it to regroup and strike back when and where it is least expected!


No comments:
Post a Comment