
"To each of us falls a task. And all the Emperor requires of us Guardsmen is that we stand the line and we die fighting. It is what we do best. We die standing."
On Xhorik Prime, the key trading and transport hub of the system, Traitor forces are newly victorious over those loyal to the Emperor in a massive planetary civil war that erupted along old, pre-Imperial factional rivalries. A combined force of Death Guard and World Eaters has crushed the stratocracy of Kozar and their small garrison of the White Scars Legion. The major space ports are now securely in the hands of the Traitors, although small bands of Loyalist survivors continue to wage a shadow war along the fringes of the high desert wilderness.
On Xhorik Secundus, the planetary governor has remained loyal to the Emperor and maintained control of most of the planet. As war raged on Xhorik Prime, armies began mobilizing for an invasion of the heart of Traitor territory, in the Federation of Unimund. The first phase of the invasion was codenamed Operation Downfall and called for a massive nighttime drop assault on key enemy installations in order to clear the way for the massive, lumbering landing craft that would be bringing the bulk of the invasion the next day.
 |
| Night Drop scenario map: the outpost around Relay Station AN-09. |
- Force Commander Saghesh the Sadistic: power sword, plasma pistol, refractor field, Alchem-Jackers, Warrior Elite
- Squad Alpha - The Tongue Collectors: 15 Grenadiers with plasma gun, flamer
- Squad Beta - The Psycho Slaves: 15 Grenadiers with melta gun, flamer
- 2 Auxilia Medicae: Dr. Cut and Dr. Cauterize
- Leman Russ Battle Tank
- Leman Russ Demolisher
- Leman Russ Vanquisher
- Malcador Battle Tank with armored ceramite
**Horus Heresy Imperialis Militia and Cults army list
 |
| An armored division of traitor militia is guarding the landing zones, including this sentry force at Relay Station AN-09. |
 |
| Traitor force map icons |
- Company command section (5): regimental standard, medic, vox, power sword and plasma pistol
- Stormtrooper squad (10): melta gun, plasma gun, sergeant with power sword
- Second platoon: Grav chute insertion force
- Platoon command squad (5) with power fist, vox, medic and two grenade launchers
- 1st Infantry squad (10) with melta gun
- 2nd Infantry squad (10) with grenade launcher
- Special weapons squad (6) with three melta gun teams
- Special weapons squad (6) with three melta gun teams
- Drop sentinels (2) with multimeltas
- Valkyrie with multilaser, 2 Hellstrike missiles, and 2 heavy bolters
- Tauros with grenade launcher
- Drop troop recon bikers White-Bolts (5) with demo charge
- Drop troop recon bikers Black-Bolts (5) with breacher charge
- Sentry Guns (3) with twin-linked lascannons
- Sentry Guns (3) with twin-linked heavy bolters
 |
| Strike Force Glaive: Reinforced 2nd Platoon of the Xhorik 87th 3rd Company, under the command of Captain Xhaer. |
 |
| Drop trooper map icons |
+++++++++++++++++++++++++++++++++++++++++++++++++++++++++++++++++
 |
| Pict-capture of Drop Zone Zeta acquired during night recon flight one day prior to drop. |
 |
| Pict-cap of target relay station AN-09 prior to drop. |
++++++++++++++++++++++++++++++++++++++++++++++++++++++++++++
++Thought for the day: A good soldier obeys without question. A good officer commands without doubt.++
Battle: Night Drop
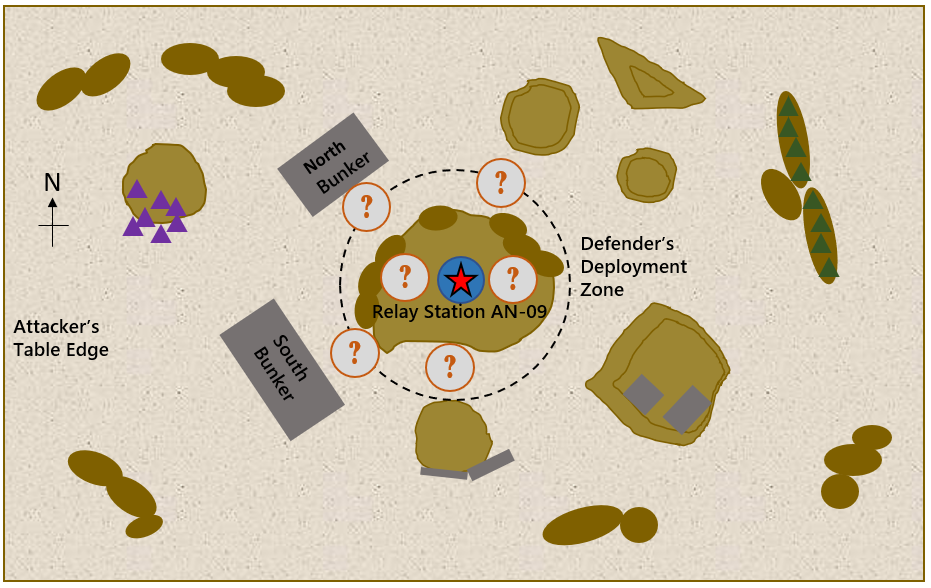 |
| 01.40: Traitor sentries are arrayed around the critical Relay Station. Loyalists will be attacking from the west. |
 |
| The Tauros leads two squads of recon bikers to find the target and mark the drop site in the dark. |
+++01.49 Outpost North Bunker+++
In accordance with standard Xhorik drop troop combat protocol, the first units dropped into a hot combat zone are Tarantula sentry guns to secure the drop zone before the men arrive. A lascannon team landed right next to the northern bunker. The mechanical legs unfolded and the targetters immediately locked onto a nearby Leman Russ Vanquisher. The weapons automatically started firing and damaged the Traitor battle tank, the las weapons creating a blind flash in the darkness of the outpost.
 |
| A lascannon Tarantula team strikes a Traitor tank at the relay station outpost. |
At the same time, a heavy bolter team dropped to the east of the relay station and began firing into the grenadier sentries.
 |
| Even the utter darkness, the Tarantula targeting arrays spot the Traitors and the guns open fire. |
 |
| 01.50: Xhorik recon elements approach from the west. Tarantula sentry guns drop into action, revealing the locations of several Traitor units. |
+++01.52 Relay Station AN-09+++
 |
| A Demolisher Cannon shell lights up the night and destroys a Drop Tarantula. |
+++01.55 South Bunker+++
 |
| A militia battle tank fires into approaching recon bikers, destroying one. |
 |
| 01.55: Traitor armor mobilizes and begins firing into the attackers. |
++01.58 Relay Station AN-09++ As the Valkyries of the reinforced 2nd platoon race to the drop site, heavy AA fire forces several of the transports off their planned route in order to avoid taking too much flak. The closely synchronized nature of the attack starts to fall apart as the Valkyries are forced to spread out. The elite Stormtrooper Valkyrie heads straight through the incoming fire, relying on the skill of their veteran pilot to make it through. Arriving at the drop site on time, they found they were alone. But they had a mission to accomplish and made their jump, landing just south of the objective. They landed near a surprised squad of Traitor Grenadiers along with an officer. The Stormtroopers of the 501st immediately opened fire, inflicting several casualties, although the Traitors' Protectron medical robot was able to patch up several wounded Grenadiers and get them back in the fight.  |
| Stormtroopers of the 501st make a precision drop and attack traitor militia grenadiers with superheated plasma. |
The only other Xhorik forces to arrive are a second squadron of Recon bikers, as part of the flanking attack from the south. Both squadrons of bikers attack the Traitor Leman Russ holding that side of the outpost with demo charges and breacher charges, managing to inflict enough damage to shake the concentration of the crew.
++01.59 North Bunker++
Meanwhile, at the north end of the outpost, the lascannon Tarantula team continues its automated firing protocol and destroys the Traitor Leman Russ Vanquisher, turning the battle tank into a smoking wreck.
 |
| A Traitor Vanquisher battle tank burns as advance elements of the drop force encircle the objective. |
 |
| 02.00: The Stormtroopers arrive at the objective alone and attack the Traitor Grenadiers. Tarantula guns destroy a Vanquisher tank while recon bikers harass the southern flank. |
 |
| Traitor reserves arrive from the north and two Tarantulas are destroyed, neutralizing their anti-tank capabilities. |
++02.03 Relay Station AN-09++
 |
| Led by their commander, Traitor grenadiers launch a fierce counterattack against the Stormtroopers of the 501st. Their flamers are particularly deadly against the closely-packed Loyalists. |
 |
| 02.05: The Traitor Malcador enters from the north, punishing the Tarantulas as the Grenadiers clear the area around the Relay Station of the first wave of drop troopers. |
 |
| In a hard-fought melee between the bikers and the Grenadiers, the Traitor Commander kills the lead biker with a white-hot blast of plasma from his pistol. |
 |
| 02.10: The 2nd platoon finally arrives, dropping mostly along the northern side of the outpost. |
With an entire platoon of drop troopers arriving and heading for the Relay Station, things suddenly looked desperate for the Traitor sentry force. They needed to quickly clear the area of attackers.
The Leman Russ battle tank at the southern edge of the outpost backed away from the meltagun squad that had been attacking it and fired its battle cannon into their midst. When the smoke cleared only a single trooper out of the six remained uninjured and able to continue the fight.
The Traitor commander knew he had to protect the tower at all costs. Over the din of the ongoing melee, he ordered his unengaged Grenadiers of Squad Beta to the eastern side of the tower to help attack the 1st Infantry Squad that had landed almost on top of the Relay Station and was close enough to start planting demo charges. He and his men of Squad Alpha then injected a massive dose of their combat chems and surged over the Xhorik bikers like madmen, ripping several from their bikes and stabbing them repeatedly with bayonets as they lay on the ground. The surviving bikers desperately tried to turn their bikes to flee the crazed Traitors. In the confusion, the White Bolt squadron was swarmed and destroyed while the Black Bolt squadron managed to flee the deadly melee.
 |
| 02.15: The Traitors counterattack the newly-arriving drop troopers and win the melee in the center. |
At the sight of their commander dropping in nearby, the recon bikers of the Black Bolt squadron regained their discipline and regrouped in preparation to support the final push on the central tower.
++02.18 Relay Station AN-09++
Xhaer ordered all units to assault the central objective while the Sentinels engaged the tanks. The 2nd Infantry Squad made a short drop as their Valkyrie slowed down to hover near the Relay Station. It lit up the area with its searchlight while the door gunners rained down heavy bolter fire into the Traitor Grenadier Squad Beta on the near side of the tower. Many Traitors fought on despite taking horrendous injuries that would kill a man, thanks to constant medical work from their Protectron and massive amounts of painkillers. Their resilience forced all all the nearby infantry squads to focus their fire on Squad Beta as well until the Traitor unit was finally wiped out. Although their refusal to die easily prevented most of the Loyalists from reaching the Relay Station.
Sensing his opening, Lieutenant Tarvar ordered his small platoon command squad to run for the tower. They scrambled up the rocks and through the gap held by the remnants of 1st Infantry Squad on one side and the Tauros on the other. Despite the distance and the hard climb, the men's training had paid off; they reached the Relay Station and prepared to set their explosives. They were the first to arrive and could accomplish the mission if they could just hold out long enough.
 |
| The Valkyrie floods the battlefield with light from its searchlight as Xhorik infantry attack the Traitor Grenadiers. |
 |
| 02:20: The Loyalists surround and destroy Traitor Grenadier Squad Beta while the platoon command squad reaches the Relay Station and prepares to destroy it! |
++02.23 Relay Station AN-09++
The tank crew responded by landing a battle cannon shell right in the midst of the squad, killing or maiming them all, leaving their explosive charges un-set and thereby preventing the destruction of the Relay Station.
For Lieutenant Tarvar, everything went black...
 |
| The Malcador destroys the platoon command squad with its battle cannon, saving the Relay Station, at least for now. |
 |
| 02.25: The situation is desperate for the Traitor garrison but they manage to destroy the platoon command squad before they can set their charges. |
The battle between the Sentinels and the Leman Russ Demolisher came to a climax when a multimelta blast penetrated the front armor of the tank and started a chain reaction of explosions, eventually engulfing the tank in a massive eruption.
 |
| One drop sentinel lights up the Traitor Demolisher with its searchlight and the other scores a direct hit with its multi-melta, obliterating the tank in a massive explosion as a Valkyrie screams past overhead. |
 |
| As the Valkyrie lights up the area, the 2nd platoon infantry charge up to the Relay Station from all directions and prepare to plant their demolitions. |
 |
| 02.30: Loyalist forces assault the Relay Station in an attempt to set the demolitions. |
++02.32 Relay Station AN-09++
But when the smoke cleared, a handful of shaken and temporarily-deafened drop troopers still stood and continued their task.
In furious rage, the Traitor Commander cuts down one of the recon bikers his unit is engaged with. He knows he cannot stop the Loyalists now.
 |
| Xhorik infantry is caught in a cross-fire between two battle cannons that takes 14 men out of action. |
 |
| 02.35: Traitor battle tanks pour fire into the drop troopers and kill many, but survivors emerge from the smoke, determined to fulfill their mission. |
Captain Xhaer stumbled forward, his ears bleeding and his vision swimming. At the last second, one of his men had shoved him down and thrown himself on top of him, shielding him from the worst of the shrapnel. When the explosion subsided, he had rolled the dead man's bleeding body off of himself and struggled to his feet. All around him where the bodies of his men, torn apart from the blast. He tried to clear his vision and ignore the ringing in his ears and keep his focus on the mission. He saw a handful of men left standing in the area between the two massive blasts. With a shout, he called them back to their senses and they finished installing their explosive charges.
The surviving drop troopers then dove for cover as the detonation began.
 |
| The surviving Xhorik drop troopers detonate their charges on the objective. |
 |
| For a moment, the darkness of night is replaced by a light brighter than the sun as Relay Station AN-09 erupts in a blinding flash. |
 |
| 02.40: Infantry of the Xhorik 87th 3rd company, 2nd platoon plant their demolition charges on the Relay Station and destroy it, accomplishing their mission objective. |
Loyalists Win!
"Go! Go! Go!" shouted Xhaer as he jumped aboard. The Valkyrie lurched suddenly into the air as the sound of explosions echoed around them in the night.
Tarvar was in agony. He felt burning over most of his body. He could barely see. His mouth tasted blood. He tried to speak and a gurgling cough of blood erupted instead.
"You're alive, sir. Don't worry, we're getting out of here." Tarvar recognized the voice as Sula, one of the men of melta stick. "We did it, sir. We blew it sky high. Now time to go home."
Tarvar closed his eyes and tried his best to make what he hoped was a thumbs-up with his left hand, the one not wearing the power fist. He just hoped he had a thumb left to raise.
"Too bad the medic didn't make it..." he heard Sula mutter.
The next thing Tarvar felt was the stab of a needle and a numbing coolness washing over the burning pain. His jagged breaths became easier and he passed into blissful unconsciousness.
I agree that this mission allowed the Drop Troopers to really shine and show their merit. After so many stand-up missions against traitor marines, fighting toe-to-toe, and getting rightfully walloped, THIS mission was against fair competition and with a singular objective that could be won through speed, tactics and precision. I was loving seeing my new army, all painted up on the filed of battle, but I was nearly as excited to see Phil’s boys finally show off their best qualities. And a really thematic battle - kind of like a good war, action movie! Those troopers came screaming in via drop packs, bikers & a Valkyrie! Landing right into the perimeter of the station, guns blazing!
I appreciated that we made a gentleman’s agreement to allow me to start my Leman Russ battle tank squadron guarding the objective, as two measly cultist squads alone did not stand much of a chance. And having a night battle with markers down so the Drop Troopers didn’t know what they were up against?!? So cool. Plus, having tanks defending, allowed the Drop Troopers to have really gnarly targets for all that Melta and demo charges. I admit that they probably couldn’t handle the Malcador as easily, but Leman Russ tanks are very killable – and blow up in spectacular fashion they did.
I think I played a pretty good game for what I was up against and for what I was able to bring to the table. Of course another two squads of cultists to bog down Phil’s rapidly approaching squads would have been ideal, and makes it supremely obvious what I need to add to my new army next. The two squads of grenadiers performed well and were tough outs, but there just was too much firepower against them. And I need a close combat focused squad for this army. You can’t always be shooting at range – at some point the Loyalists and Drop Troopers will be assaulting. If I could go back and change one decision, it may be to keep my eye on the prize and not have the Malcador spend so much time focused on the lascannon tarantulas. We needed every single available shot against all those troopers, and I shouldn’t have worried about my pretty new tank getting blown up on turn 6 or 7.
But again, really great game. Fun to play and fun to re-live with this battle report. Kudos Phil! Looking forward to the next scrap between these two armies.
Even with all of the gentlemen's agreements to make the game more enjoyable and balanced, we both tried our best to guide our armies to victory. My strategy to neutralize a few tanks and then focus on the Relay Station worked well. It was a surprise to me when the game started and I learned that the Malcador had armored ceramite! (Do all the big tanks in Horus Heresy get that option?! It makes it tough for an army that relies on melta for its anti-tank...) But once I knew that, I decided to not even try to hurt that beast as I would be wasting my limited firepower. I had to clear his infantry and then swarm the objective with too many units for him to stop them all. Pete's Grenadiers were extremely resilient with their medics and their strong morale from their Provenances of War. It ended up being pretty close in the end. I only cleared his Squad Beta in turn 4 so I could charge in turn 5 so I could win in turn 6. That is the challenge for the attacker in this scenario - you have to stay in melee contact for a full game turn so if you wait until the last turn to make your charge, it is too late! And of course his remaining tanks could (and did!) wipe out a unit per turn once my guys were bunched up in melee so I would not have survived much longer. The main thing that saved me was that I was able to land a penetrating hit here and there on the tanks and shake their crew, preventing Pete from firing their big blast weapons. Otherwise I may not have had enough men at the end to make my big push. I am sometimes still not sure what I see in a Guardsman army without tanks and who's special ability is to get closer to the enemy faster in a way that leaves them clustered together and exposed in the open! But they got it done this time and I salute those brave souls with their flimsy armor and lasguns.
It was a great game played in the spirit of fun and style. I spent a lot of time on the battle report, trying to do justice so such a cinematic scenario and armies. Now we are already planning how to make the next one even more exciting and interesting...
No comments:
Post a Comment