
We used our custom mission cards and each drew a random, secret mission. For a list of the missions, see the previous battle report.
Pete drew Take and Hold. After putting back his first choice, Phil drew Assassinate and had to play it face up.
Rolling for the shape of the deployment zones yielded opposing corners. Phil won the roll to choose his deployment zone and chose the southwestern corner. Pete won the roll to go first and chose to deploy and go second.
 |
| View of the battlefield from the south. |
ARMY SELECTION: 850 Points
Death Guard Eradication Patrol - Pete
- Praetor Wolfgang: Terminator armor, Paragon Blade, volkite charger, digilasers
- Tactical Squad Stärke: 14 marines with close combat weapons, sergeant with power fist and artificer armor
- Tactical Support Squad März: 7 marines with volkite calivers
- Heavy Support Squad Tragen: 3 marines with missile launchers
- Contemptor Dreadnought Friedrich: multi-melta, meltagun, dreadnought close combat weapon
White Scars and Drop Troops RAPTOR Team- Phil
White Scars, Brotherhood of the Wind
- Consul Kuyuk: Power glaive, bolter, cyber-hawk
- Tactical Squad Kheeg: 10 marines
- Tactical Support Squad Khoer: 5 marines with plasma guns
- Legion Outrider Squad Anchin: 3 bikes with twin-linked plasma guns
- 2nd Platoon (remnants): 13 auxilia troopers with lasrifles
- Grenadiers: 12 grenadiers, melta gun, grenade launcher
- Tauros (counts as attack bike with heavy bolter)
- 2 Sentinels with lascannons
Deployment
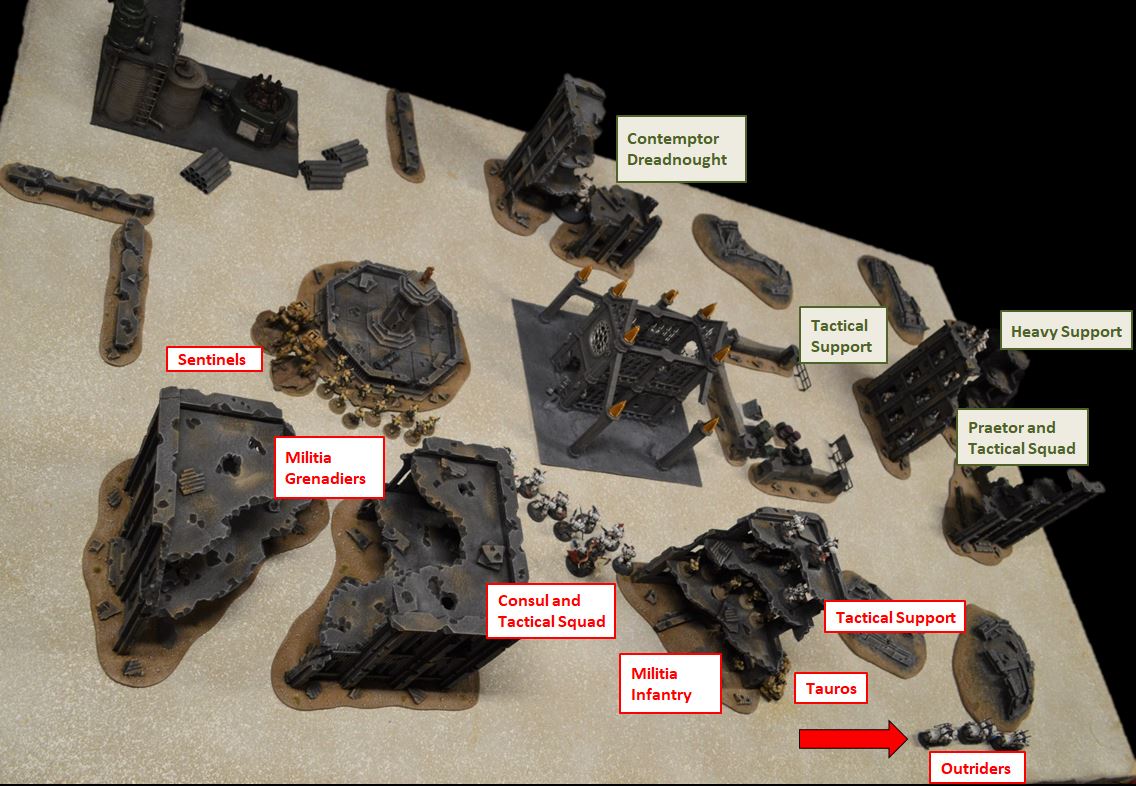 |
| Deployment and scout moves. No units were held in reserve. |
White Scars Deployment and Plan:
Phil: Deploying first without knowing Pete's mission was a guessing game. I spread my forces across the center of the table so I could contest either of the objectives. With small armies on a medium size table, there is always a risk that my slower-moving units could be left mostly out of the fight if Pete deployed in a refused flank configuration with all his units concentrated at one end of his deployment zone. This had put me in a tough starting position in several of the previous battles and in this fight I would be without the ability to Deep Strike (since I was using the Imperial Militia army list), which would greatly limit my mobility. To protect against this as much as possible, I put my infantry in the middle and my units with Scout (Outriders and Sentinels) on the flanks so they could at least use their free move to get closer to the action if there were no enemies nearby.
I put two infantry units in the central/eastern ruin to have a good view of the eastern half of the table and to add some durability from cover to my squishy militia infantry. Their job was to hold that area of the table in case his mission was Breakout or Take and Hold.
Death Guard Deployment and Plan:
The strategy would be to feign defending my table edge, only to streak out (as fast as Death Guard can) on turn three to secure the objective for the win. My HQ choice would be out of danger the first two turns and then hopefully Phil would have less firepower to threaten him once in sight.
The Dreadnought would be available to strike at Phil’s lascannon wielding sentinels., which left
unchecked could alter the outcome of the game. Sniping off marines from 48 inches away with impunity would be bad.
 |
| The militia infantry and White Scars Tactical Support squads hunker down in a ruined building with a good view of the center of the battlefield. |
 |
| Tactical Support Squad Khoer scans the ruined city from some high ground. |
 |
| Heavy Support Squad Tragen hold a ruined building overlooking the supply depot. |
 |
| Consul Kuyuk and the loyalist infantry stalk through the ruins, searching for their prey, the Death Guard Praetor Wolfgang. |
 |
| Two sentinels with lascannons provide fire support for the grenadiers. |
 |
| The unstoppable war machine Friedrich emerges from the roiling dust clouds of the ruined city. |
 |
| The ruined building on the eastern edge of the battlefield is crowded with a mass of Death Guard infantry. |
White Scars Turn 1:
Phil: It was pretty clear from his deployment that Pete's mission was either to defend his deployment zone or capture the Take and Hold objective. Either way, his refused flank deployment left most of my army out of position and out of range of any suitable targets, so the tactical squad and the grenadiers just ran toward the main Death Guard position. My auxilia squad and tactical support squad in the ruins held their positions where they could cover the objective and threaten any of his units that approached it. The bikers moved along the southern edge to get into position for an attack next turn. I knew if I threw them straight at his massed forces with no support they would be easily decimated, so I wanted to wait a turn for more of my forces to arrive and force him to split his fire a bit more.
With most of the army running or out of range, shooting was uneventful and no damage was inflicted.
 |
| The White Scars begin their advance by running into the ruined cathedral toward the Death Guard. |
 |
| The grenadiers follow the space marines toward the distant enemy infantry while the sentinels are unable to hit the enemy dreadnought emerging from the ruins. |
 |
| White Scars Turn 1: Most units advance toward the Death Guard. With the entire Death Guard army hunkered down in cover, shooting is ineffective. |
Death Guard Turn 1:
Pete: I sent my dreadnought forward and unleashed his multimelta on the sentinels, thankfully knocking one out of commission. I liked my chances against the remaining sentinel who only hit on a 4+, and I could rely on my 5+ inv. force field for some added defense.
The marines stayed hunkered down in cover, as per the plan. They fired out at Phil’s in-range targets
with only minor success. Advancing out into the open on this turn would have obviously resulted in a
bloodbath, as all the White Scar units would be within their weapon’s ranges on turn 2.
 |
| Friedrich emerges and opens fire on the sentinels. |
 |
| His multimelta easily destroys one of the light Imperial walkers. |
 |
| Death Guard Turn 1: The Contemptor Dreadnought moves up and destroys a sentinel. The rest of the army remains stationary in the ruins and fires at the oncoming White Scars. |
White Scars Turn 2:
Phil: Since his forces were not going to be leaving their cover and they had the advantage of range, it looked like I would have to attack him in his base. The tactical squad moved forward and fired their bolters to no effect. The grenadiers continued to run, probably wishing they could have used deep strike! The Outriders moved behind his lines and killed a few of the tactical support squad armed with volkite calivers. The remaining sentinel missed again.
 |
| The Grenadiers continue to move through the ruined city toward the enemy as fast as they are able. |
 |
| The Outriders attack the Death Guard Tactical Support Squad from the rear and bring down a few with their plasma guns. |
 |
| The Loyalist forces approach the supply depot objective through the ruins. |
Death Guard Turn 2:
Pete: The bikes did serious but acceptable casualties to the volkite squad and would have been even deadlier if it weren’t for the cover bonuses they gained (although not realistically deserved).
I had seen time and again in previous battles that Phil’s White Scar tactical squad couldn’t stand up to
the dreadnought in close combat, and I saw my opportunity to change targets from the sentinels to the
still very dangerous marines nearing the objective. I sent Fredrich lumbering toward the cathedral.
The volkite calivers had the range and strength to knock out the Scar’s plasma gunners from our ruined building to theirs. That 30” range and strength 6 is killer. And who cares if their target is marines in cover – they would have received their saving throws anyway!
 |
| The Death Guard take advantage of their fortified and elevated position and fire into the oncoming Imperial forces. |
 |
| Contemptor Friedrich moves to intercept the White Scars before they can reach the Death Guard infantry. |
 |
| Turn 2: The Death Guard deal some serious damage to the White Scars and begin to take control of the field. |
White Scars Turn 3:
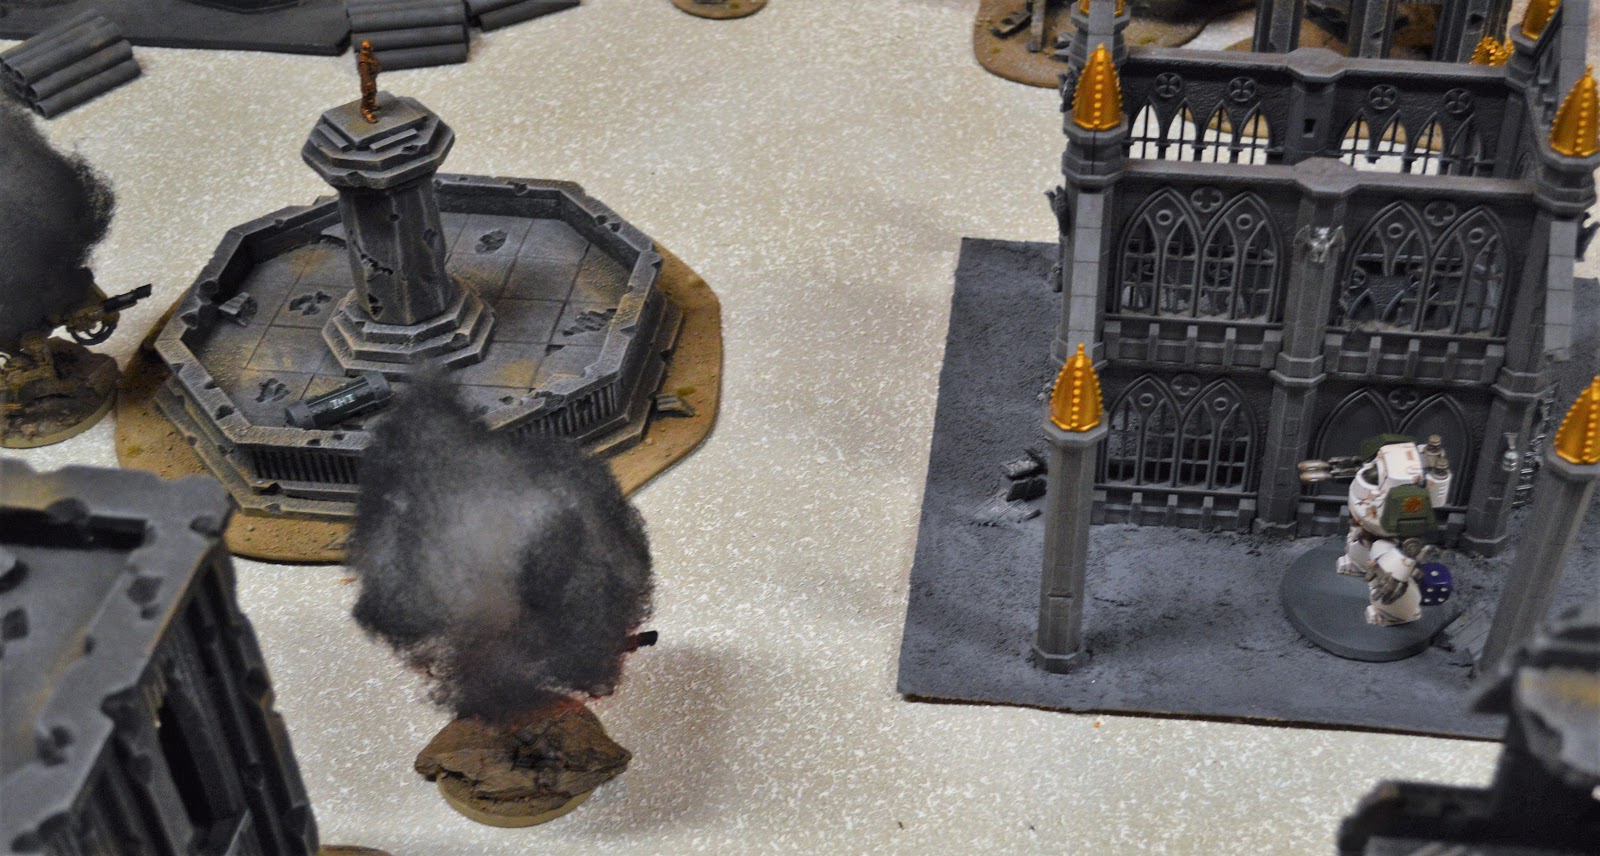
Phil:The remaining sentinel moved to line up a shot on the dreadnought. He finally scored a hit and destroyed the dreadnought close combat weapon. Everything else that was in range fired at the heavy support squad with the missile launchers and killed two.
 |
| The White Scars and their militia allies continue to march toward the Death Guard fortified position. Finally in range, they fire and bring down a few of the traitors camped out in the ruins. |
 |
| The second sentinel continues to pursue his mission of eliminating the enemy walker. He finally scores a hit and destroys the dreadnought's power fist. |
Death Guard Turn 3:
Pete: Losing the dreadnought close combat weapon was the worst weapon to lose now that the objective was hand-to-hand combat with the tactical squad. Lo and behold the Contemptor rushed in and killed a grand total of zero marines! Embarrassing yes, but he still accomplished his mission of holding-up the main Scars force still on the table.
Finally, time to advance Wolfgang and his retinue out of the ruins and toward the objective. The battle had gone to plan and Phil’s army no longer posed a serious threat to knock out my warlord.
 |
| The Death Guard finally emerge from the ruins and begin to march toward the supply depot. |
 |
| Being much faster than he looks, Freidrich charges the White Scars infantry. Their bolters, power glaives and krak grenades are useless against the armor of the mighty construct. |
 |
| With his power fist destroyed, Friedrich is unable to kill any tactical marines. |
 |
| Turn 3: The White Scars continue to approach under a withering hail of fire while the Death Guard infantry leave the ruins to approach the supply depot objective. After taking heavy casualties, the grenadiers break and fall back. |
White Scars Turn 4:
Phil: With Pete finally making a move out of cover, I deduced his mission must be Take & Hold and not Hold the Line. Luckily, the grenadiers rallied. Everything fired at the large tactical squad and the Praetor moving toward the Take & Hold Objective. When the smoke cleared, only two tactical marines had fallen; not enough to slow the implacable advance of the Death Guard.
In the melee, I had to try to break off or my unit would be tied up for the rest of the game with no chance of harming the dreadnought and no chance of contributing to my mission or denying Pete his objective. Being stuck in melee the rest of the game would be just as bad as being dead. If I was going to have a chance at killing the Death Guard Praetor, I needed my last remaining marines. So I decided to roll the dice (literally!) and made the desperate attempt to flee. But just like last time, the entire unit was wiped out in a sweeping advance, crushing any remaining hope I had of stealing a win or draw.
 |
| The Grenadiers rallied and fired at the advancing Death Guard infantry, trying desperately to hold them back from reaching the objective. |
 |
| The White Scars infantry try to fall back from the dreadnought so they can engage the enemy commander and complete their mission. But the fury of the dreadnought causes the unit to scatter from the field. |
 |
| White Scars Turn 4: The mighty Contemptor Dreadnought destroys the center of the White Scars force and essentially seals the game for the traitors. |
Death Guard Turn 4:
Pete: Dread was looking pretty weak, but when Phil chose to roll the dice and break off from combat, his tacticals were wiped off the battlefield. So I guess all’s well that ends well. This also freed up the Dread from close combat, so I turned him on the last sentinel and cooked him. All that was really left now was the grenadiers and guardsmen, so I knew I had victory in hand. March forward to the objective and claim another prize for Warmaster Horus.
 |
| The dreadnought destroys the other sentinel with its melta weaponry, getting revenge for the damaged power fist. |
 |
| The Death Guard march up to claim the supply depot unopposed. |
 |
| Death Guard Turn 4: The last of the loyalists are killed or driven from the field as the Death Guard claim the objective. The last White Scars Outrider flees in order to bring news of the defeat to his commander. |
Result: Traitors Win
Loyalist Post-Game Analysis:
Phil: Yeesh... yet another game where I was basically tabled by the end of turn 4 and where I only managed to bring down a handful of Pete's models. I think I had around three guardsmen and one Outrider left (besides the fleeing Grenadiers) and I had only killed maybe six of Pete's marines. And of course I was nowhere close to achieving my objective.
When I look back at this game, it was pretty much sealed after deployment. It seems that the information advantage Pete had by knowing my mission without me knowing his, combined with deploying second gave him such a strategic advantage that I was out of position the entire game and could never get anything going. I give him credit; he played the situation really well and had the patience to execute his plan. If anyone has any ideas on what I could have done differently, I would be glad to hear it.
This campaign has been an utter beat down for me so far, with Pete more-or-less tabling me in four out of five games so far (I only had models left in most games because we didn't play the last turn) and me only barely stealing my one win because Pete failed a 4" charge. I'm not sure my army so far can stack up against his at this point in our builds.
Traitor Post-Game Analysis:
Pete: I have to agree with Phil on this one, knowing the opponent’s objective and seeing their entire army deploy before putting a model on the table of my own probably stacked the deck too far in my favor. It would have taken a lot of poor dice rolling and decision making on my part to lose this one. But with the situation I had I think I played it about right. Why sacrifice models needlessly early in the game when a major source of cover was available a short distance from the objective? Also, I could have more evenly divided my forces to try to further confuse my opponent as to which mission I had, but why bother with all the slight-of-hand tricks when I knew that if I deployed everything in that one quadrant I almost couldn’t be beaten? And I think if I would have overlooked the sentinels and not sent my dreadnought after them, it may have been enough unchecked lascannon shots over 4-5 turns to make a big difference in the outcome of the game.
All-in-all it was a fun game as always. Our plan is to not play this campaign again until we each have a new unit to add to the fun! I’m currently working on a second tactical squad with a rhino dedicated
transport. This should give me slightly more maneuverability for my army and really up the coolness
factor of our games. I know I need more models on the table and more scoring units able to secure
objectives. From my perspective, it’s getting to feel like the old days of marines playing orks with all of Phil’s guardsmen strewn across the table!
No comments:
Post a Comment