"The bigger they are... the harder they hit."
- Sergeant Albrecht,
Death Guard Legion
Campaign To Date:
As the Horus Heresy rages across the galaxy, the Xhorik System is engulfed in civil war. On the planet of Xhorik Prime, the traitors have been on the offensive, gaining ground and mostly pushing the loyalist forces back to the northern badlands. Despite a few successful raids and ambushes, the White Scars and their allies have mostly been taking the worst of the conflict and have been forced back to their stronghold on the snowy Vaalbara Plateau, pursued by the relentless Death Guard.
With control of the only major space port in the vicinity, the half-ruined city of Bielyr, the Death Guard are able to bring in a super heavy battle tank to further increase the pressure on the loyalist forces.The White Scars sent a kill team to attempt to disable the tank while it was still making final preparations to leave the port, but they ran into a rival Death Guard kill team protecting the crucial reassembly and armament facility. The White Scars were only able to cause modest damage to the facility, which would slightly delay the tank's arrival to the war zone.
Meanwhile, Praetor Wolfgang of the Death Guard was preparing to launch his assault on the loyalist fortification known as Bunker Tauruk, knowing he had to strike before enemy reinforcements could arrive. As it stood, he would be starting the assault outnumbered, but he had to trust that his men had done their job and that his super heavy war machine would arrive in time to carry the day.
++++++++++++++++++++++++++++++++++++++++++++++++++++++++++++
Praetor Zhalitai Zherdan watched the Death Guard forces approaching through the dry swirling dust and ice. Raw hatred burned inside him at the sight of the former heroes who had broken their vows, murdered their own brothers, and tore asunder the great accomplishment of humanity, the Empire of Man. He closed his eyes, channeling his anger to a cold focus on the death of his enemies. He gripped his power glaive and felt as one with with the ornate and flawless weapon.
No help would be arriving until tomorrow, at the earliest. His small force was on their own. Wolfgang surely knew it as well, which was why he was attacking now.
Zherdan scanned the horizon for any sign of a large dust plume indicating the approach of the Death Guard Fellblade. If Sergeant Khaljyk and his kill team had succeeded and the Fellblade was unable to join the assault, he was confident he could turn back the traitor tide here today. But if Kill Team Sürel had failed... he knew he had little chance of stopping the monstrous machine with the firepower he had available. He knew his best chance was to find and slay Praetor Wolfgang, cutting the head from the snake and giving his reinforcements time to arrive and launch a counter attack.
As the Death Guard advanced nearly into range, he finalized the positions of his men, gave his last orders, and positioned himself in the center of the fortification, ready to strike out at any enemy that dared approach too close.
++++++++++++++++++++++++++++++++++++++++++++++++++++++++++++
PRE-GAME AND MISSION:
We played a modified version of Blood Feud, the first of the original six Horus Heresy missions. This mission awards victory points for destroying enemy units, as well as Slay the Warlord and a bonus VP for the side with the most units left at the end of the game. Additionally, each side picks a specific type of unit to kill for bonus victory points. To stay with the story of the campaign at this point, we decided that Pete (Traitors) would be trying to destroy the loyalist fortification and we counted each individual bunker of the Castellum Stronghold as being worth an extra VP. For the Loyalists, we thought it would make the most sense to target the enemy vehicles as the biggest threat so we made each vehicle (rhino, dreadnought and Fellblade) worth an extra victory point. Both of these were slight variations from the actual rules, but seemed fair since each side could earn up to three extra VPs. We also decided that a destroyed unit would be worth a number of VPs relative to its point cost rather than all units being worth one victory point: 0 - 100 pts = 1 VP, 101 - 200 pts = 2 VP, etc.
Finally, with the previous Kill Team game being a draw, we decided that the Fellblade would be available for the battle, but would be in "Delayed Reserve" which meant a 6+ roll to arrive in Turn 2, 4+ to arrive in Turn 3, and would automatically arrive in Turn 4.
Pete setup the terrain and we mutually decided on the deployment zones to accommodate the large fortification. Phil won the roll to go first and elected to do so.
ARMY SELECTION: 1700 Points
Death Guard - Pete
- Praetor Wolfgang: Terminator armor, Paragon Blade, volkite charger, digilasers
- Apothecary Wilhelm
- Apothecary
- Tactical Squad Stärke: 14 marines with close combat weapons, sergeant with power fist and artificer armor
- Tactical Squad Ritter: 10 marines with close combat weapons, sergeant with power fist and artificer armor, rhino with heavy flamer
- Tactical Support Squad März: 7 marines with volkite calivers
- Heavy Support Squad Tragen: 3 marines with missile launchers
- Contemptor Dreadnought Friedrich: multi-melta, meltagun, dreadnought close combat weapon
- Fellblade Super Heavy Tank
White Scars - Phil
White Scars, Brotherhood of the Wind
- Praetor Zalitai Zherdan: Master-crafted power glaive, bolter, iron halo, cyber hawk, digilasers
- Tactical Squad Kheeg: 10 marines with close combat weapons, sergeant with power glaive and artificer armor
- Tactical Support Squad Khoer: 8 marines with plasma guns
- Sicaran Omega Tank Destroyer Kharvaak: Omega Plasma Array, heavy bolter and lascannon sponsons
- Castellum Stronghold with two twin-linked lascannons and a twin-linked heavy bolter
Imperial Fists, Boarding Party
- Terminator Squad: Plasma blaster, volkite charger, two power fists, chainfist, lighting claws
Kozar Army Auxillia
- Infantry squad: 20 infantry with lascarbines
- Grenadier squad: 12 grenadiers with melta gun and grenade launcher
- Sentinels: 2 sentinels with multi-meltas
- Tauros: counts-as Legion Attack Bike with autocannon
BATTLE:
 |
| The White Scars and their Imperial Fist and Kozar Army allies defend their base as the implacable Death Guard slowly approach. Luckily for the defenders, Kill Team Sürel partially succeeded in their mission and at least delayed the Traitors' massive new weapon of war. But for how long? |
 |
| The two armies face off across the frozen Vaalbara Plateau. |
 |
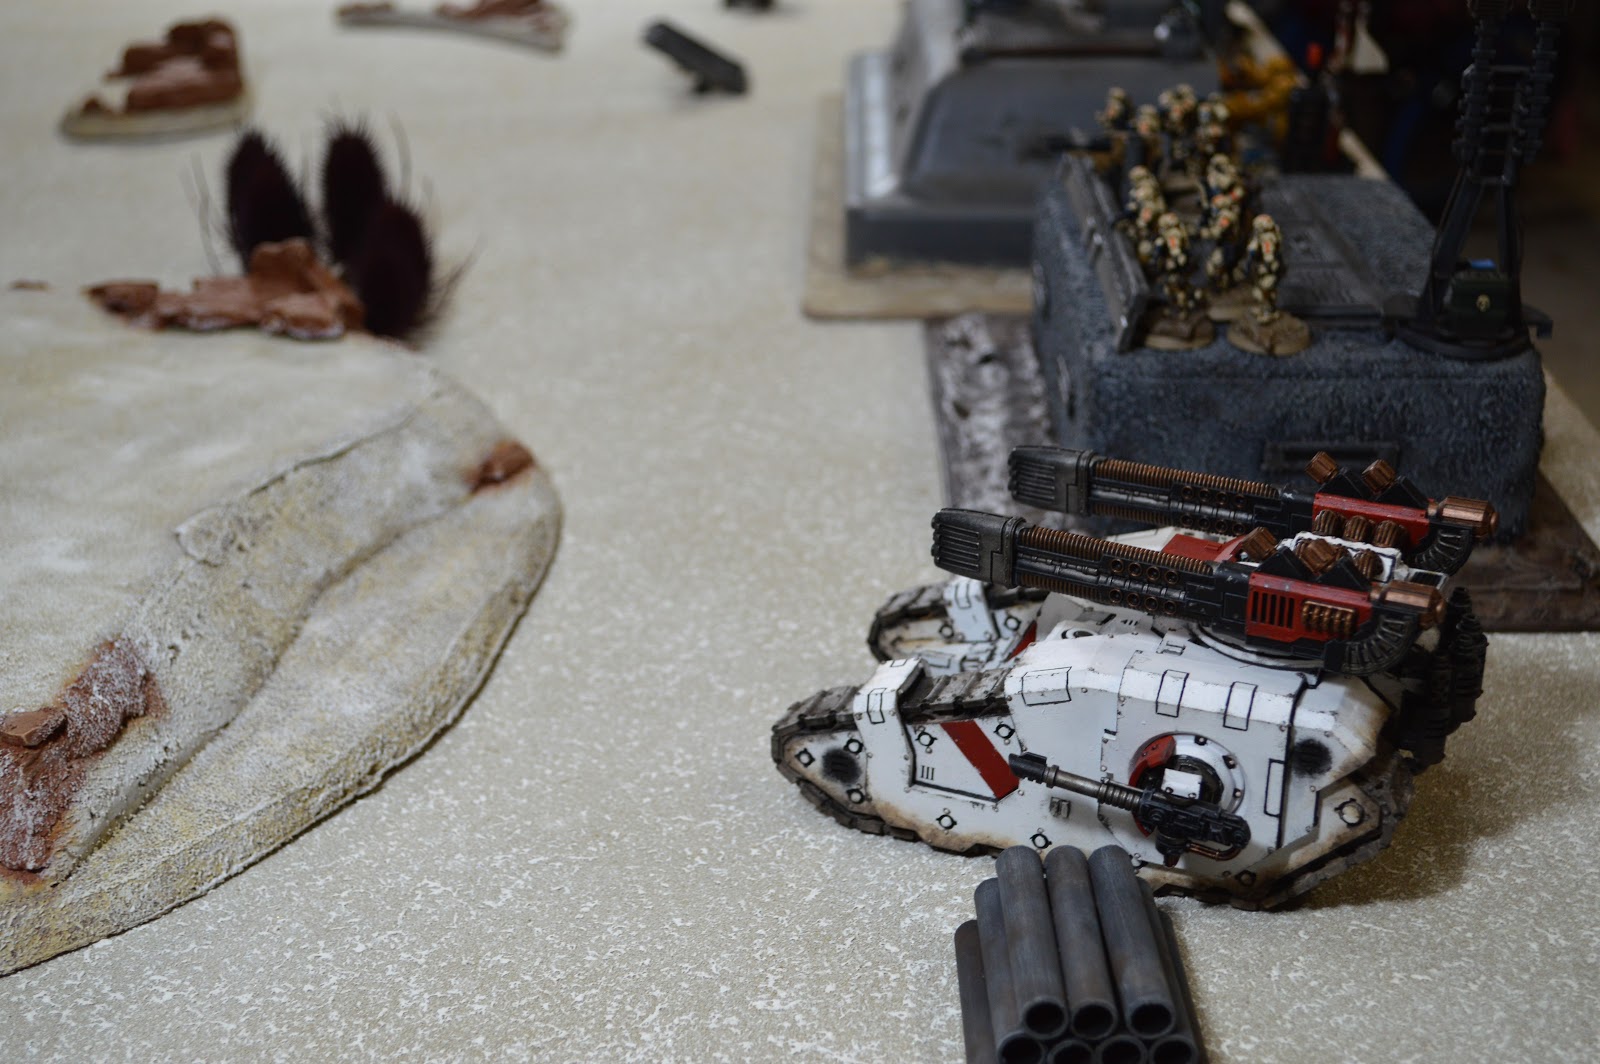
| The Brotherhood of the Wind Sicaran Omega Tank Destroyer III, Kharvaak, protects the right flank of the bunker complex. |
 |
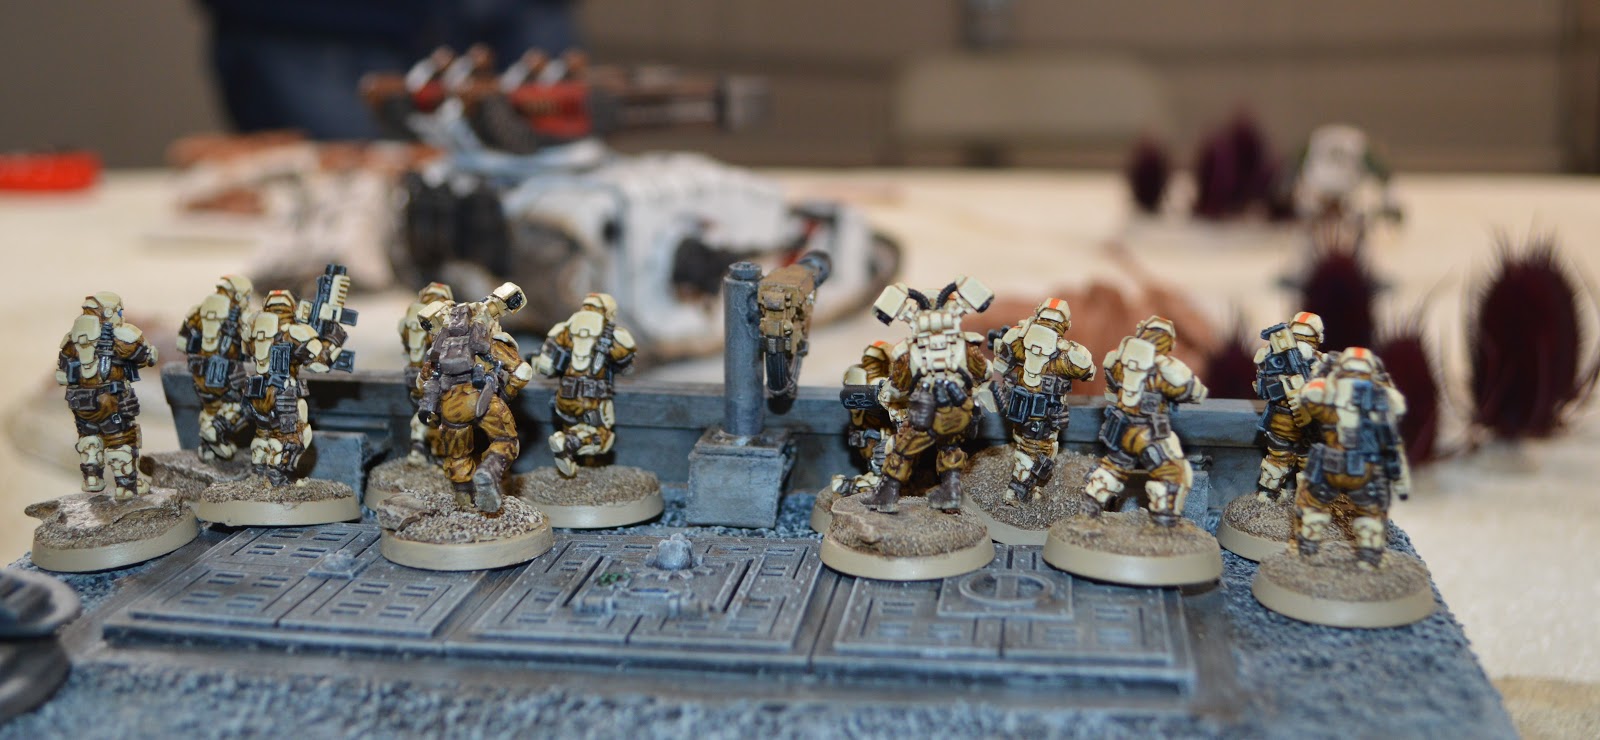
| Kozar Army mobile units patrol the left side of the outpost. |
 |
| The light vehicles look to spot and intercept any enemy flanking maneuvers. |
 |
| The Death Guard approach over the horizon, massed infantry marching forward through the bitter cold winds. |
 |
| Their heavy weapons teams take up positions in the rocky outcrops in the center while Wolfgang leads his men into the canyons in an attempt to approach the bunkers out of sight of the defensive weaponry. |
 |
| Squad Ritter in their Rhino advance on the Traitor right flank, along with Contemptor Dreadnought Friedrich. |
 |
| The Tauros drives in front of the bunker and opens fire on the Death Guard heavy support squad with no effect. |
 |
| The brave men have little hope of survival against the superhuman Death Guard, but they fight on nonetheless. |
 |
| The Sicaran Kharvaak advances onto the hill and lines up the Contemptor dreadnought Friedrich in its sights. |
 |
| The Kozar Army Grenadiers fire the emplaced lascannon at the approaching dreadnought. |
 |
| The White Scars tank fires everything at Friedrich, but the ancient construct shrugs off the hits from the tank and the fortifications' weapons emplacements. |
 |
| The Loyalist vehicles advance on the flanks but their firing does no damage to the durable Death Guard. |
 |
| The Death Guard infantry in the center and left begin their assault on the Loyalist base. The support squad easily destroys the lightly-armored Tauros assault vehicle with their volkite calivers. |
 |
| Wolfgang orders his men forward through the badlands, keeping out of sight as they advance on the bunkers. |
 |
| Sergeant Albrecht and Squad Ritter take their rhino over the hill and around the flank of the White Scars Sicaran, attempting to catch the tank in a pincer between them and the dreadnought. |
 |
| Friedrich advances and returns fire on the Kharvaark, but the armor is strong enough to absorb the melta blast. |
 |
| Seeking to avoid the encirclement, the Sicaran Omega Tank Destroyer reverses back down the hill while firing at the rhino. |
 |
| The rhino is destroyed and Sergeant Albrecht leads his men from the wreckage. |
 |
| The lascannons on the bunkers blast Friedrich, damaging and stunning the walker. |
 |
| The sentinels hold back out of sight of the enemy heavy weapons, waiting for Traitor targets to approach within the short range of their multi-melta weapons. |
 |
| The Death Guard gain ground and push the defenders back, but take some damage. |
 |
| Praetor Wolfgang and his men continue to slowly advance through the broken ground, not wanting to rush in without the support of the Fellblade. |
 |
| The heavy weapons squad looses a volley of frag missiles at the grenadiers on the ramparts, but the cover and the skills of their medicae limit the casualties. |
 |
| With his weapon systems stunned, Friedrich runs forward, trying to reach the Loyalist bunker with his mighty power fist. Sergeant Albrecht also advances. |
 |
| Squad Ritter charges the Sicaran, using a combination of krak grenades and Albrecht's power fist to wreck the tank. |
 |
| The wreckage of the White Scars tank burns and smokes, while the Death Guard maneuver for cover behind it. |
 |
| The Death Guard continue their unrelenting advance, wading through the Loyalists' fire with impunity. |
 |
| Praetor Zherdan's cyber hawk, Aztai, soars over the Death Guard, feeding back detailed targeting information to the White Scars tactical support squad in the bunker. |
 |
| The plasma gunners in the bunker fire at Wolfgang's squad and kill two of the Death Guard. |
 |
| The Loyalist bunkers remain undamaged as the Death Guard advance closer. |
 |
| The Traitor center continues to provide fire support, killing a Grenadier hunkered down behind the bunker ramparts. |
 |
| Friedrich fires both of his melta weapons at the bunker, doing significant damage before charging in and tearing through the wall with his power fist, causing a partial collapse that kills one of the occupants. |
 |
| Friedrich attacks and does serious damage to the main Tacticus Bunker of the stronghold while Praetor Zherdan and the terminators prepare to sally forth. And both sides continue to exchange fire from a distance. |
 |
| Praetor Zherdan and the Imperial Fist terminators race around the corner and assault Friedrich. The combat is a stalemate as the dreadnought takes some damage, but remains upright. |
 |
| The ground shakes as the fearsome Fellblade finally rumbles over the horizon. |
 |
| The behemoth lines up its accelerator cannons at the central bunker. |
 |
| And the Fellblade immediately makes its presence felt by destroying the central structure of the Loyalist fortification. |
 |
| The White Scars exit the bunker to face off against the approaching Death Guard. |
 |
| The White Scars miss the chance to charge and are instead assaulted by the Death Guard. Both sides lose a man or two to sporadic fire as they close ranks. |
 |
| Sergeant Khaljyk of the White Scars and Sergeant Albrecht of the Death Guard face off. Khaljyk is quicker with his glaive and strikes down Albrecht. |
 |
| On the other side of the battlefield, Praetor Wolfgang urges his men forward, embolded by the arrival of his massive war machine, the Fellblade. His squad fires at the sentinel, disabling it with massed bolter fire. |
 |
| In the center, the power fists and chain fist of the terminators finally bring down Friedrich, the mighty walker crashing down in a smoking heap. |
 |
| Bolstered by the arrival of the Fellblade, the Death Guard redouble their assault on the stronghold all along their lines while the defenders launch desperate counter attacks. |
 |
| On the Loyalist left, the Kozar Grenadiers leap down from the bunker and join the fray. |
 |
| A few more Death Guard were killed and the rest scattered from the field, with no hope of breaking through to the bunker. |
 |
| Sergeant Khaljyk leads his men back toward the approaching Death Guard on the right flank. |
 |
| With the Death Guard driven off, the Grenadiers hold the bunker unopposed. |
 |
| The Kozar Army infantry that survived the blast pour out of the rear of the collapsed bunker and make their way toward the approaching Death Guard. |
 |
| Praetor Zherdan and the terminators also move toward the right flank to challenge Praetor Wolfgang and his men. |
 |
| To bring more of their firepower to bear, the tactical support squad climbs to the roof ramparts and fires everything at the approaching Death Guard infantry, but only manage to kill two. |
 |
| One of the terminators drops another traitor with his a shot from his plasma blaster. |
 |
| Despite being in a crossfire between a sentinel with multi-melta, eight plasma guns, and the terminators, even with the help of the cyber hawk, only three of the Death Guard are felled, thanks to the skills of apothecary Wilhelm. |
 |
| The White Scars strike back, clearing the bunker perimeter of threats, but they have no answer for the Fellblade. |
 |
| The Fellblade rolls forward and begins punishing the loyalist positions with its firepower. |
 |
| Zherdan and his terminators are exposed in front of the super heavy tank. It pounds them with its Demolisher siege cannon, the blast killing a terminator and sending Zherdan flying backward into the bunker, knocking him out of the fight. |
 |
| The Fellblade's other weapons continue to pound the Loyalists, along with the heavy weapons teams in the rocks. Another terminator is killed along with three tactical support marines on the bunker. The rest decide it is folly to stand against such a monstrosity and fall back behind the bunker. |
 |
| The Traitors use superior firepower to cripple the Loyalist elite units and knock out their commander. |
 |
| The plasma gunners quickly rally and creep out from behind the bunker, ensuring they are out of sight of the Fellblade. |
 |
| All of the Loyalists' remaining firepower is turned upon Wolfgang and his men. |
 |
| The Loyalists fire everything at Wolfgang's men, but can only bring down two of the Death Guard who again prove their reputation for endurance. |
 |
| The Loyalists surge to their right and throw everything they have left at Wolfgang and his unit, but are unable to inflict enough damage. |
 |
| The Fellblade continues to pound the Loyalist positions, killing some infantry and one of the terminators. |
 |
| A lone Imperial Fist terminator stands defiant as the entirety of the Death Guard army fires upon him. After surviving fire from a Demolisher siege cannon, a quad lascannon, 7 volkite calivers and three missile launchers, he is finally finished off by a torrent of bolter fire from Wolfgang's squad. |
RESULT:
Loyalists: 8 Victory Points
Rhino: 1
Tactical Squad Ritter: 2
Contemptor Dreadnought: 2
Bonus for vehicles destroyed: 2
Last Man Standing: 1
Traitors: 11 Victory Points
Tauros: 1
Sicaran Omega: 3
Praetor: 2
Terminators: 3
Bonus for bunkers Destroyed: 1
Slay the Warlord: 1
Loyalist units remaining: Castellum Stronghold, sentinel squadron, tactical squad, tactical support squad, infantry squad, grenadier squad: 6
Traitor units remaining: Fellblade, Praetor, tactical squad, tactical support squad, heavy support squad: 5
Traitor Victory!
++++++++++++++++++++++++++++++++++++++++++++++++++++++++++++++
Rousing himself from a swirling sea of blackness and pain, Zherdan heaved himself to his knee. The main bunker was destroyed, most of his men were dead, and the Fellblade was rolling toward him. He stumbled to his feet, clinging to the rubble of the bunker for support. He knew he had suffered significant injuries from the battle cannon blast and his last remaining men were already falling back before the approaching super heavy tank. Their only hope was to fall back into the mountains and rendezvous with the reserves that he knew were coming.
One of his legionaries saw him staggering through the smoke and rushed to his side to help him. As they fell back into the mountains, Zherdan gave one glance back at the handful of men chosen to stay behind and die defending the fortification so that the rest could escape. They will die with honor, on their feet, fighting the greatest enemy we have ever known, he thought.
With the help of his men, he staggered into the mountains, the smoke of the burning bunkers rising behind them.
+++++++++++++++++++++++++++++++++++++++++++++++++++++++++++++++
POST-GAME:
Loyalist Post-Game Analysis:
Phil: That was a really cinematic battle, with the Loyalists defending their fortified positions against the advancing Traitors, under the impending threat of the arrival of the super heavy Fellblade at any moment. I thought the "delayed reserves" rule for the Fellblade turned out perfectly: it added suspense, built up the drama around the big tank's debut in the campaign, and helped balance its dominance in a game where it doesn't fit within the 25% points limit for Lords of War. It was fun to have that amazing model in a game and see what it can do, without being on the wrong side of its Accelerator cannon and Demolisher siege cannon for six turns.
Our first use of fortifications also gave us something else new to add to the mix, with decisions to be made about placing squads inside or on the ramparts and when to stay inside and when to charge out. The fortifications have some interesting trade-offs. They greatly increase the survivability of the units inside, but severely restrict their mobility (including the restriction of charging only from the exit points) and firepower by only being able to shoot a few shots through the fire ports.
The only disappointment in this great game was my poor tactical decision making. The scenario was fair and could have gone either way, but I made some silly blunders that severely cost me:
- I should not have shot the rhino on turn 2 with the Sicaran. By destroying it, I gave them a free disembark and an extra 3" of movement closer, leading to their ability to charge in their turn and wreck my tank, which they would not have been able to do had I just left them in the tank. I just served him my tank (and 3 VPs) on a silver platter, like a fish that jumps into the fisherman's boat. Argh, so dumb!
- I should have had my commander break off from the terminators when they went to engage the dreadnought. He could not add anything to the fight since he could not penetrate the vehicle's armor and I was just throwing him out in the open in front of my lines as a sitting duck to be blown away for absolutely no reason. This gave Pete 3 crucial victory points and may have single-handedly determined the outcome. What was I thinking?!
Of course, there were plenty of smaller mistakes and I forgot about the Swift Action special rule (again), the bunkers' save against shooting attacks, Scout moves, etc., etc., but those two errors were so bad in hindsight that I could not fall asleep after the game. This should have a been a close game with an exciting dramatic finish, but I never felt the final result was ever in doubt going in to the final turn. Besides learning the rules better, maybe I need to worry less about the photos and note taking for the battle reports and focus more on the game or else this campaign will continue to be pretty one-sided! Maybe Pete can take a turn being the chronicler next time. I am not too worried about winning and losing, but I would like the games and reports to be exciting and suspenseful down to the finish and for the campaign to live up to the background and setting.
Despite those dumb moves, it really wasn't as lopsided as it felt to me at the end. Looking back, I still had a chance of scoring 3 VPs on the last turn if I could have brought down Wolfgang (2 kill points + 1 Slay the Warlord) and the next wounds would have hit him as the closest model. Or if that terminator could have survived those last few shots (3 VPs). Oh, well. All you can do is learn and get better. The campaign must go on. The Loyalists were forced to flee their stronghold, their only goal now is survival and escape, so that eventually they can get their revenge.
Traitor Post-Game Analysis:
Pete:


Rules Correction: The tactical squad in the Rhino should not have been allowed to charge the turn after they are forced to disembark from a destroyed vehicle.
ReplyDelete