Monday, February 22, 2021

Deredeo Pattern Dreadnought

Now that the Traitors have taken most of the key spaceports of Xhorik and driven the remaining Loyalists into the mountains, fresh supplies and equipment can be brought in to tighten the Warmaster's grip on this key planet. The first unit Preator Wolfgang requested as support for his continued campaign against the White Scars and Kozar Army was a Deredeo Pattern Dreadnought for some much needed anti-aircraft firepower. 

This dedicated heavy weapons platform combines superior firepower with the flexibility, mobility and durability of a dreadnought chassis.  

Wolfgang's prized new toy comes equipped with an Arachnus Heavy Lascannon Battery, a torso mounted twin-linked heavy bolter, and a carapace-mounted Aiolos Missle Launcher. A Helical Targeting Array gives the Deredeo Skyfire and Interceptor if it neither moves nor runs during its turn.


Sunday, February 21, 2021

Sons of Horus Army Update

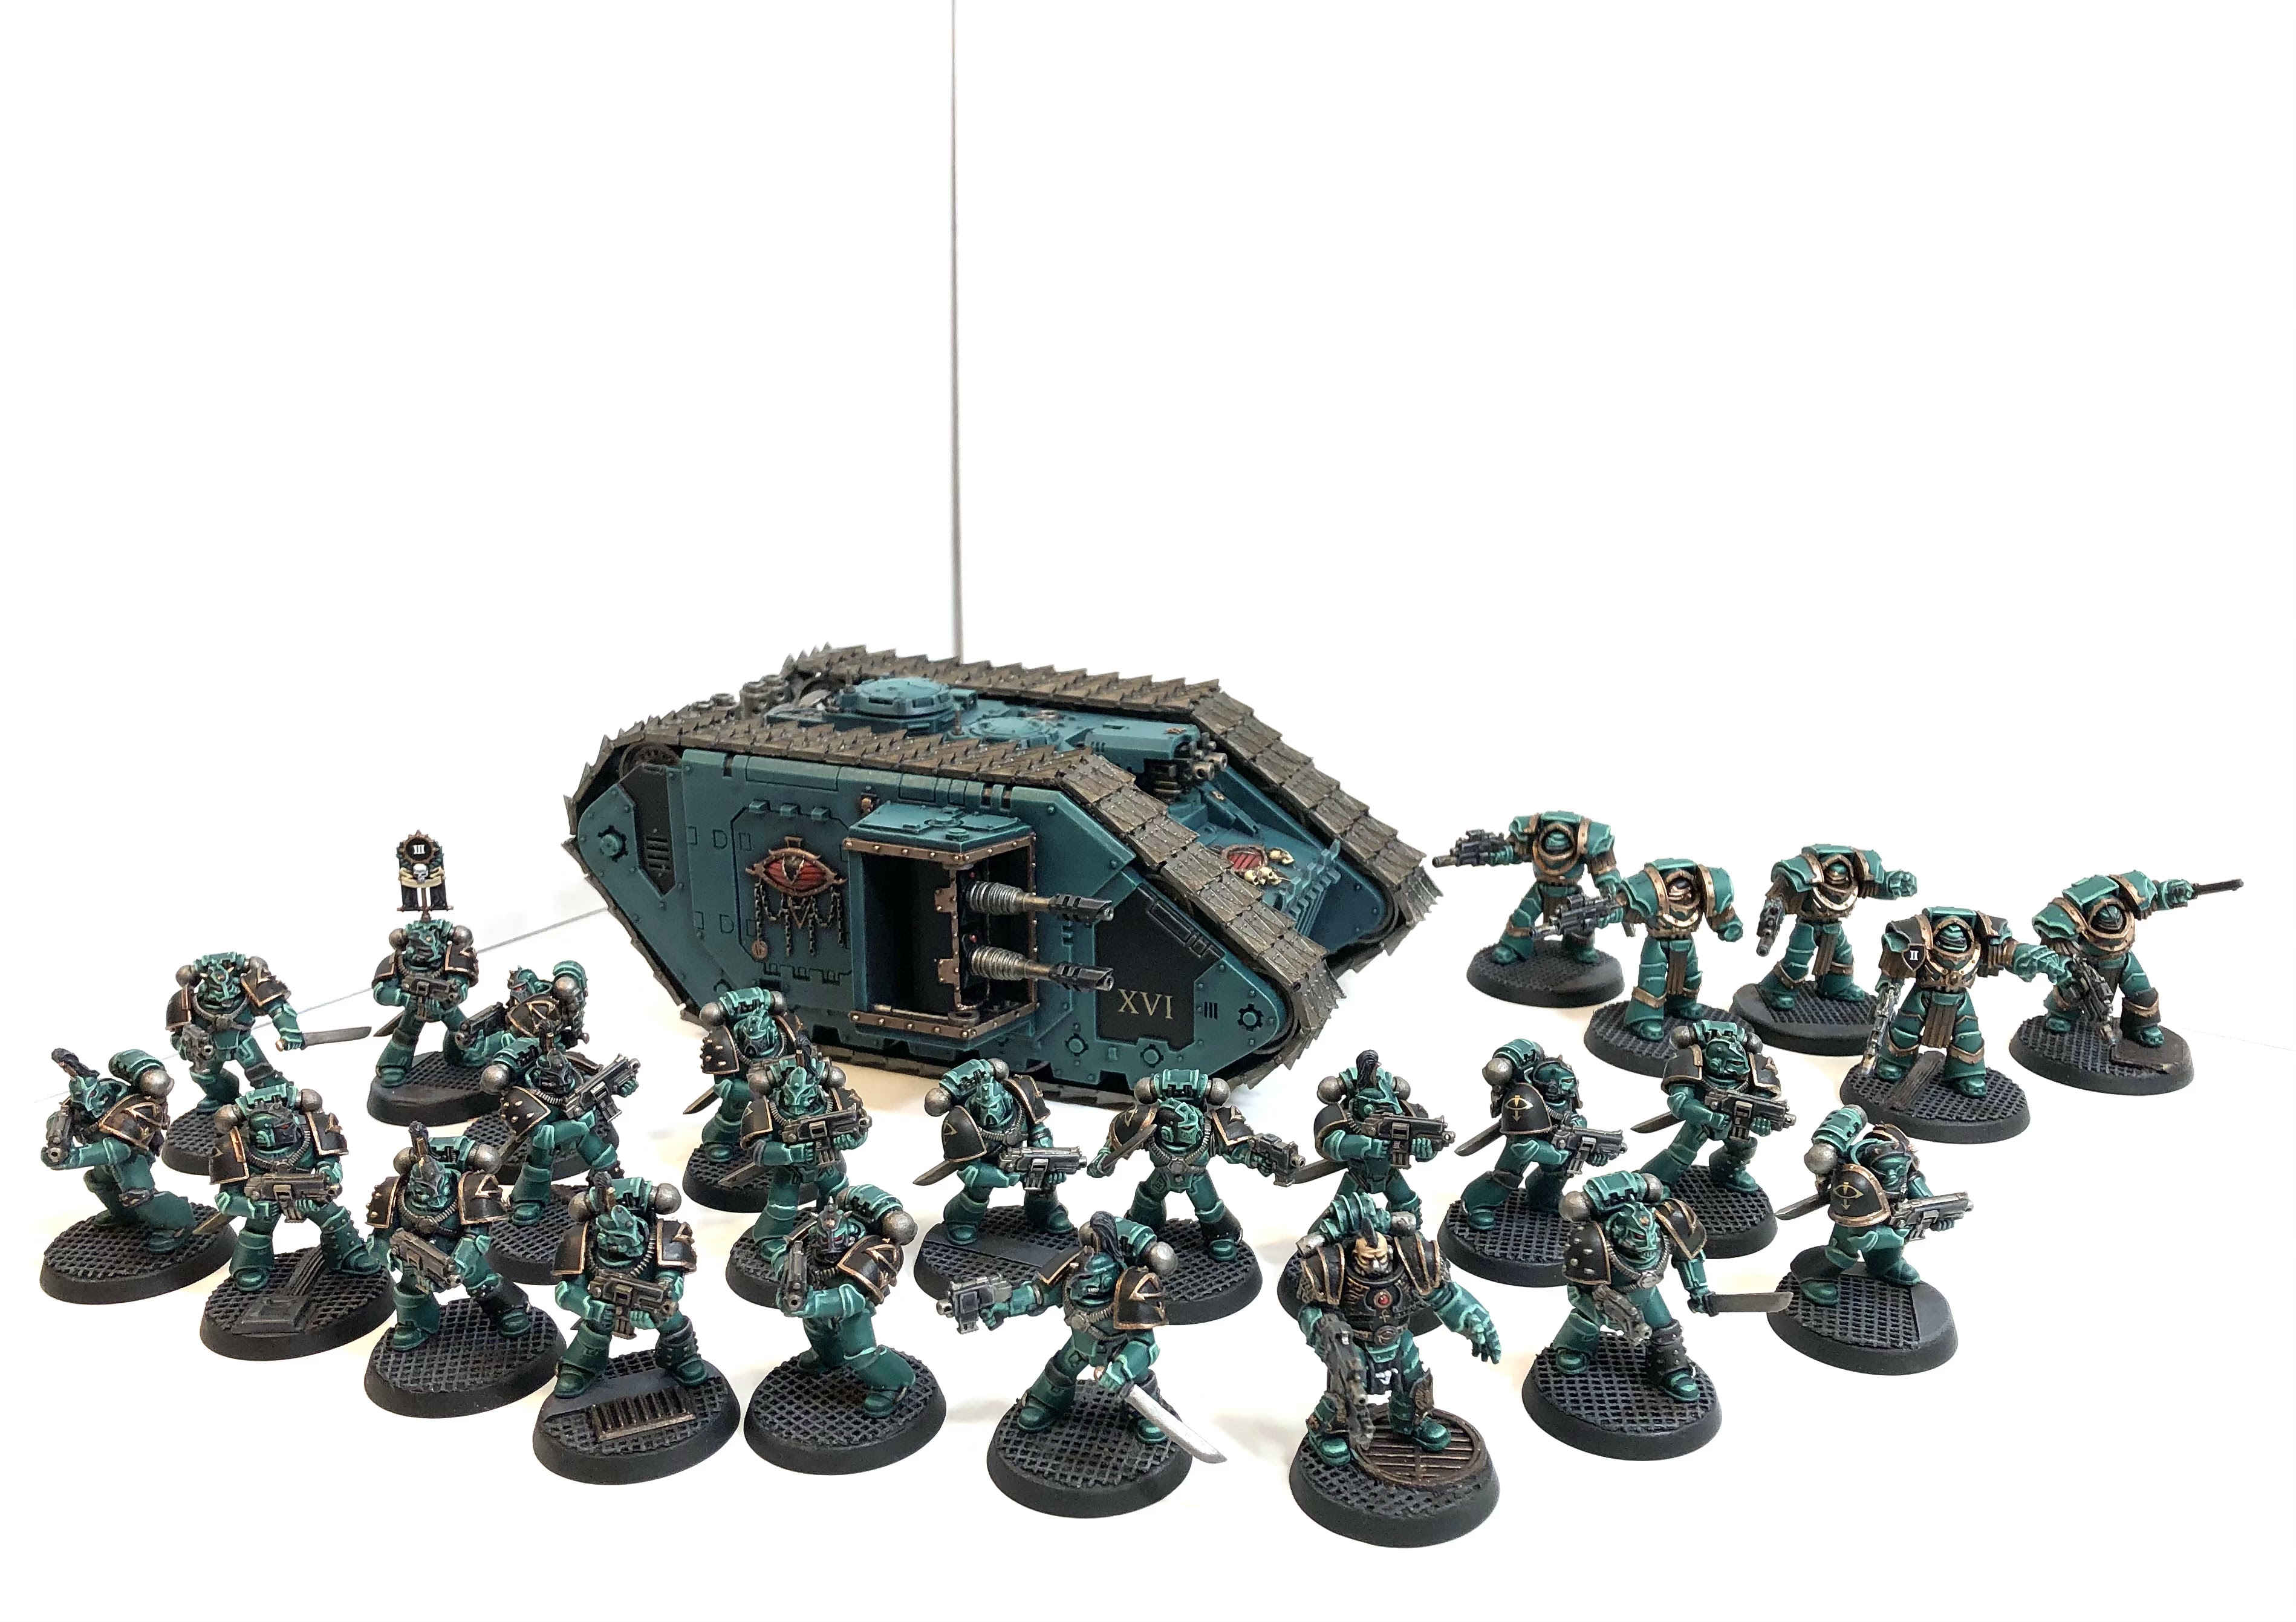
The Sons of Horus so far:

  • 20-man tactical squad with additional close combat weapons, vexilla and sergeant with artificer armor and power fist
  • 5-man Cataphractii terminator squad with combi-meltas, 3 power fists, 2 chain fists
  • Land Raider Phobos with two twin-linked lascannons and twin-linked heavy bolters


Saturday, February 13, 2021

New Terrain: Antenna Tower

 Is it a radio tower, a forcefield generator, a radioactive reactor or something else? This versatile piece should make a good objective in a variety of games.


Tuesday, February 9, 2021

The STEEL Legion

 The Steel Legion I ordered over a month ago finally arrived. It is amazing to get these old metal models. GW has changed just about all of their metal sculpts to their Finecast resin so I haven't actually bought a new metal model in years - maybe a decade - until these. These truly are the STEEL Legion. And at $35 for ten, they are the same price as the cheapest plastics and feel like a steal compared to anything from Forge World.


And he even has a slottabase!


Just handling these old metal models again in a great feeling. They certainly would be a pain to do any conversions, and of course every squad looks exactly the same in all the same poses, but you can't complain about the assembly time! They need some straightening of gun barrels and quite a bit of flash cleanup and mold line removal, but overall pretty fast compared to assembling Elysian Drop Troopers and all their little fiddly bits. And these guys are a great scale for Horus Heresy marines - they precede the massive scale creep that has bloated the miniatures more and more over the years and eventually led to the heresy of Primaris marines. 

Sunday, February 7, 2021

Next Campaign: Loyalist Imperial Guard vs Traitor Space Marines?

I have been brainstorming ideas for the next campaign and my favorite idea so far is to have the Imperial Army launch an invasion to take back Xhorik Prime from the Traitors. But let me hear what ideas you have.


Operation Downfall

In campaign for Xhorik Prime, the Traitors were victorious and have conquered most of the populated areas of the main continent. The small detachment of White Scars on Xhorik Prime have been defeated, their forces shattered and the cities lost. A few isolated bands of White Scars remain, scattered and uncoordinated. They can mount the occasional raid, but they have no ability to hold ground or face the Traitors in open battle. With all Imperial forces pulled away from hunting orks in the east to fight the Traitors in the west, the orks have regrouped and started mounting raids on the human cities again. 

During the weeks of the Xhorik Prime campaign, Loyalist forces on Xhorik Secondus have been mobilizing an army to oppose the Traitors. Although they had a Planetary Defense Force (PDF), they lacked the capacity to quickly launch an expedition onto a war-torn planet. By the time, they were ready to attack, Kozar had fallen and the Traitors had taken control of most of the (human-)populated areas of the main continent. To recapture the planet before the army of Horus arrived in the system, the Imperial generals on Xhorik Secondus would have to take a dangerous gamble: to launch an invasion of a hostile planet - and with minimal space marine support.

The planned invasion was dubbed Operation Downfall and consisted of three parts. The first step would be a night drop by several dozen regiments of drop troopers around the invasion landing sites. The drop troopers were to disable enemy planetary defenses, disrupt communications, and capture key bridges that would allow the invading Imperial army to quickly breakout from the landing zones before the Traitor forces could fully respond. In the second phase, the main army would land at space ports in enemy territory and secure a beachhead to hold open the supply lines. The final phase would be a push to crush the heart of the Traitor territory in the Federation of Unimund. 

Many of the generals thought the plan was suicidal. Sending an army of humans, no matter how well prepared and numerous, to launch a massive interplanetary invasion against the most elite warriors in the galaxy sounded like folly. Their only chance was to take the Traitors by surprise, and establish a firm beachhead, enabling a constant stream of reinforcements with which to grind down the outnumbered space marines in a war of attrition. If the invasion failed to establish a toehold before the Traitors responded in force, they would be mercilessly crushed.  


Campaign Phase 1: Night Drop

The first phase of the campaign takes place during the night preceding the main invasion as dozens of regiments of drop troopers make a combat drop to secure the landing zones for the fleet. This phase consists of several games that take place more or less simultaneously as different companies of the Xhorik 87th Drop Troops make their drops with different objectives.  Even though night drops are dangerous and full of confusion, it was deemed the best way to take the Traitors by surprise and accomplish their objectives before greater force could be applied. 

All games of Phase 1 use the Night Fighting and Hidden Setup rules for the entire game, unless specified otherwise. This represents the darkness and the general confusion both sides found themselves in during the nighttime raid. All scenario rules are as per the WH40k 4th Edition Rulebook (2004 edition).

Scenarios:

Hold at All Costs: Represents the Traitors defending a key position such as a road, bridge or hill that the attackers must take to enable the invasion (Hold the Objective)
Patrol: This represents small bands of Loyalists, scattered by their night drop, trying to meet up and find their objective who then bump into a Traitor patrol searching for the invaders. Both sides must eliminate the other. (Kill Points)
Sabotage: This represents the attackers attempting to destroy a key installation, such as force field generator, missile silo, or planetary defense turret. (Destroy/Protect the Objective)

After these three missions are played, a final battle is fought. The final battle takes place at dawn just as the main invasion is about to start so the Night Fighting rules only apply to the first two turns.

If the defenders win 2 out of 3, the final battle is Meat Grinder as the attackers throw everything they have at a desperate attempt to clear the Traitors from the landing zones. The defender has the advantage and so can choose to re-roll the results to see if the game ends.

If the attackers win 2 out of 3, the final battle is Ambush as the attackers have completed their mission and setup to in hiding to destroy a Traitor column heading for the landing zones.  The attacker has the advantage and so can choose to re-roll the results to see if the game ends.

For balance, I propose all WH40k non-space marine infantry have their costs reduced by 25%.

So what do you guys think? Any other ideas?


Saturday, February 6, 2021

Campaign Phase 4, The Battle for Berat: Game 5 - The Decisive Moment

  "The Battle for Berat was a decisive moment for the planet of Xhorik Prime during the Horus Heresy. And the action around the central industrial area was the decisive moment of that Battle."

- The Xhorik Wars:
The Military History of a Keystone System Across the Millenia


Campaign To Date:

It has been about 40 years since a combined force of Sons of Horus, Death Guard, and White Scars brought the Xhorik System into compliance during the Great Crusade. The major population centers of the largest continent were quickly brought under Imperial control in the typical fashion: a series of pinpoint attacks of overwhelming force by the Legions against the enemy's strong points, followed by rapid surrender. Due to the richness of the primary planet and the strategic location of the system on a sort of crossroads of warp currents, small garrisons of the Death Guard and White Scars legions were left on the planet to oversee the tithes of men and material to the Great Crusade and to help eradicate the threat of large ork populations in the eastern wastes.

With the advent of the Horus Heresy, the Warmaster ordered that the Xhorik System be taken to act as a way station for resupply on his long march to Terra. The Death Guard and their human allies on Xhorik Prime launched an attack on the White Scars and their allies, the Stratocracy of Kozar.

In Phase 1 of the campaign, the Traitors pushed the Loyalists from the war-torn border city of Bielyr in a series of bloody street fighting.

In Phase 2, the war escalated across the badlands of the Valbaara Plateau in several pitched battles. In the end, the Brotherhood of the Wind was defeated and their leader Praetor Zherdan was killed by the Death Guard.

In Phase 3, the Death Guard marched to the major Kozar city of Berat, fighting their way through a number of Loyalist counter attacks. In the end, helped by taking control of low-planetary orbit over the city in a void battle, the Traitors smashed through the outer walls of Berat behind the might of their super heavy Fellblade battle tank.
---------------------------------------------------------------------------------
Phase 4 is the battle for the Kozar city of Berat. The Traitors have broken through the gates and are working their way toward the city center block by bloody block in a brutal street fight. This Phase uses a number of special rules:

Campaign Points: CP are earned by playing games and by achieving secret secondary campaign objectives (drawn randomly each game and kept secret). They can be used to gain advantages in games. The player with the most CP at the end of the phase wins.

Normal games:
Win: 5 CP
Draw: 3 CP
Loss: 1 CP

Final Game:
Win: 10 CP
Draw: 6 CP
Loss: 2 CP


  • Spend 1 CP to re-roll the die to deploy first or to re-roll the die to steal the initiative. Can only be used once per game.
  • Spend 1 CP to include a unit that would not be allowed due to the Grinding Attrition or Street Fighting special campaign rules below. The point cost of the unit still counts toward the army total. Can only be used once per game.
  • Spend 1 CP to re-roll the die to see if the game ends. Can only be used once per game.

(Special rules apply for the final scenario.)

Hunter Killers: Due to the very dense terrain providing ample hiding places, surprise attacks are extra deadly. Units who used Infiltrate, Scout or Outflank can charge the on the first game turn or the turn they come into play. If they don’t charge, they gain an extra +1 cover save for their first turn in play (stacks with any bonuses they have already).

Street Fighting: Narrow streets, debris, billowing smoke and crumbling towers limit the ability to utilize large vehicles and artillery. Other than the final battle, a max of one total unit can be selected with any of the keywords: heavy, artillery, flyer, or over 3 HP. In the final battle, everything goes.

Grinding Attrition: Other than Troops choices, any unit that is destroyed cannot be used in the next battle. If the next battle is the final battle, it can be taken but must start in reserves. Any unit that is selected as Troops choice can be used even if it was destroyed in the previous battle.

Named Warlord: Choose your warlord trait. Must be the same for the whole phase. Can also can always re-roll LD and morale checks. Other warlords must roll for trait.

If named warlord dies in battle, roll die:
1-2: debilitating injury: can't use in the rest of the campaign phase until final battle
3-4: major injury: can't use in next game
5: close call: no effect
6: Miraculous Recovery (Chosen of the Emperor/Horus/gods of Chaos): can use as normal and has an inspiring presence for the next battle: all units within 12" can use his LD.

The Revenant: Once warlord returns after dying in a game, he has Hatred (Traitors/Loyalists) for the rest of the campaign phase.

Our standard Terrain Rules are in effect.


Pre-Game and Mission:

We created a new scenario: The Decisive Moment

Army Selection: 4000 Points

Traitors - Pete

Death Guard
  • Preator Wolfgang: terminator armor, volkite charger, paragon blade, digital lasers, rad grenades, Fearless, It will not Die
  • Deathshroud Terminators with hand flamers, power scythes and rad grenades
  • Tactical Support Squad Folterer: 8 marines with flamers and melta bombs, sergeant with artificer armor. 
  • Tactical Squad: 14 marines with close combat weapons, sergeant with power fist and artificer armor and Apothecary Gerhard
  • Tactical Squad Toddestraffe: 10 marines with close combat weapons, sergeant with power fist and artificer armor. Mounted in a Rhino APC with a pintle mounted heavy flamer.
  • Heavy Support Squad Feuer Sturm: 7 marines with missile launchers and Apothecary
  • Predator Mittel Panzer 021 with Predator Autocannon and lascannon sponsons and Machine Spirit
World Eaters
  • Chaplin Zungarz: Artificer Armor, plasma pistol, refractor field, crozius arcanum
  • Tactical Squad Hell Hounds: 17 marines – 16 with bolters, bolt pistols and chain axes. 1 sergeant with artificer armor, power fist and plasma pistol
  • Reconnaissance Squad Butcher's Eyes: 5 marines with power armor, sniper rifles, cameleoline
  • Unending Slaughter: Terminator squad with lightning claws 
  • The Red Butchers: 1 Devoured with dual chain fists, 4 Butchers with dual power axes
  • Land Raider Phobos Flesh Grinder: side sponson twin-linked lascannons, twin heavy bolter, armored ceramite, machine spirit 
  • Contemptor Dreadnought Delrog the Diabolicawith twin-linked lascannon and chainfist
  • Predator Severing Cut with Predator Autocannon and lascannon sponsons and Machine Spirit

Loyalists - Phil

White Scars Brotherhood of the Wind 
  • Khan Turan Jorma: jetbike, paragon blade, cyber hawk
  • Centurion Champion Subotei: power glaive, refractor field, artificer armor
  • Skyhunter Squadron Khujaa: 6 jetbikes,  2 x volkite culverin
  • Tactical Squad Temgar: 10 marines with close combat weapons, sergeant has power glaive, artificer armor with Rhino with multimelta
  • Recon Squad Chono: 10 marines with recon armor and camo cloaks, sergeant with power fist and artificer armor
  • Outrider Squad Tsujen: 5 Outriders with plasma, sergeant
  • Tactical Support Squad Khoer: 8 marines with plasma guns, with Drop Pod
  • Ebon Keshig: 10 terminators, 8 power glaives, 2 power fists, 1 melta gun
  • Sicaran Omega Tank Destroyer Flamespear: lascannon sponsons
  • Primaris Lightning Strike Fighter Ariunbold: twin-linked lascannon, 6 x Kraken Heavy Penetrator Missiles, Battle Servitor Control, Ground-tracking Auguries, Ramjet Diffraction Grid

Kozar Army, Berat Garrison
  • Force Captain Xhaer: plasma pistol, iron halo, familiar, Warrior Elite, Duck and Cover (Cyber Augmented)
  • Platoon command squad: power fist, 3 grenade launchers, vexilla, vox caster
  • Medicae: 2 medics
  • Infantry Platoon Secondus: lascarbines
  • Fire Support Squad Septima: 6 fire teams with heavy flamers
  • Recon Squad Decima: 5 infantry with sniper rifles and camo cloaks
  • Recon Squad Tertius: 5 infantry with shotguns and a demolition charge
  • Grenadier Squad : 11 infantry, 1 with plasma gun
  • Arvus Lighter with lascannon and 2 hellstrike missiles
  • 3 x Tarantulas sentry guns with twin-linked lascannon
  • Tarantula sentry gun with heavy bolter
  • 2 x Sentinels with lascannon
  • Tauros with grenade launcher
  • Medusa Siege Cannon with 2 extra crew
++++++++++++++++++++++++++++++++++++++++++++++++++++++++++++


++++++++++++++++++++++++++++++++++++++++++++++++++++++++++++


Battle:

The Decisive Moment

Each army sends a powerful contingent led by their Warlord to contest the central industrial facility, knowing that this point would be the lynchpin of the wider battle. 

Sunday, January 31, 2021

Alternate Unit Activation: First Trial Game

Pete and I played a full game using the trial rules for alternate unit activation. Here is a quick recap of how the rules functioned.

The Game

  • Orks vs World Eaters: 1500 points
  • Onslaught Scenario: Each player places an objective in the opponent's deployment zone and gains 5VP for controlling it at the end of the game (6 turns). Also gain 1 VP for each unit destroyed in Turn 1, Slay the Warlord, and Attrition (1 VP for whichever side destroyed the most enemy units).
  • Long table edge deployment zones.
  • Alternating unit deployment, starting with Pete. 
  • Roll each turn for first unit activation.


What Worked Well

  • Selecting which unit to activate in which order was very fun. It added another level of tactical depth by forcing prioritization, anticipating enemy moves, and requiring more forethought in order to coordinate your attacks. I really like this aspect and would like to keep it as it is (as opposed to the units always going in a fixed order or a random order).
  • It was satisfying to perform an entire round with a single unit: move, shoot, charge, and resolve morale checks.
  • I felt there were offsetting pros and cons to armies with more (weaker) units compared to armies with fewer (stronger) units. At times, the orks were able to move expendable units into range first, forcing the marines to fire before later moving their more important units into the open. An example was waiting until the dreadnought fired before exposing the mega trukk later in the turn. But the orks also suffered from trying to coordinate multiple units against one strong unit. An example was when the shoota boyz and warbikes faced a large tactical squad with chaplain. The shoota boyz shot and charged, lost combat and were wiped in a sweeping advance before the warbikes could charge in to lend a hand and add their damage to the result - either tipping in the orks' favor or least reducing the negative morale modifier by inflicting more wounds. (And if the shoota boyz had not been destroyed, then the warbikers would have lost the ability to shoot before charging, compared to the normal rules). 

Areas for More Thought

  • We did not attempt to Hold or Seize. We were busy enough with the base rules that we did not really think about it. It may have helped to fix some of the seemingly odd issues, or it may have created worse imbalance. We will need to play test these next time.
  • As expected, the biggest differences are in melee. As stated in the rules, we limited a unit to attacking in melee to no more than two times in a game turn to keep it in line with the current rules. This worked fine for the entire game except one instance. Pete's tactical squad went first and charged and destroyed the tankbustas, then consolidated. The shoota boyz charged the tactical squad and were defeated in a sweeping advance, so his tactical squad consolidated again. Then the warbikers charged. Since the marines had fought twice, the rules-as-written stated that the warbikers were allowed to attack the marines but the marines could not fight back, and since the marines of course lost combat, they had to make a morale check. This felt odd, but I think it actually worked out OK. The marines all got to dish out two rounds of attacks and destroy two units and then they may have been destroyed themselves (but they passed morale). I think this is an important advantage/reward to coordinating attacks from multiple units on a single enemy unit. It helps to balance out the negative impact of having to attack piecemeal with your multiple weaker units. It could result in some situations where a unit of grots or militia charge a powerful unit and "use up" their attacks before a stronger unit moves in to attack without retribution. But, with a unit being able to fight twice in a turn, the outnumbered unit would have needed to already have charged earlier in the turn, or the outnumbering side would need to throw three units at them in one turn. I'd like to hear your thoughts on this one. And if this is a big advantage to having some disposable units, I say "good"! Right now, militia are so weak as to be nearly useless in games and certainly not worth the points cost. I am fine with rewarding a player who chooses more "regular men" rather than just filling the bare minimum of two troops and then loading up on elite units. Right now, I am leaning toward leaving this rule as it is and seeing how it plays out in more situations. 
  • There was a situation where a unit got what felt like a double move. The mega trukk was activated near the end of turn 1, going flat out to get close to the dreadnought. A different ork unit went last in the turn. On the next turn, I believe the orks had the first activation and chose to charge with the meganobz before the dreadnought could shoot the trukk and charge the survivors. At first this felt unfair to the dreadnought - the last time it went, the orks were out of sight. Then the orks moved up to point blank range and got to go again before the dreadnought had a chance to shoot. But we played it out: the orks disembarked and declared a charge, the dreadnought killed one with overwatch, the other two charged in, the dreadnought killed them both in melee before they could attack. So the end result was fine for the dreadnought (in this case) even though it felt "wrong" at the time. One thing to keep in mind is that a transport and the unit inside are activated separately. So the only reason the orks got to charge as the first activation is because the trukk did not need to move farther first. So this limits a bit just how far of a reach an embarked unit has. (Obviously assault units with jump packs, wings or bikes could still be unbalanced with an extremely long reach on the double move). I think this played out OK. We will have to account for this possibility and position units to anticipate it. Also, if a player focuses on one unit for a "double move" that means the opponent will have the potential to have an effective "double move" somewhere else on the table that turn, where a unit acts twice since the last time the offsetting enemy acted. I think the roll to see who gets to activate first, and the stipulation that the last unit to act can't be first next turn both helped to make an effective double move harder to plan on but it can still happen (there was an equal chance that the dreadnought would have gone first and the orks would have been sitting ducks at point blank range). This roll simulated the initiative swinging to the orks as they stole the first activation and the marines were left flatfooted by the unexpected appearance of the orks so quickly. My gut feel is to leave this alone for now and continue play testing, but I am curious to hear what Pete thinks. I can't think of a way to prevent this while still allowing the selection of the unit to activate (rather than having the order be fixed or random - and if it is random, the same thing can still happen). I think the best way to give a player a chance to avoid being on the receiving end of this is to expand the "Hold" rule such that an HQ can attempt a Hold for any unit within 12" as a sort of command radius. This would have given Pete the option to Hold the dreadnought and wait for the trukk to show itself on turn 1 (if he had an HQ closer to it). This would reward using an HQ choice as a central commander. I'm open to other ideas as well!
  • Activating a transport and the transported unit separately creates some differences compared to how the unit would act normally. Whereas you would normally get to move the transport, dismount, and then shoot/charge all at once, with these rules you move the transport and shoot, but then your opponent may have a chance to shoot or charge the transport before your squad can disembark. Most of the time this was not an issue, but it gave Pete some headaches when his land raider full of terminators was facing off against the tankbustas. If he moved up so that his terminators would be in range to charge, then the tankbustas would also be in range to possibly move and charge the tank first. But, even if the tankbustas destroyed the tank, the terminators would have had a chance to move, shoot and charge in return from the wreckage (assuming they were not pinned). Or if he would have moved his land raider forward and destroyed the trukk with shooting, the orks may have become pinned and unable to charge. Overall, in this particular situation, these rules made the transport less effective. Other times, it may be advantageous to have the unit and transport go separately, such as if you want to have a unit wait: move up, let the transport absorb enemy fire and only disembark once your unit would be mostly safe. Also, this would have been a perfect attempt for Pete to try to Seize the Initiative: move the land raider and shoot the tankbusta's trukk. Then attempt to Seize in order to activate the terminators next before I could respond. It is a very risky choice due to the low probability, but sometimes the situation calls for desperate moves. Or simply just wait for your opponent to move his target unit first, then you know you can move your transport and the unit without being charged. I'd like to hear your opinion on this one as well. 

Summary
The game was very close with lots of back and forth momentum swings and exciting moments. I'm sure the new rules impacted many things compared to playing normally, but if the game was fun, engaging, and closely fought then I say the rules are a success! Realistically, I think the biggest reason the orks were in a better position at the end is Pete's poor use of his most powerful unit: the land raider filled with terminators indecisively shifted back and forth for most of the battle before finally attacking in the last few turns. The terminators never entered combat until the sixth turn, too late to have much impact. This was partially due to us learning how the new rules would play out, especially the issue with a transport and its unit going separately, but mostly because Pete underestimated the threat of the tankbustas early on and did not prioritize their destruction. Once they moved up into the midfield, they forced him to hold his tank back at a safe distance until they were dealt with. In hindsight, he should have had his predator target them immediately in an attempt to destroy their transport in the back field, leaving them to footslog toward the land raider totally exposed. 

The game highlighted the benefit of the new rules for a powerhouse unit such as Pete's tactical squad with chaplain. They destroyed in succession the 'ard boyz, the tankbustas, the shoota boyz, the warbikers and the kommandos (although the kommandos should have survived due to being fearless that turn, they were certainly badly beaten in combat). These five units made up 730 points - a full half of my army! This highlighted the ability of a strong unit to isolate and destroy weaker units one by one with less chance of being ganged-up-on than the normal rules. The game also highlighted the benefit of having many smaller units by allowing my meganobz to get the drop on the dreadnought - although it worked out rather badly for them in actuality! Both armies had their moments to shine: the dread destroying the meganobz without a scratch, the snipers taking out the weirdboy (very fitting for snipers!), the aforementioned World Eaters tactical squad bringing the pain to the orks in melee, the tankbustas blowing up the predator, the warboss destroying a building and the dreadnought, and the kommandos moving across the entire battlefield by jumping in an empty trukk in order to contest the marine objective on the last turn! Plenty of great action. 

The next step is more play testing, maybe with a tweak or two.

Sunday, January 24, 2021

Drop Troop Recon Bikers

In case you couldn't tell, I love bikes. Ork and space marine bikes are among my favorite units for each army. It always seemed strange that the Imperial Guard had horse-mounted rough riders with the same old metal models for decades (until finally being axed in the new edition), but they never had bikes. So I decided to do something about it.

Basically a Valkyrie discharging a biker squadron!


Saturday, January 23, 2021

Trial Rules: Alternate Unit Activation

Overview:
 Deploy as normal for the scenario but the default is to use alternate unit deployment. After infiltrators are placed and scout moves, both players then roll to see who goes first. 

Create a list of all units on the table or arriving from reserves this turn (see Reserves below). As a unit is activated, put a mark by it on the list to keep track of which units have gone in each game turn. A unit can be activated once per game turn.

The first player selects a unit to activate. That unit goes through the normal turn progression: Movement Phase, Shooting Phase, Assault Phase and then Morale (for any enemy unit, as applicable). 

Whichever side has more units will have a number of units to activate at the end of the turn without interruption, just like the alternating deployment. 


Movement:
Movement is handled as normal. 


Shooting:
Shooting is handled in the same way as normal. Units can elect to run, turbo-boost or move flat out as normal.

Wednesday, January 6, 2021

Sons of Horus Terminators

I need to get a photo with better lighting, but here is a quick shot of the Sons of Horus terminators that I painted back in November. They are geared up for anti-armor with combi-meltaguns, three power fists and two chainfists.