Sunday, March 22, 2020

Urban Fighters Recon Squad

I did these guys as a little side project. I bought the torsos and legs about 4 - 5 years ago with the intent of doing a squad like this but never got around to it.

They are part of the Kozar military, specially trained for urban combat. Before the Heresy, their main duties were putting down riots, rebellions, cults and the occasional ork kommandos that infiltrated one of the cities. Now they use their detailed knowledge of the city streets and sewers to act as a recon unit in the urban warfare ensuing from the traitors' assault on Berat.


I am happy with the conversions and I think the paint scheme turned out well. I kept the same brown and black colors as my Drop Troopers along with the same blue lenses and the orange regimental color, but I changed the brown/tan scheme of the fatigues and armor to a grey scheme to better fit with the urban surroundings. The bases are a mix of the sand colors used on the Drop Troopers (to help tie them in) along with grey building rubble to show they are urban fighters. I wanted them to fit in with the rest of the army despite being camouflaged for a different environment.

Unfortunately, I had a problem with the primer again and they came out quite grainy. This has been happening to me a lot lately. I actually scrubbed them down with Purple Power to remove some of the worst of it and re-primed them but you can see they still have a pretty rough appearance overall. Oh well. I will just move on and try to do better next time.

These guys were built to use the rules for a Militia Recon Squad from the Horus Heresy Imperial Militia list: shotguns and a sergeant with a breacher charge or melta bombs. With shotguns (probably the worst weapon for guardsmen) I doubt they will ever kill a single space marine, but maybe they can stay out of sight and grab an objective or hit a back line unit with a breacher charge. I doubt they will ever be useful but they look cool and fun, which is my main motivation.

I see one or two details I forgot to paint now that I am looking at the pictures. After that, they need Dullcote and then gloss finish on the lenses and they will be done.

Saturday, February 29, 2020

Horus Heresy Campaign Phase 3 Final Battle - Assault on the Walls of Berat

"Preservation lies in the defense, but the possibility of victory lies only in the attack."
 - Khan Turan Jorma,
Brotherhood of the Wind,
White Scars Legion


Campaign To Date:

It has been about 40 years since a combined force of Sons of Horus, Death Guard, and White Scars brought the Xhorik System into compliance during the Great Crusade. The major population centers of the largest continent were quickly brought under Imperial control in the typical fashion: a series of pinpoint attacks of overwhelming force by the Legions against the enemy's strong points, followed by rapid surrender. Due to the richness of the primary planet and the strategic location of the system on a sort of crossroads of warp currents, small garrisons of the Death Guard and White Scars legions were left on the planet to oversee the tithes of men and material to the Great Crusade and to help eradicate the threat of large ork populations in the eastern wastes.

With the advent of the Horus Heresy, the Warmaster ordered that the Xhorik System be taken to act as a way station for resupply on his long march to Terra. The Death Guard and their human allies on Xhorik Prime launched an attack on the White Scars and their allies, the Stratocracy of Kozar.

In Phase 1 of the campaign, the Traitors pushed the Loyalists from the war-torn border city of Bielyr in a series of bloody street fighting.

In Phase 2, the war escalated across the badlands of the Valbaara Plateau in several pitched battles. In the end, the Brotherhood of the Wind was defeated and their leader Praetor Zherdan was killed by the Death Guard.

Phase 3 of the Campaign for Xhorik Prime finds the battered Loyalists unable to stand against the Death Guard heavy armor and so they are resorting to guerrilla tactics as the Traitor army advances north toward the major cities of Kozar. This phase will culminate with a large Traitor assault on a fortified Loyalist city. There will be four missions that will impact the deciding battle of the phase.


PRE-GAME AND MISSION:


The defender selects an army of 3000 - 3500 points and splits his forces into two parts: Sentries and Reserves. Only units with the Infantry or Artillery type may be selected as Sentries. At least one HQ and one Troops choice must be included. This portion of the army can cost up to half the army total points cost and may be deployed anywhere up to 6" in front of the city walls. The HQ unit must be deployed inside a piece of ruins designated as the Defenders Headquarters. The Defender Reserves force starts in Reserve as normal and enters using the normal rules for those units. The Warlord may be part of either force.

The Attacker can select an army of 3500 - 4000 points following the normal army selection rules. Any points chosen in excess of the Defender's total must start in Reserve and are ineligible to enter on Turn 1 even if normally allowed to do so. The Attacker may deploy any units with Infiltrate as per the normal rules. The Attacker automatically goes first (no chance to seize the initiative) and may move as much of his army onto the table from his board edge as desired.  Any unit with the Deep Strike rule that is chosen to enter the table on Turn 1 may deploy using Deep Strike on Turn 1. Any unit that does not enter the table on Turn 1 starts in Reserves as normal. The Attacker's army can include a Lord of War.


There are three primary objectives: the gate, the loyalist headquarters and the defensive artillery platform. Holding an objective at the end of the game is worth 3 VPs. Or the attacker can earn 2 VPs for destroying the gate or the artillery platform (the headquarters must be held). Holding a destroyed objective at the end of the game is still worth 1 VP. Secondary objectives: Slay the Warlord (1 VP) and Annihilation (whichever side destroys more points worth of enemy units gets 1 VP). Additionally, the Attacker can earn Line Breaker (1 VP) and, as always, the Defender can earn The Price of Failure (1 VP) if they destroy the Attacker's Lord or War.


Gate: AP 14, 5 Hull Points, fortification damage table. If you control the Gate Controls at the start of your turn, you may choose to open or close the gate. The Gate can still be attacked in the open position. The Gate controls count as the objective for holding purposes.

Artillery Platform: AP 14, 5 Hull Points, fortification damage table. Any units on the platform count as being on the ramparts. Any artillery units on the platform can re-roll scatter.

Command Post: Uses standard rules for a ruin. Any unit (of either side) in this ruin may re-roll failed morale and leadership tests.

City Wall: This counts as a terrain piece and not a fortification. Units on the wall receive a 3+ cover save from the front a 6+ cover save from behind. Multiple units from opposing sides may simultaneously be on the walls. Although not a fortification, the walls can be attacked. AP 15, 5 Hull Points (Mighty Bulwark). If destroyed, a 5" x 5" hole opens through the wall. The ramparts are unaffected.

The battle lasts for a minimum of six turns. At the end of the sixth turn, there is a seventh turn on a roll of a 4+. The Attacker determines if Night Fighting is in effect in Turn 1. No need to roll. 


Additionally, the four games already played have an impact on this battle.

(1) The Conclave of the Damned: If the traitors win, they have successfully coordinated their assault in the final battle.  One unit from the allied detachment (and any transport) gains Outflank and the allied detachment counts as "Sworn Brothers".

(2) The Boarding of the KVS Defiant: If the Traitors win, they control geosynchronous orbit above the city and can launch bombardments (as per the Damocles Command Rhino) at the start of the shooting phase of their first two turns. Also, one unit of Terminators gains Deep Strike.

(3) Night Raiders: If the Traitors win, they have successfully defended their depot of war materiel and can use the supply lines to push their attack farther. The attacker can re-roll the result when determining if the game ends.

(4) The Road to Berat: If the Traitors win, they have successfully blitzed the approach to the city. The attacker can select three units to gain the Scout rule and move on from their table edge prior to Turn 1. The attacker can also re-roll reserves rolls.

The Traitors won battles 2 and 4 and would gain those advantages in this game.


ARMY SELECTION:

Traitors - Pete

Death Guard
  • Preator Wolfgang: terminator armor, volkite charger, paragon blade, digital lasers, fearless, It will not Die
  • Tactical Squad Folterer10 marines with close combat weapons, sergeant with power first and artificer armor. In a Rhino APC with a pintle mounted heavy flamer.
  • Tactical Squad Toddestraffe14 marines with close combat weapons, sergeant with power fist and artificer armor and Apothecary Gerhard
  • Tactical Support Squad Blitz Schock: 7 marines with volkite calivers 
  • Heavy Support Squad Feuer Sturm: 7 marines with missile launchers and Apothecary Gerhard
  • Contemptor Dreadnought Friedrich with multimelta, melta gun and close combat weapon
  • Legion Fellblade Super Heavy Battle Tank Welt Zerstörer
World Eaters
  • Tactical Squad Hell Hounds: 17 marines – 16 with bolters, bolt pistols and chain axes. 1 sergeant with artificer armor, power fist and plasma pistol
  •  Chaplin Zungarz: Artificer Armor, plasma pistol, refractor field, crozius arcanum
  •  Reconnaissance Squad Butcher's Eyes: 5 marines with power armor, sniper rifles, cameleoline 
  • The Red Butchers: 1 Devoured with dual chain fists, 4 Butchers with dual power axes
  • Land Raider Phobos Flesh Grinder: side sponson twin-linked lascannons, twin heavy bolter, armored ceramite, machine spirit 
  • Contemptor Dreadnought with twin-linked lascannon and chainfist
  • Unending Slaughter: Terminator squad with lightning claws
Army of House Harkhathe
  • Grenadiers The Hero Hammers: 15 grenadiers with 2 plasma guns
  • Support squad with 2 missile launcher teams and 3 lascannon teams


Loyalists - Phil

White Scars Brotherhood of the Wind 
  • Khan Turan Jorma: jetbike, glaive, cyber hawk
  • Centurion with glaive
  • Skyhunters: 6 jetbikes,  2 x volkite culverin
  • Outrider Squad Tsujen: 5 Outriders with plasma, sergeant
  • Tactical Squad Temgar: 10 marines, sergeant has power glaive, artificer armor
  • Tactical Support Squad Khoer: 8 marines with plasma guns, with drop pod
  • Ebon Keshig: 10 terminators, 8 power glaives, 2 power fists, 1 melta gun
  • Sicaran Omega Tank Destroyer Kharvaak: lascannon sponsons
Kozar Army, Berat Garrison
  • Captain Xhaer, plasma pistol, power sword 
  • Command squad: 6 veterans, medi pack, missile launcher, plasma gun, carapace armor
  • 2nd Platoon, 3rd Company
    • Infantry squad: 10 infantry with grenade launcher
      • Valkyrie with heavy bolter sponsons, lascannon, Hellfury missiles
    • Infantry squad: 10 infantry with melta gun
    • Special weapons squad: 6 infantry with 3 melta guns
    • Special weapons squad: 6 infantry with 3 melta guns
    • 2 x Sentinels with multi-meltas
  • Veteran squad: 10 veterans with carapace armor, 3 sniper rifles, 1 missile launcher
  • Tauros with grenade launcher
  • 3 x Tarantulas with twin-linked lascannon
Imperial Fists
  • Terminator Squad Stalwart Blade: 5 marines with plasma blaster, volkite charger, two power fists, chainfist, lighting claw

++++++++++++++++++++++++++++++++++++++++++++++++++++++++++++


++++++++++++++++++++++++++++++++++++++++++++++++++++++++++++


BATTLE:

Assault on the Walls of Berat

Battlefield overview. Objectives shown in green. 

Aerial view of the battlefield from the east, prior to deployment. The main gate of Berat is closed.

Monday, January 27, 2020

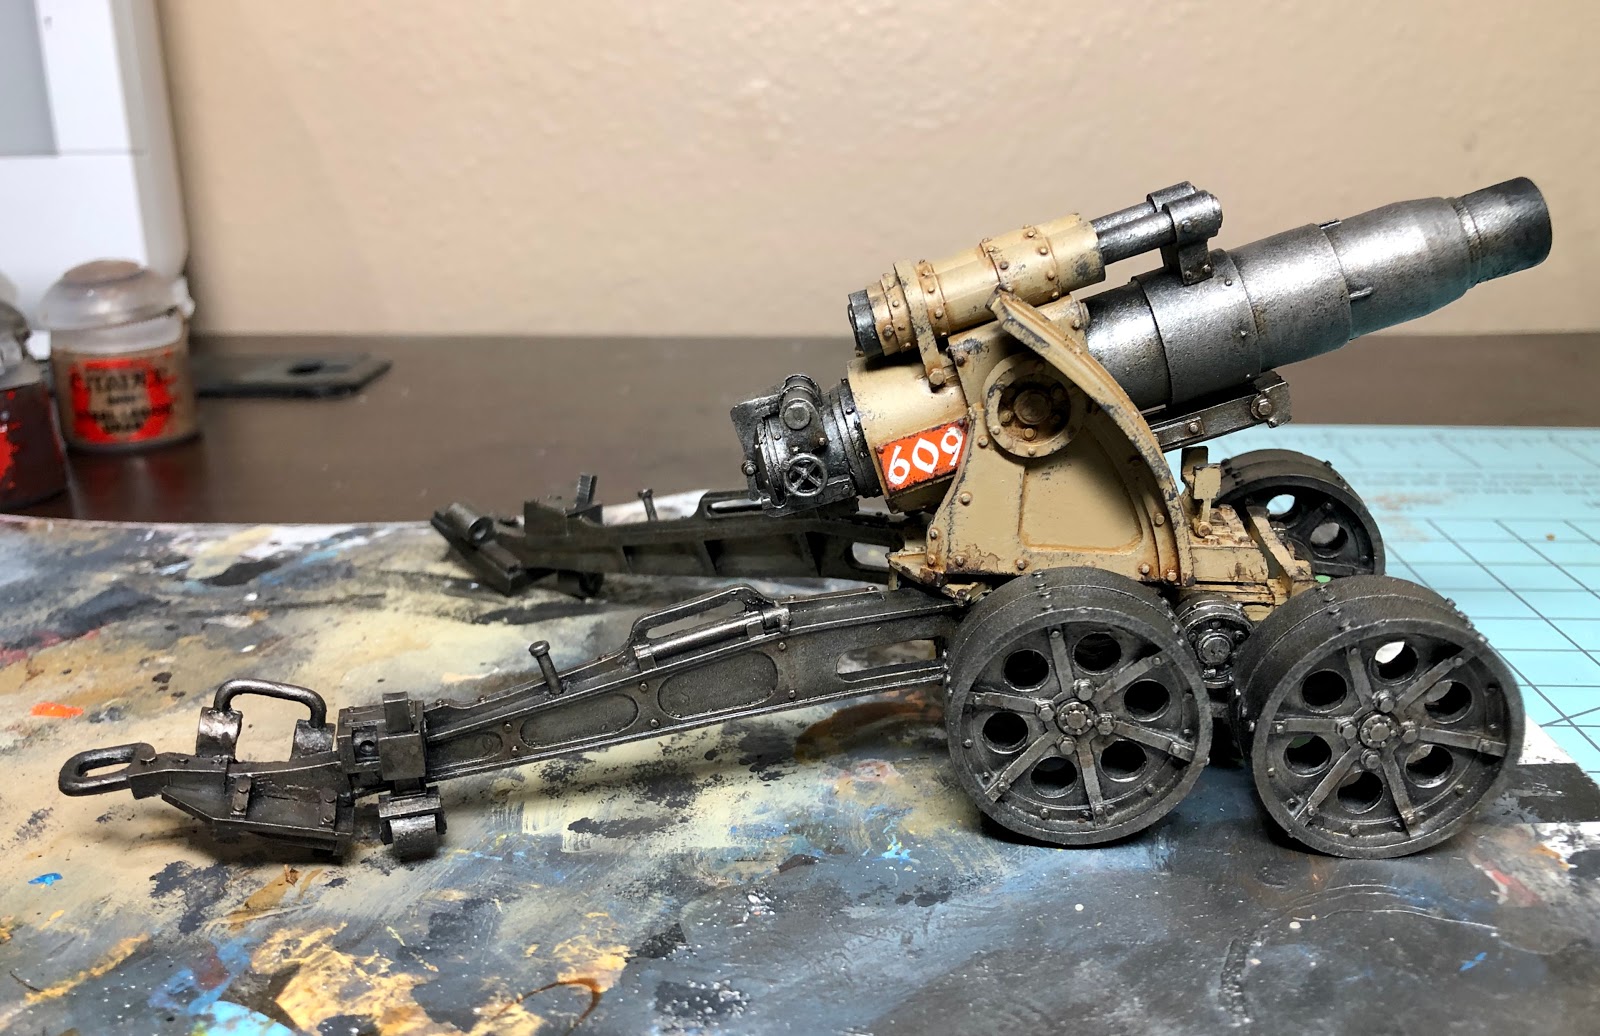
Artillery!

Artillery is the god of war.
– Stalin

I know cumbersome artillery does not seem to fit with the Drop Troops' style of warfare, but I bought this with the intent of using it as part of the defenses for the City Assault scenario. Unfortunately, I didn't get it done in time for that battle (report coming eventually), but it is done now and ready for the next time the Drop Troopers need to defend.


I am converting a few guys to act as crew. I hope to get back to working on them in February after all this business travel is finished.

Saturday, January 4, 2020

Ebon Keshig

The Ebon Keshig have a distinct Samurai look so I decided they could use some katanas! I love the dynamic poses of these models. They really look like they fight with a speed and agility beyond other terminators, suitable for their Legion and their rules.


Saturday, December 28, 2019

Sunday, November 17, 2019

Horus Heresy Campaign Phase 3 - Battle 4: The Road to Berat

Campaign To Date:

It has been about 40 years since a combined force of Sons of Horus, Death Guard, and White Scars brought the Xhorik System into compliance during the Great Crusade. The major population centers of the largest continent were quickly brought under Imperial control in the typical fashion: a series of pinpoint attacks of overwhelming force by the Legions against the enemy's strong points, followed by rapid surrender. Due to the richness of the primary planet and the strategic location of the system on a sort of crossroads of warp currents, small garrisons of the Death Guard and White Scars legions were left on the planet to oversee the tithes of men and material to the Great Crusade and to help eradicate the threat of large ork populations in the eastern wastes.

With the advent of the Horus Heresy, the Warmaster ordered that the Xhorik System be taken to act as a way station for resupply on his long march to Terra. The Death Guard and their human allies on Xhorik Prime launched an attack on the White Scars and their allies, the Stratocracy of Kozar.

In Phase 1 of the campaign, the Traitors pushed the Loyalists from the war-torn border city of Bielyr in a series of bloody street fighting.

In Phase 2, the war escalated across the badlands of the Valbaara Plateau in several pitched battles. In the end, the Brotherhood of the Wind was defeated and their leader Praetor Zherdan was killed by the Death Guard.

Phase 3 of the Campaign for Xhorik Prime finds the battered Loyalists unable to stand against the Death Guard heavy armor and so they are resorting to guerrilla tactics as the Traitor army advances north toward the major cities of Kozar. This phase will culminate with a large Traitor assault on a fortified Loyalist city. There will be four missions that will impact the deciding battle of the phase.


PRE-GAME AND MISSION:

The fourth battle of the phase sees the Traitors pushing down the main road to Berat and attempting to smash through the outer defenses, while the Loyalists are trying to break through the attackers' spearhead and into the main body of their force, stalling the advance. We played Shatter Strike from Horus Heresy Book One. The goal was to get infantry units into your opponent's deployment zone. The mission also allowed one unit from each side to redeploy after both forces were setup. We chose Hammer and Anvil as the deployment map to give the effect of a concentrated push along a narrow front.


ARMY SELECTION:  2000 Points

Traitors - Pete

Death Guard
  • Preator Wolfgang: terminator armor, volkite charger, paragon blade, digital lasers, fearless, It will not Die
  • Tactical Squad Folterer10 marines with close combat weapons, sergeant with power first and artificer armor. In a Rhino APC with a pintle mounted heavy flamer.
  • Tactical Squad Toddestraffe14 marines with close combat weapons, sergeant with power fist and artificer armor and Apothecary Gerhard
  • Legion Fellblade Super Heavy Battle Tank Welt Zerstörer
World Eaters

  • Tactical Squad Hell Hounds: 17 marines – 16 with bolters, bolt pistols and chain axes. 1 sergeant with artificer armor, power fist and plasma pistol
  •  Chaplin Zungarz: Artificer Armor, plasma pistol, refractor field, crozius arcanum
  •  Reconnaissance Squad Black Vultures: 5 marines with power armor, sniper rifles, cameleoline 
  • The Red Butchers: 1 Devoured with dual chain fists, 4 Butchers with dual power axes
  • Land Raider Phobos Fleisch Schleifer: side sponson twin-linked lascannons, twin heavy bolter, armored ceramite, machine spirit 


Loyalists - Phil

White Scars Brotherhood of the Wind 
  • Khan Turan Jorma: jetbike, glaive, cyber hawk
  • Skyhunters: 6 jetbikes,  2 x volkite culverin
  • Outrider Squad Tsujen: 5 Outriders with plasma, sergeant (in reserve)
  • Tactical Squad Temgar: 10 marines, sergeant has power glaive, artificer armor
  • Tactical Support Squad Shatak: 8 marines with plasma guns, with drop pod (in reserve)
  • Sicaran Omega Tank Destroyer Firespear: lascannon sponsons
Kozar Army, Berat Garrison
  • Force Commander Xhosa (deployed with Grenadiers)
  • Grenadiers Squad: 11 infantry, 1 missile launcher (deployed inside bunker)
  • Infantry squad: 20 infantry
  • Special weapons squad: 12 infantry with 6 melta guns (deployed inside bunker)
  • 2 x Sentinels with multi-meltas
  • 3 x Tarantulas with twin-linked lascannon
  • 2 x Bunkers - no weapons


++++++++++++++++++++++++++++++++++++++++++++++++++++++++++++


++++++++++++++++++++++++++++++++++++++++++++++++++++++++++++


BATTLE:


Turan Jorma and his men deploy along the Loyalist right flank, ready to counter attack.

Thursday, October 10, 2019

Valkyrie: Our First Flyer!

After all these years in the hobby, one of us finally built and painted a flyer. The skies are no longer safe!

The Valkyrie really is an impressive model.

Sunday, September 15, 2019

Drop Troops Updates: Tarantulas and More Grenadiers/Veterans

I've finished a few things for the Drop Troops over the last few months while building by Khan on Jetbike and the Skyhunter squad. Just a few quick projects to break up the endless coats of white on the Scars:

Quick and dirty paint job: prime, base coat the black and metal, wash, drybrush twice, pick out the eagle, add weathering. 

They turn out pretty well for being so quick. They look like they have been dropped from a Valkyrie and used in the field for a while.

If these were not so pricey, I would get a few more just because they were so quick and fun to paint.


If you see those blue sensors... move!


Then I painted a sergeant and some sniper rifle guys for my squad of Grenadiers or veterans with carapace armor, depending on what book you use. I did not have any particular want or need for sniper rifles. They just looked cool and I felt like painting something different. 

Another shot of the sergeant. I am not sure why he has to remove his mouth armor to give orders into his communicator. I guess they don't have radio helmets? And I finally finished the sign for our industrial facility terrain. The only decals I could find online that were sort of generic sci-fi appropriate were zombie themed. Guess we need to get some plague zombies now.

And somewhere along the way, I picked up some old Kasrkin models from eBay to use as Storm Troopers. The only thing I did not like was that the sergeant had a bare head while everyone else sensibly wore helmets. So I painstakingly cut and filed his head off (and the helmet hanging on his belt!) and replaced it with a matching helmet. I'd like him to match the rest of the army and look like he is jumping into a hostile environment!
I also did a single Grenadier with missile launcher but I guess I never took a picture so here he is in his first battle report where he died horribly at the hands of the Butchers.


That's all for now.

Sunday, September 8, 2019

Horus Hersey Campaign Phase 3 - Battle 3: Night Raiders

Campaign To Date:

It has been about 40 years since a combined force of Sons of Horus, Death Guard, and White Scars brought the Xhorik System into compliance during the Great Crusade. The major population centers of the largest continent were quickly brought under Imperial control in the typical fashion: a series of pinpoint attacks of overwhelming force by the Legions against the enemy's strong points, followed by rapid surrender. Due to the richness of the primary planet and the strategic location of the system on a sort of crossroads of warp currents, small garrisons of the Death Guard and White Scars legions were left on the planet to oversee the tithes of men and material to the Great Crusade and to help eradicate the threat of large ork populations in the eastern wastes.

With the advent of the Horus Heresy, the Warmaster ordered that the Xhorik System be taken to act as a way station for resupply on his long march to Terra. The Death Guard and their human allies on Xhorik Prime launched an attack on the White Scars and their allies, the Stratocracy of Kozar.

In Phase 1 of the campaign, the Traitors pushed the Loyalists from the war-torn border city of Bielyr in a series of bloody street fighting.

In Phase 2, the war escalated across the badlands of the Valbaara Plateau in several pitched battles. In the end, the Brotherhood of the Wind was defeated and their leader Praetor Zherdan was killed by the Death Guard.

Phase 3 of the Campaign for Xhorik Prime finds the battered Loyalists unable to stand against the Death Guard heavy armor and so they are resorting to guerrilla tactics as the Traitor army advances north toward the major cities of Kozar. This phase will culminate with a large Traitor assault on a fortified Loyalist city. There will be four missions that will impact the deciding battle of the phase.


PRE-GAME AND MISSION:

The third battle of the phase represents a raid by the Loyalist forces on a Traitor outpost and supply depot. The Loyalists are trying to capture and destroy enemy supplies in order to reduce the Traitors' ability to wage war and assault the city. This is a scenario from the Taros Campaign. Each player takes turn places objectives. The defender (Traitors) deploys anywhere within 12" of any of the objectives and chooses a table edge. The attacker does not deploy, but can move on any units from their table edge at the start of Turn 1, including Deep Striking with units that have that ability. Each objective is worth 3 VPs at the end of the game. Secondary objectives are Slay the Warlord and First Blood. The special rule is "Night Raid", which means the Night Fighting rule is in effect for the first 3 - 4 turns.


ARMY SELECTION:  2000 Points

Traitors - Pete

Death Guard
  • Tactical Squad Folterer: 10 marines with close combat weapons, sergeant with power fist, artificer armor, rhino with heavy flamer
  • Tactical Squad Toddestraffe: 14 marines with close combat weapons, sergeant with power fist, artificer armor
  • Tactical Support Squad Blitz Schock: 7 marines with volkite calivers 
  • Heavy Support Squad Feuer Sturm: 7 marines with missile launchers and Apothecary Gerhard
  • Contemptor Dreadnought Jürgen:  multi-melta, melta gun, dreadnought close combat weapon
World Eaters
  • Chaplain Zungarz: with power weapon and plasma pistol
  • Tactical Squad Hell Hounds: close combat weapons, sergeant with power fist, plasma pistol and artifcer armor
  • Recon Squad Black Vultures: with sniper rifles
  • Contemptor Dreadnought Delrog the Diabolical: twin-linked lascannon, melta gun and chain fist
Army of House Harkhathe
  • Grenadiers The Hero Hammers: 15 grenadiers with 2 plasma guns


Loyalists - Phil

White Scars Brotherhood of the Wind 
  • Khan Turan Jorma: jetbike, glaive, cyber hawk
  • Skyhunters: 6 jetbikes,  2 x volkite culverin
  • Outriders: 5 Outriders with plasma, sergeant
  • Tactical Squad Temgar: 10 marines, sergeant has power glaive, artificer armor
  • Sicaran Omega Tank Destroyer: lascannon sponsons
Kozar Drop Troops, 2nd Company
  • Captain Xhosa and Command Squad: medic, vox caster, plasma pistol, carapace armor, missile launcher
  • Infantry Platoon
    • Infantry squad with vox caster and melta gun
    • Infantry squad with grenade launcher
    • Special weapons squad with melta guns
    • Special weapons squad with melta guns
    • 2 x Drop Sentinels with multi-meltas
  • 3 x Tarantulas with twin-linked lascannon
Imperial Fists
  • Terminator Squad Stalwart Blade: 5 marines with plasma blaster, volkite charger, two power fists, chainfist, lighting claw

++++++++++++++++++++++++++++++++++++++++++++++++++++++++++++


The White Scars force was a streak of white moving across the black sand. The silhouettes of Valkyries passed overhead, only noticeable from the way they briefly winked out the stars. They had been pushing hard for two days, ever since they got the shocking news of what was happening back west, the mind-wrenching idea that their sworn brothers had betrayed their honor and turned their guns against their fellow Astartes. The Brotherhood of the Wind forces in the west had been beaten back and, impossibly, the great Khan Zherdan was dead. Turan Jorma knew that made him Khan of the Brotherhood now and he had to make it to Berat in time to turn the tide.

The traitors had chosen their moment well.  He had been in the Far East for weeks with fully half the Brotherhood, hunting down the remnants of the vast Ork populations that had once plagued this planet. The enemy had clearly done a good job of choking any communications while they launched their attack. But now the winds had awakened and they could not be stopped. Their speed would give them surprise. The traitors would not expect a full fighting force to cover the breadth of the continent in two days.

As they approached the Death Guard facility in the predawn blackness, Turan felt the hatred and sense of betrayal rising to boiling. These wretched traitors had murdered his brothers and broken their sworn oaths. He meant to rip this outpost apart and prevent this traitor force from bringing aid to the assault on Berat. He would tear through this scum like a hurricane, leaving only wreckage and desolation in his wake as he carved a path to his besieged brothers.

The night vision sensors on his jet bike lit up with the distant targets. He growled into the comm link, “Engage at will. Take no prisoners. Purge the betrayers.”

++++++++++++++++++++++++++++++++++++++++++++++++++++++++++++


BATTLE:


Game map highlighting the four objectives. The traitors chose the near table edge, leaving the far edge for the Loyalists to enter the table from on turn 1. 

View of the Traitor facility from the east. 

Sunday, July 7, 2019

Horus Heresy Campaign Phase 3 - Battle 2: The Boarding of The KVS Defiant

"We are going in to disable that ship, and we are going to kill anyone who stands in our way. Prepare the Butchers."

 - Praetor Helmuth,
Death Guard Legion


Campaign To Date:

It has been about 40 years since a combined force of Sons of Horus, Death Guard, and White Scars brought the Xhorik System into compliance during the Great Crusade. The major population centers of the largest continent were quickly brought under Imperial control in the typical fashion: a series of pinpoint attacks of overwhelming force by the Legions against the enemy's strong points, followed by rapid surrender. Due to the richness of the primary planet and the strategic location of the system on a sort of crossroads of warp currents, small garrisons of the Death Guard and White Scars legions were left on the planet to oversee the tithes of men and material to the Great Crusade and to help eradicate the threat of large ork populations in the eastern wastes.

With the advent of the Horus Heresy, the Warmaster ordered that the Xhorik System be taken to act as a way station for resupply on his long march to Terra. The Death Guard and their human allies on Xhorik Prime launched an attack on the White Scars and their allies, the Stratocracy of Kozar.

In Phase 1 of the campaign, the Traitors pushed the Loyalists from the war-torn border city of Bielyr in a series of bloody streetfighting.

In Phase 2, the war escalated across the badlands of the Valbaara Plateau in several pitched battles. In the end, the Brotherhood of the Wind was defeated and their leader Praetor Zherdan was killed by the Death Guard.

Phase 3 of the Campaign for Xhorik Prime finds the battered Loyalists unable to stand against the Death Guard heavy armor and so they are resorting to guerrilla tactics as the Traitor army advances north toward the major cities of Kozar. This phase will culminate with a large Traitor assault on a fortified Loyalist city. There will be four missions that will impact the deciding battle of the phase.


PRE-GAME AND MISSION:

The second battle of the phase takes place in orbit over the Loyalist Kozar city of Berat. We elected to use the Zone Mortalis mission Force the Breach! to represent a Traitor boarding party trying to capture a Loyalist ship, the Kozar Void Ship Defiant. The setup is simple: three objectives (one in the Defender's deployment quadrant and one in each neutral quadrant) and whoever controls more of them at the end of the game wins.


ARMY SELECTION:  1000 Points

Traitors - Pete
Death Guard
  • Praetor Helmuth: Terminator armor, Paragon Blade, volkite charger, digilasers
  • Tactical Squad Hammer Streik: 12 marines with close combat weapons, sergeant with power fist and artificer armor and Apothecary Holtzendorff
World Eaters
  • The Red Butchers: 5 marines with power axes plus Devoured Argore with two chain fists
  • Contemptor Dreadnought Fellblood: twin-linked lascannon, melta gun and chain fist


Loyalists - Phil

Ship's Crew of the Kozar Battlecruiser KVS Defiance

  • Commander Kazchian with plasma pistol
  • Infantry squad with lasguns and medicae
  • Grenadiers with one missile launcher and medicae
  • 2 Sentinels with lascannons
  • 3 Tarantulas with twin-linked lascannons
White Scars Brotherhood of the Wind 
  • Consul Barikh with power glaive and refractor field
  • Veteran Tactical Squad Zurgaa: 10 veteran marines, sergeant with power glaive and artificer armor
  • Veteran Tactical Support Squad Khoyor: 7 veteran marines with combi-plasmas, and 1 with plasma gun

++++++++++++++++++++++++++++++++++++++++++++++++++++++++++++


Kohrin gripped his lasgun tightly as the ship shuddered and groaned around him.  The lights flickered out momentarily, casting him and his squad mates into utter blackness. He knew that meant that all available power was being diverted, likely to the shield systems. The lights sputtered back to life, but weaker now, and some not at all. 

Again, the walls shook and the floor rocked and swayed under his feet, as the artificial gravity generators struggled to keep up with the pitching of the ship as it recoiled from the impacts. Kohrin swallowed and glanced around. His squad mates were quietly lost in their own thoughts, some mumbling the now-forbidden, but not forgotten, prayers of Kozar, their ancient homeland. Prayers that pre-dated their assimilation into the Empire of Man and the administration of His Imperial Truth. 

The ship jolted harder than before and Kohrin staggered, but this time instead of the dull, echoing rumble and groans of previous hits, the sounds were immediate and intense: an eruption, the screaming whine of metals failing, a hissing roar like a windstorm. 

“Rifles up, lads. That’s a boarding party.” the Lieutenant barked. “And nearby, from the feel of it.”

The men around Kohrin tensed. The praying from some intensified. 

He heard the hard pounding echoes of metal on metal. Then the distant sound of men screaming, dying, muffled by the doors and yet unmistakable. Kohrin’s stomach twisted and his hands felt numb. He looked down to check that he was still holding his lasgun. 

The metal pounding got louder. Then an angry roar split the air, sounding only half-human. 

From behind him, Kohrin heard the metallic footsteps of power armor and whipped around only to see the massive bodies were clad in the stark white of the White Scars. He trembled at the sight of the superhumans.  Even knowing they were on his side, he couldn’t forget the things he had seen them do. 

The White Scars moved wordlessly through the Kozar troopers to stand ahead of them, shoulder to shoulder in the narrow hallway. 

The clanging of the approaching enemy grew louder. The bellows of rage reverberating through the halls made Kohrin squeeze his eyes shut. The men around him murmured and glanced sideways at each other, as if each was checking to confirm his squad mates were still there. 

“You are soldiers of Kozar! Whatever comes down that hallway, you will hold your ground!” The lieutenant’s voice was firm and clear, practiced in command. 

In the dim light, Kohrin could just make out the massive silhouettes at the other end of the hall and his heart sank. Whatever they were, they made the giant power-armored marines in front of him look small. Their weapons alone were nearly the size of a man. The flickering lights gleaned off the splatters of slick, fresh blood that covered them. 

Once again, that horrible, twisted roar that seethed with hatred. This time louder and clearly coming from those huge and horrible metal shapes. Kohrin found himself screaming too, whether to drown out the terrifying sound or to steel his nerves or just out of sheer terror, he did not know...

++++++++++++++++++++++++++++++++++++++++++++++++++++++++++++


BATTLE:


Map overview with objectives highlighted and deployment zones designated.

The near side of this board represents the entrance to the engine room. If the Traitors gain control of this vital area, they can disable the ship from the inside, taking her out of action and swinging the void battle in their favor. The objectives represent vital ship's controls.