"Be careful out there."
"If I wanted to be careful, I wouldn't have joined the drop troops."
- exchange between Kozar troopers,
2nd Platoon, 3rd company,
just before Operation Comet
Campaign To Date:
It has been about 40 years since a combined force of Sons of Horus, Death Guard, and White Scars brought the Xhorik System into compliance during the Great Crusade. The major population centers of the largest continent were quickly brought under Imperial control in the typical fashion: a series of pinpoint attacks of overwhelming force by the Legions against the enemy's strong points, followed by rapid surrender. Due to the richness of the primary planet and the strategic location of the system on a sort of crossroads of warp currents, small garrisons of the Death Guard and White Scars legions were left on the planet to oversee the tithes of men and material to the Great Crusade and to help eradicate the threat of large ork populations in the eastern wastes.
With the advent of the Horus Heresy, the Warmaster ordered that the Xhorik System be taken to act as a way station for resupply on his long march to Terra. The Death Guard and their human allies on Xhorik Prime launched an attack on the White Scars and their allies, the Stratocracy of Kozar.
In Phase 1 of the campaign, the Traitors pushed the Loyalists from the war-torn border city of Bielyr in a series of bloody streetfighting.
In Phase 2, the war escalated across the badlands of the Valbaara Plateau in several pitched battles. In the end, the Brotherhood of the Wind was defeated and their leader Praetor Zherdan was killed by the Death Guard.
Phase 3 of the Campaign for Xhorik Prime finds the battered Loyalists unable to stand against the Death Guard heavy armor and so they are resorting to guerrilla tactics as the Traitor army advances north toward the major cities of Kozar. This phase will culminate with a large Traitor assault on a fortified Loyalist city. There will be four missions that will impact the deciding battle of the phase.
PRE-GAME AND MISSION:
This first battle represents the arrival of the World Eaters into the Xhorik system and their attempts to link up and coordinate with Praetor Wolfgang and his Death Guard. They have arranged a secret meeting at a remote location far from the front lines, but a Loyalist spy was able to get wind of the approximate location. Now a Loyalist R.A.P.T.O.R. team has been assembled to make a daring raid in an attempt to eliminate the Traitor leaders and disrupt their coordination for the coming assault.
We played the Conclave of the Lost scenario from Horus Heresy Book VI. In this mission, commanders of two allied factions start in a central ruin with a few sentries around the perimeter. The attacker can deploy infiltrators and the rest of each force is in reserve. Victory points are awarded to the attacker for eliminating enemy HQ units by turn 3 or to the defender if they survive for three turns instead. The secondary objective is kill points for destroying units and we elected to use our house rule of units being worth one kill point for every 100 pts the unit cost, rounded up.
The result of the
Kill Team game we played previously setup this game by allowing the Traitor side to start with a dreadnought on the board (rather than just infantry) by obtaining replacement parts and for the Loyalist side to have one unit up to 200 points arrive from reserves on Turn 1 due to capturing additional data on the meeting location from scanner consoles.
ARMY SELECTION: Points
Traitors - Pete
Death Guard
- Praetor Wolfgang: Terminator armor, Paragon Blade, volkite charger, digilasers
- Tactical Squad Stärke: 12 marines with close combat weapons, sergeant with power fist and artificer armor and Apothecary Wilhelm
- Tactical Squad Ritter: 10 marines with close combat weapons, sergeant with power fist and artificer armor, rhino with heavy flamer
- Tactical Support Squad März: 7 marines with volkite calivers and Apothecary
- Contemptor Dreadnought Friedrich: multi-melta, melta gun, dreadnought close combat weapon
World Eaters
- Vigilator Remulak: Cameoline and bolter
- Legion Recon Squad The Butchers' Eyes: 4 marines with sniper rifles
- The Red Butchers: 5 marines with power axes plus Devouer Argore with two chain fists
- Land Raider Flesh Grinder: twin-linked lascannon sponsons, twin-linked heavy bolter
- Contemptor Dreadnought Vorgett the Vicious: twin-linked lascannon, melta gun and chain fist
Loyalists - Phil
R.A.P.T.O.R. (Rapid Attack / Precision Tactical Operations / Reconnaissance) Team for Operation Comet:
Kozar 87th Drop Troops, 3rd Company
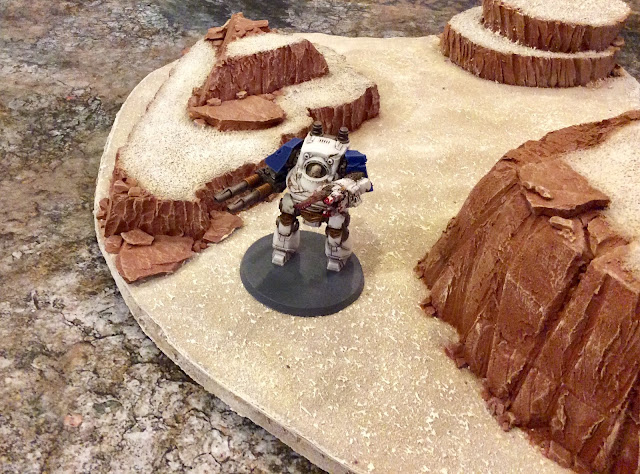
- Captain Xhaer with plasma pistol and Command Squad with medic, vox caster, carapace armor
- Veteran Squad Recon with carapace armor and Forward Observers (infiltrate and homing beacon)
- 2nd Drop Platoon:
- First Stick: Infantry Squad with melta gun and vox caster
- Second Stick: Infantry Squad with grenade launcher
- Melta stick: Two special weapons squads with melta guns
- 2 Drop Sentinels with multimeltas
- Tauros with grenade launcher
White Scars Brotherhood of the Wind
- Tactical Squad Kheeg: 10 marines with close combat weapons, sergeant with power glaive and artificer armor
- Tactical Support Squad Khoer: 8 marines with plasma guns
- Sicaran Omega Tank Destroyer Balestorm: Omega Plasma Array, heavy bolter and lascannon sponsons
- Outrider Squad Anchin: 5 Outriders with twin-linked plasma guns, including sergeant Genju
- Anvillus Pattern Dreadclaw Dop Pod
Imperial Fists Support
- Terminator Squad: 5 marines with plasma blaster, volkite charger, two power fists, chainfist, lighting claw
++++++++++++++++++++++++++++++++++++++++++++++++++++++++++++
"Listen up, soldiers," snapped Captain Xhaer.
"You've been briefed so you know the importance of Operation Comet. We've already been taking a beating and now the traitor scum is trying to link up with a warband of the World Eaters legion. We know the Death Guard are advancing on Berat. I know more than a few of you are from there and have family there. We cannot let them coordinate a joint attack on the city. This is our chance to disrupt their forces. We must take it and we must not fail.
"We will have sixty minutes, plus or minus ten, from T-zero when the White Scars drop pod hits until the Valkyries come back in for extraction, depending on how much heat they face. If the Primaries are neutralized, then take out any enemy targets of opportunity before we pull out. But watch yourselves; this isn't a suicide mission. We cannot afford to deplete too much of our fighting strength. We need to hit them fast and hard, accomplish our objectives, and get out of there alive. Understood?"
"Sir, yes, sir!" was the shouted response of 2nd Platoon.
"Into hell we go..." Xhaer began the regimental motto of the Kozar 87th.
"...Willingly!" the men finished with raised fists.
++++++++++++++++++++++++++++++++++++++++++++++++++++++++++++
BATTLE:
 |
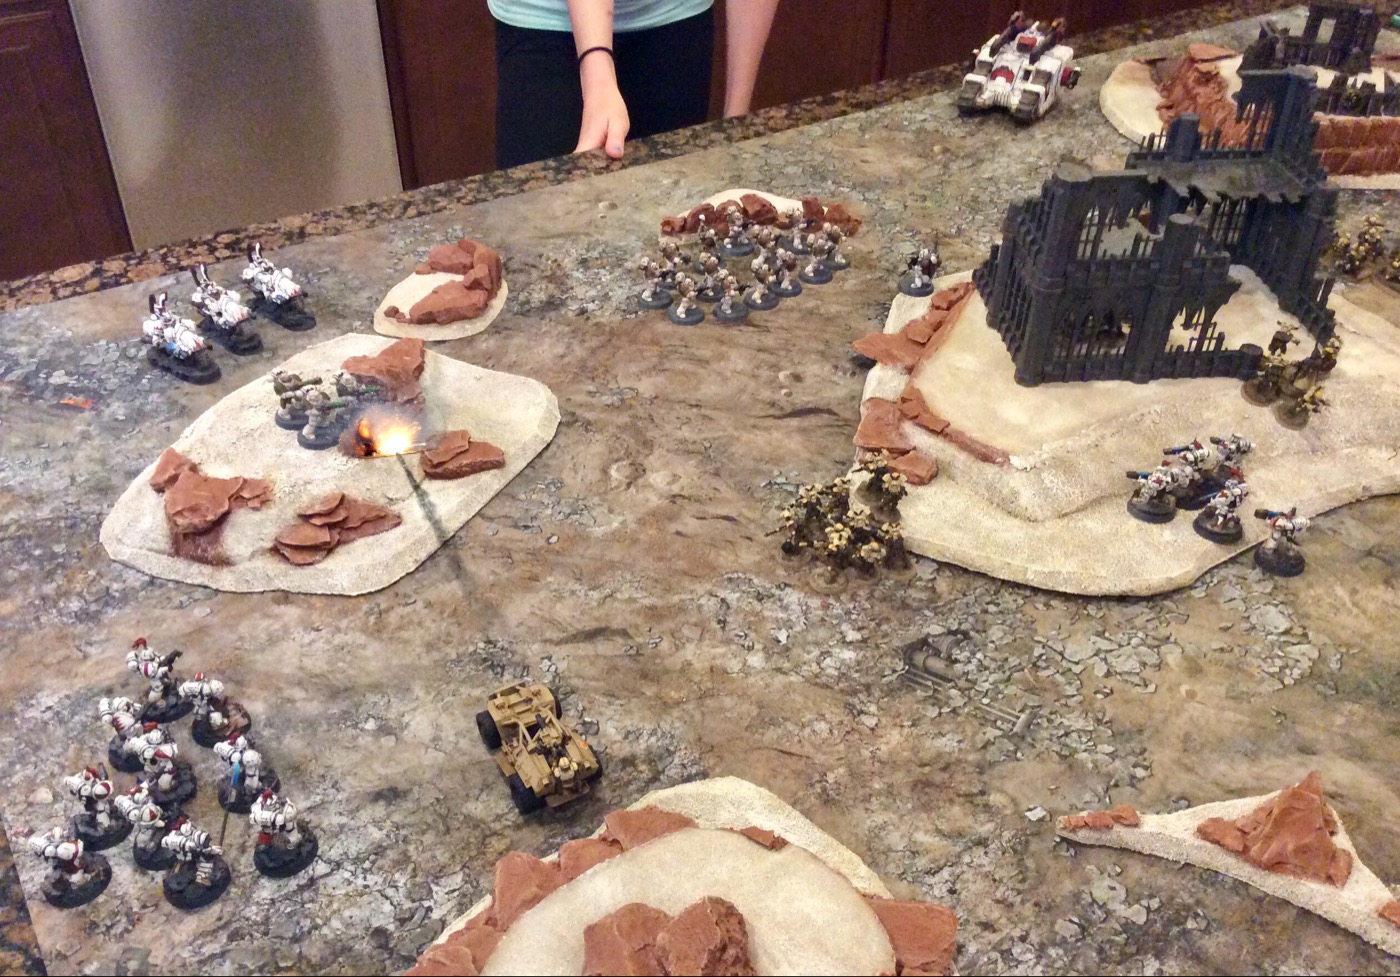
| Deployment Map |
 |
| Praetor Wolfgang of the Death Guard and Vigilator Remulak of the World Eaters meet for a secret counsel in the crumbling ruins of an ancient temple, destroyed over 40 years ago when the Xhorik system was brought into compliance during the Great Crusade. |
 |
| The meeting place is guarded by Traitor sentries representing both factions, with additional reserves stationed nearby, even though the Traitors do not expect an attack this far from the front lines. But a small group of Loyalists has infiltrated unnoticed deep into enemy territory. |
 |
| Death Guard infantry secure the area around the conclave of the two leaders, ensuring nothing disturbs their deliberations of war. |
 |
| The World Eaters Contemptor Dreadnought Vorgett the Vicious patrols among the large rocks alone... Not even the Death Guard want to be near this half-mad, barely-constrained engine of death. |
 |
| The squad of hand-picked veterans slowly make their way toward the drop zone with their homing beacon, using the rough terrain to stay out of sight of the Death Guard sentries. They are equipped with carapace armor for this dangerous, but critical, mission. |
 |
| Suddenly, a white streak screams through the sky, drawing all eyes. It slams into the barren ground with a thunderous crunch, its legs penetrating deeply into the rock. Dust billows up from the impact as the White Scars come charging out, their target in sight. |
 |
| With a burning hatred for Wolfgang, Tactical Support Squad Khoer unleash a storm of white-hot death from their plasma guns as they advance on the ruin, striking the Praetor over and over. |
 |
| The mighty Praetor Wolfgang is brought down by the plasma fire, his armor ruined and his body badly burned. |
 |
| The spear tip of the Loyalist R.A.P.T.O.R. team has struck. The Traitors quickly recover from their initial shock and prepare to come to the aid of their ambushed leaders. |
 |
| Dreadnought Vorgett is enraged at the sight of his enemies and begins striding forward, eager to experience the joy of killing once again. |
 |
| Apothecary Wilhelm leads the tactical squad toward the ruin to rescue Vigilator Remulak from the ambush. Tactical Support Squad März provides covering fire into the flanks of the White Scars force, felling a few and slowing their advance. |
 |
| From the other side, the bellowing Vorgett advances, pounding Squad Khoer with heavy weapons fire and attempting to get close enough to crush them in melee. |
 |
| The first wave of the Loyalist ambush is underway. Squad Khoer delivers vengeance for their fallen leader, Praetor Zherdan, but are now caught between Dreadnought Vorgett and the deadly volkite of Squad März and need reinforcements to finish the mission. |
 |
| As Veteran Squad Recon helplessly watch the towering World Eaters Dreadnought approach, they hear the most beautiful sound known to a Kozar infantryman: the roar of Valkyries overhead. The veterans cheer as Second Platoon makes a combat drop, their grav chutes humming as they descend right on target thanks to the homing beacon. |
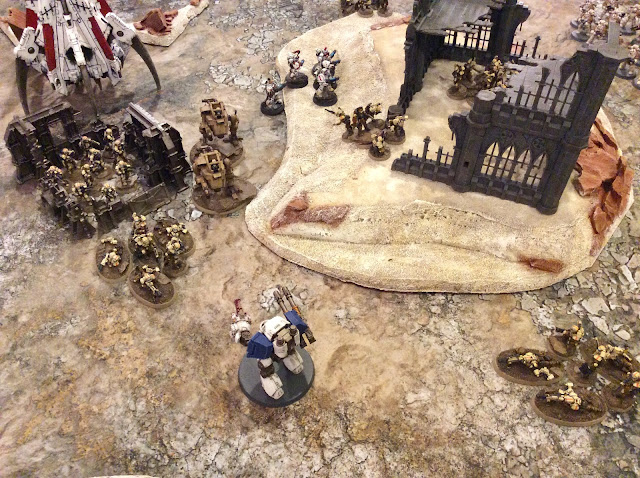 |
| Melta Stick and the drop sentinels land all around the enemy dreadnought. |
 |
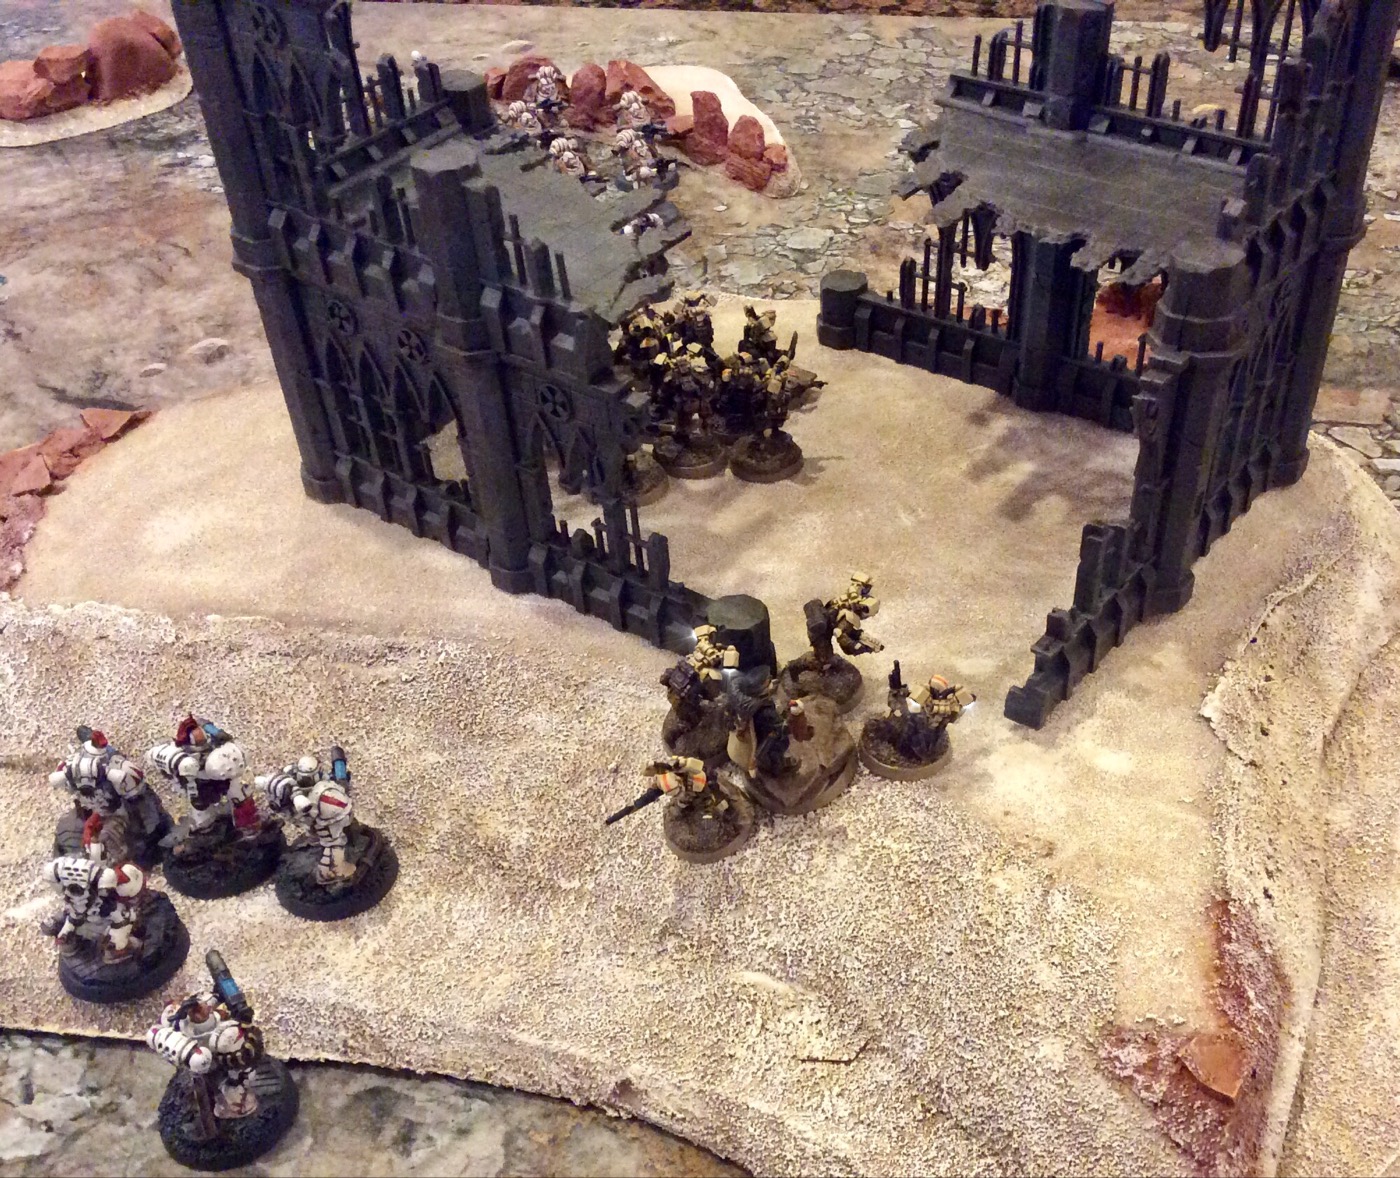
| Captain Xhaer and his command squad drop next to the central ruin where he can observe and direct the battle flowing around him. Second infantry squad make a daring drop right into the ruin where they immediately fire upon their target, the World Eaters Vigilator. |
 |
| "Aim for the legs! Don't let it reach you!" the sergeant of Melta Stick calls out as the dreadnought advances, brandishing its chain fist. |
 |
| Through the concentrated fire of eight melta weapons, the ferocious war machine is finally immobilized, but not destroyed. The nearby Kozar troopers exhale deeply with relief and then give a cheer. |
 |
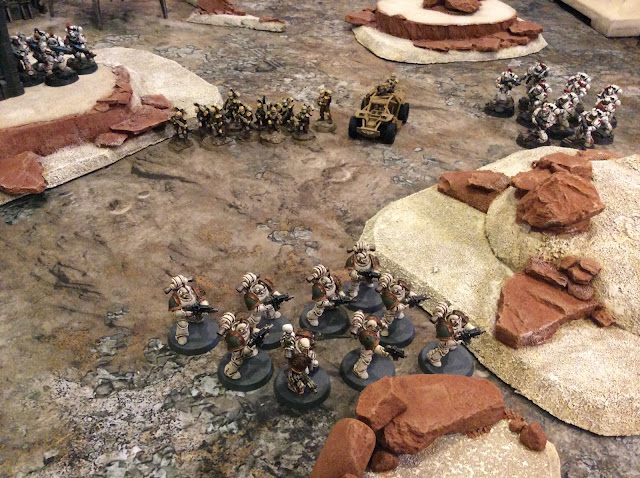
| Outrider Squad Anchin outflanks the enemy, racing behind enemy lines in a burst of speed and a cloud of dust. They take Support Squad März by surprise with a hail of plasma fire. Unfortunately, they may have pushed their bikes too hard in the flanking maneuver as two of the riders crash when their unstable plasma weapons overheat. |
 |
| Tactical Squad Kheeg arrive from reserves. Their mission is to work in tandem with the Outriders to neutralize the enemy fire base and then close off this route of escape in case either of the primary targets survive the initial strike. |
 |
| Tactical Support Squad März is caught in a crossfire between five Loyalist units. They absorb fire from every direction and although the Death Guards' famed toughness means that only a few are killed, the rest of the unit is forced to fall back from the battle due to the overwhelming enemy attack. |
 |
| The Sicaran Omega Tank Destroyer Balestorm roars onto the battlefield to intercept the escape of Vigilator Remulak. Although he is quick, the tremendous volume of fire proves too much and his body is tossed aside by an eruption of plasma. |
 |
| The Loyalists have quickly eliminated the two primary targets. They must now hold out against the encircling traitor forces until their extraction at the central ruin. |
 |
| Contemptor Dreadnought Friedrich arrives at the battle, heading straight for the White Scars' only heavy armor. |
 |
| Tactical Squad Stärke turns and marches back toward the Outriders, firing their bolters with deadly precision. |
 |
| Under the withering hail of bolter fire that fells his two remaining men, Sergeant Genju is forced to wheel his bike around and fall back to try to gain some separation from his attackers. |
 |
| The World Eaters Recon Squad, the Butchers' Eyes, march in from their outlying position, furious that their enemies were able to strike deep into their territory. They immediately size up the battlefield situation and make the call to the driver of the Red Butchers' Land Raider on where to arrive in order to deliver the most death. |
 |
| With his leg badly damaged by the melta guns, Dreadnought Vorgett roars in wrath at his inability to get into close combat with the foes that surround him and taunt him with their presence. He is forced to take out his anger by blasting the multi-melta off one of the drop sentinels. |
 |
| Friedrich rips the Balestorm's turret completely off and tosses it aside, causing the plasma generators to erupt in a gout of flame, destroying the tank and burning the crew alive inside. |
 |
| All of the Loyalist forces in the vicinity turn their focus to Death Guard Tactical Squad Stärke and Apothecary Wilhelm. |
 |
| Stick 1 advances bravely toward the Death Guard infantry, firing their lasguns while the Tauros supports by launching a few krak grenades. |
 |
| The massed fire of these units plus Tactical Support Squad Khoer kills three Death Guard marines. |
 |
| With the aid of Apothecary Wihelm, Squad Stärke stands strong and prepares to return fire. |
 |
| Captain Xhaer orders Melta Stick to focus all fire on the giant dreadnought. The two squads and the sentinel unleash another salvo of melta fire but the ancient warmachine's force fields absorb several blasts, leaving Vorgett damaged but alive. |
 |
| The last of the Loyalist strike force, the Imperial Fists Terminators, arrive from reserves in the north and immobilize the dreadnought Friedrich with plasma fire from behind. The rest of the Loyalists surround the two biggest enemy threats and concentrate their fire, but only inflict modest damage. |
 |
| The Red Butchers arrive to eliminate the target identified by the Butchers' Eyes. The Land Raider crew vaporize a few White Scars marines with lascannon fire while the Red Butchers bellow and stomp in the crew compartment, ready to kill anything that moves once they are set free. |
 |
| Sergeant Albrecht and Squad Ritter arrive from the south, eager to take revenge for the harm done to Wolfgang. The marines immediately disembark and begin gunning down the melta troopers of Second Platoon. |
 |
| Squad Ritter's Rhino unleashes a horrendous stream of chemical flame on Veteran Squad Recon. Even their carapce armor and the cover of the ruins provide no safety against the volatile mix of flaming liquids and gasses. Seven men die in horrible agony as they are burned alive, their uniforms and armor melting into their flesh. |
 |
| "AAAARRRGH!!" The screams of dying men and the stench of burning flesh fill the air. |
 |
| Squad Ritter efficiently clears away the first squad of Melta Stick and most of Veteran Squad Recon. Dreadnought __ finishes off the damaged Sentinel with another volley of heavy weapons fire. |
 |
| Sergeant Genju holds his ground and fights desperately as Squad Stärke charges forward. He is dragged from his bike and stabbed repeatedly with bayonets. |
 |
| Traitor reinforcements arrive to take vengeance on the Loyalist assassins. They vow that none will escape alive. |
 |
| Under orders from Captain Xhaer, Melta Stick's 2nd squad continue to maintain steady fire at the Contemptor Dreadnought and finally bring the fearsome warrior down in an eruption of smoke and flame. |
 |
| The resolute Imperial Fists face off against the towering Friedrich. |
 |
| "For the Emperor and Dorn! Foul traitors must perish!" |
 |
| Friedrich kills two of the Imperial Fist Terminators before he is brought low by a chain fist. |
 |
| Sergeant Khaljyk and Squad Kheeg could make a run for the rendezvous point for extraction, but their hatred of the Death Guard and desire for vengeance for their lost leader drive them to instead assault Squad Stärke. |
 |
Squad Kheeg and Squad Stärke battle fiercely. Sergeant Khalhyk defeats Apothecary Wilhelm of the Death Guard in a duel, taking him out of the battle. Several others are killed on each side. The sides are fairly evenly matched until the doors of the Land Raider Flesh Grinder open and the Red Butchers emerge.
|
 |
| With howls of rage, the Butchers charge into the melee, tearing the White Scars asunder with their power axes and chain fists. |
 |
| The Butchers make short work of their enemies and immediately start toward the rest of the Loyalists. |
 |
| As more Traitor reinforcements arrive, they begin to take control of the battlefield. Squad Ritter has now killed most of the second squad of Melta Stick, leaving a lone survivor. |
 |
| The Kozar Drop Troops concentrate their fire on the Rhino, fearing its deadly chemical munitions. The last two plasma gunners of Tactical Support Squad Khoer finish off the Death Guard tank. |
 |
| The World Eaters Land Raider Flesh Grinder eliminates the remnants of Squad Kheeg taking cover in the ruins. |
 |
| Squad Ritter goes after the Kozar Veterans who infiltrated the area and called in the strike. The Death Guard marines make them pay with their lives. |
 |
| The Red Butchers make their way towards the Loyalist rendezvous point, hoping to catch them before they can escape. |
 |
| The Traitors control the perimeter and have forced the surviving Loyalists back to the central ruins. The Butchers' Eyes recon squad kills the last survivor of Melta Stick with sniper rifle fire. |
 |
| Squad Ritter and the Butchers' Eyes combine their fire on the Tauros and kill both of the crew with well-placed shots. |
 |
| The World Eaters Terminators stride toward the Loyalist position, shrugging off a hail of lasgun fire. |
 |
| The surviving Loyalists cluster around the central ruin, fighting desperately and scanning the skies for the sight that will determine whether they live or die. The Valkyries finally arrive as scheduled, 60 minutes after T-Zero when the drop pod landed. Under a hail of suppressing fire from the squadron of fliers, the survivors clamber aboard and escape. Mission accomplished, but at a heavy cost. |
Loyalists: 19 Victory Points
Praetor Wolfgang: 2 + 5 Primary Objective
Vigilator: 1 + 3 Primary Objective
Tactical Support Squad März w/ Apothecary: 3
Contemptor Dreadnought Vorgett the Vicious: 3
Contemptor Dreadnought Friedrich: 2
Traitors: 17 Victory Points
Sicaran Omega Tank Destroyer: 3
Outriders: 4
Tactical Support Squad Khoer: 3
Tactical Squad Kheeg: 2
2 x Melta Squads: 2
Veteran Squad Recon: 2
Tauros: 1
Loyalist Post-Game Analysis:
Phil: What a wild game. For the first two turns everything was going my way and it looked like it would be an easy win, only for Pete to hang in there and claw his way back. Had the game gone to the seventh turn, he could have had a tie or win. It was unlikely I could have killed anything else of his with what I had left and he could have easily taken out another unit or two of mine. That has been common through the campaign. My army just doesn't have the durability to survive for the entire game against Pete. In order to win, I have to rack up a lot of damage early by using my mobility to destroy key targets and then hope to hold on to survive the long grind of the middle to late turns where Pete's forces wear me down.
It was incredibly fun and satisfying to play a game where my army had a mission well-suited to its strengths. This is a force that excels in quick strikes against isolated targets, disappearing before the enemy can bring their full strength to bear. Unlike the last battle, every unit pretty much performed to its maximum effect and I had good control over which enemy units they faced. And even with that, it was a very close run thing in the end!
To me, the coolest thing about this game is how the Loyalists ended up concentrating in the central ruins by the end, surrounded by angry Traitors advancing from both sides. It just all fell together perfectly for the end of the game to represent the survivors being extracted by airlift from a pickup point as enemy reserves closed in. Since the game could be 5 - 7 turns, I decided that the pickup would be 60 minutes plus or minus 10, with each turn representing ten minutes of the battle. This game had so much flavor and narrative to it because of the scenario rules and the way it fits in the ongoing story arc. This is why campaigns are so superior to individual games!
Traitor Post-Game Analysis:
Pete: Hell of a battle! Phil’s mobile force functioned perfectly and really excelled in this mission. It was a thing of beauty to see the drop pod complete a precision landing and unleash a squad of plasma gunners upon my HQs. They didn’t stand a chance! That was just the beginning of the blitzkrieg as the Balestorm Omega Tank Destroyer, Drop Troopers and Bikers rushed in to continue the onslaught. Very impressive.
My Volkite, tacticals and dreadnoughts functioned as well as can be expected. I really needed my Butchers and Land Raider to arrive as soon as possible for maximum effect, but sadly I was never able to get them into the heart of the battle. With another turn I think I could have secured a draw or even perhaps a narrow victory from the shellacking I suffered in turn 1.
I’m not second guessing my deployment or strategy in the battle, it was just a great mission for the Scars and Drop Troopers and they rightfully kicked some ass. It definitely adds a lot of story and flavor to the ongoing campaign to have this battle go the way it did. It steels the resolve and burning hatred of the traitors as they suffer a setback in their advance across Xhorik. I can imagine the screams of anger and bloodlust rising from the Butchers as they rush forward toward their prey as they evacuate away in Valkyries. And the Death Guard picking up their fallen champion Wolfgang, bringing him to their apothecaries, newly under the influence of father Nurgle. I can see Wolfgang’s eyes opening days later, his flesh newly marked by Nurgle, speaking of a new purpose, a new master. Oh, this could be getting really good.


Very impressive special effects! Good job on the cascading green nuclear barf and the melta weapons being reflected off force fields. The pics all look like freeze frames from a movie!
ReplyDelete