
ARMY SELECTION: 1410 Points
Da Blitzdreg Boyz: Battle Forged Combined Arms Detachment - Phil
- Warboss Ugruk: 'Eavy armor, shoota, power klaw, boss pole, Da' Lucky Stikk
- Painboy
- Mek (with 'Ard Boyz): kustom mega blasta
- Mek (with Shoota Boyz): kustom mega blasta
- 'Ard Boyz: 11 boyz with 'eavy armor. Nob with boss pole and power klaw.
- Trukk with rokkit launcha
- Slugga Boyz: 19 boyz. Nob with boss pole and power klaw.
- Shoota Boyz: 14 boyz. Nob with boss pole. 1 rokkit launcha.
- Grotz: 17 gretchin. Runtherd with squighound.
- Tankbustas: 7 boyz
- Meganobz: 3 Meganobz. 1 with killsawz. 1 with boss pole.
- Trukk with rokkt launcha
- Kommandos: 10 boyz. 1 burna. Nob with boss pole and power klaw.
- Bikes x 7. Nob with boss pole and power klaw.
- Warbuggy with twin-linked rokkits
- Skorcha Trakk
- Killa Kan with rokkit launcha
The Red Brotherhood: Battle Forged Combined Arms Detachment (Mostly) - Pete
- Company Captain Kane with Artificer Armor, Teeth of Terra, and Storm Shield
- 5 Tactical Terminators. 1 Assault Cannon
- Squad Alpha: 10 Tactical Marines. 1 flamer. 1 missile launcher.
- Squad Beta: 6 Tactical Marines. 1 plasma gun.
- Razorback with twin-linkd lascannons and storm bolter
- 5 Devastator Marines: 2 Heavy Bolters. 2 Lascannons
- Land Raider Crusader with Multi-melta, 2 x Hurricane Bolters and twin-linked Assault Cannon.
- Dreadnought with twin-linked lascannon and twin-linked autocannon.
- White Scars Tactical Squad: 8 marines. 1 with plasma gun.
- Allied Xhorik 87th Drop Troops squad: 10 Troopers. 1 with grenade launcher.
PRE-GAME
Mission: Control the Kleinhaurker (Mission 2 from IA:3 The Taros Campaign, "Assault on Missile Silo Decima")
Primary Objective: 2 VP if you hold the primary objective at the end of the game. The attacker can get 1 VP for destroying the objective (it can still be held after being destroyed). The objective has AV13 (we reduced it from 14 in the actual mission because our armies are a bit smaller than the 1500 points recommended) and it can be shot or assaulted. Glancing hits have no effect. Penetrating hits roll on a damage able that reduces the remaining AV. If the AV reaches 0, it is destroyed.
Secondary Objectives: Slay the Warlord, First Blood.
Game Length: 7 turns. The defender can attempt to end the game early by rolling under the remaining armor value on 3d6, beginning at the end of Turn 4.
Roll for attacker/defender and orks are defender.
Deployment Type: Long table edges
Roll for deployment zone selection and orks pick western edge.
Defender (orks) deploys and goes first.
Warlord Traits:
Warboss Ugruk: +1 to run and assault rolls for units within 12" of Warlord.
Commander Kain: Causes Fear with Fear tests on 3d6.
Campaign Impact: We decided that if the orks held the (undestroyed) objective at the end of the game, they could use the Kleinhaurker to build battlewagons for future games.
Click here for a summary of the story so far.
For nearly a month, Kane and his small garrison had fought almost continuously against the ork invasion, constantly on the move, parrying thrust after thrust of the ork raiding parties, trying to save the key drilling, mining and processing facilities from being overrun by the savage invaders. The Planetary Defense Forces were doing what they could, but they lacked the mobility, coordination and leadership to mount a fully-effective defense. Kane seemed to be everywhere at once, going days without food or rest, rallying PDF troops, reinforcing key positions with his own men and trying to arrange a coordinated defense, but the irradiated dust clouds that make up most of the lower atmosphere thwarted the commander's ability to communicate effectively over long distances and to get the information he needed.
The Red Brotherhood had stopped the orks in several key places, but had also been forced to fall back and give up ground, ceding several industrial sites to the invaders. After the recent defeat in the city ruins, the orks had made significant progress toward the populated coastal cities. Kane knew if the aliens reached them, the disruption to Xhorik's ability to contribute Kleinhaurker to the Imperial forge worlds would be vastly reduced for far too long, an unacceptable result. The potential millions of civilian casualties were of secondary importance.
Now Kane had just received reports that a sizable ork warband had split from Filgakk's main force and had ransacked a processing faclity where they would be able to loot a dangerous quantity of semi-refined Kleinhaurker; the PDF defenders had been no match for the lighting-fast greenskin raiding party. The marine captain had seen firsthand how the ork warriors in their massive mega armor decimated one of his squads in the last battle. Clearly their meks had stumbled upon how to utilize Kleinhaurker in some way to create armor strong enough to nearly rival anything his own men had. He knew they must not be allowed to gain such a large quantity of the rare and precious material, or who knows what hellish tools of war they would construct next for use against his men?
Kane looked at his battered. exhausted and injured men. Despite the conditions, he knew they would never falter nor waver in their duty. But he was running short on fuel and supplies and, more importantly, his vehicles were in desperate need of maintenance and repairs after multiple engagements without a pause. He didn't know if his depleted army would be enough to take the Kleinhaurker from the orks, but he never doubted their commitment to die in the attempt if need be.
As his forces were mounting up for the assault on the processing facility, a glimmer of hope appeared: the first fresh reserves had finally materialized. The Xhorik 87th Drop Troops regiment had arrived to defend their home and several divisions were now reaching the front lines to support the marine forces. Kane had known they were on the way for weeks, but the lumbering speed of the Imperial war machine meant nothing happened quickly. But more importantly and far more unexpected was the arrival of a small force of White Scars space marines. The speed of their ship had allowed them to reach Xhorik before the great gears of the Imperial bureaucracy had even finished fully recording the fact that there was an invasion occurring, let alone began the process of officially requesting aid, selecting and coordinating resources, appointing an overall commander, and so on. It could be years before the official response arrived, if ever. The White Scars were few in number, but the elite warriors were exactly what Kane needed for his assault.
As they rode through the darkness toward the processing facility, Kane could see the beginnings of a true Imperial army forming and he knew from experience that when the Imperium truly mustered her resources into a combined force, nothing in the galaxy could stand against it. His men had bought time and now hopefully enough reinforcements would arrive to allow him to cleanse this planet of every last ork. He would personally enjoy it.
DEPLOYMENT

Ork Deployment and Da Plan (Phil):
This is an interesting and seemingly well-balanced mission. While the defenders start with the objective in their deployment zone, the attackers have the chance to score one more victory point (a total of five) than the defenders (a possible total of four) by destroying the objective. The defenders also get a nice option to try to end the game early if they hold the objective where the chance of success is based on how much damage the attacker has inflicted on the objective so far. But the attackers get the last turn, which can be critical in a mission where control of the objective at the end of the game is all that matters.
Defending an objective presents a difficult situation for a fast army that utilizes board control and assault as the keys to victory. If I held back in my deployment zone to guard the objective, the marines could safely pick my force to pieces with long-range firepower for a couple of turns and then move in to grab the objective against my weakened remnants. My army's main strengths are mobility and numbers so I had to think how I could use those to my advantage to complete this mission. What I decided was that I would surge forward and try to clog up the middle of the battlefield with a wall of green bodies and ramshackle vehicles, preventing the marines from getting anywhere near the objective.
With no idea where the marines would be coming from, I went with a fairly typical deployment of infantry in the center and wheelz on the flanks. This setup ensures my slower infantry blobs will never be left hanging far from the action and forces the marines to either spread out to counter my mobile units or risk getting caught by a speedy flank attack, the famous Gorkamorka. I used the grotz as a screen for my slugga boyz to give the orks a 5+ cover save as they advanced.
Once I saw Pete's extremely concentrated Refused Flank deployment, I knew I was in trouble. I had mistakenly placed my two units with any realistic chance of stopping the land raider on the same side of the table, meaning my left flank would be overwhelmed by the vastly superior marine forces on that side of the table. Normally the key to success with orks is to threaten the enemy with too many targets at once, forcing them to split their fire and allowing at least a few units to get through into melee. But my units were too strung out to present him with multiple threats simultaneously and I knew he would be able to pick me apart, unit by unit.
So my plan was simple: use my superior numbers and mobility to stall his advance for a few turns, keeping him away from the objective for as long as possible and hope for an early end to the game. I knew he would easily achieve First Blood so in order to win, my plan was to get Slay the Warlord and to hold the objective at the end.
 |
| The ork units on the south end are disappointed to not see any opponents on their side of the battlefield. |
 |
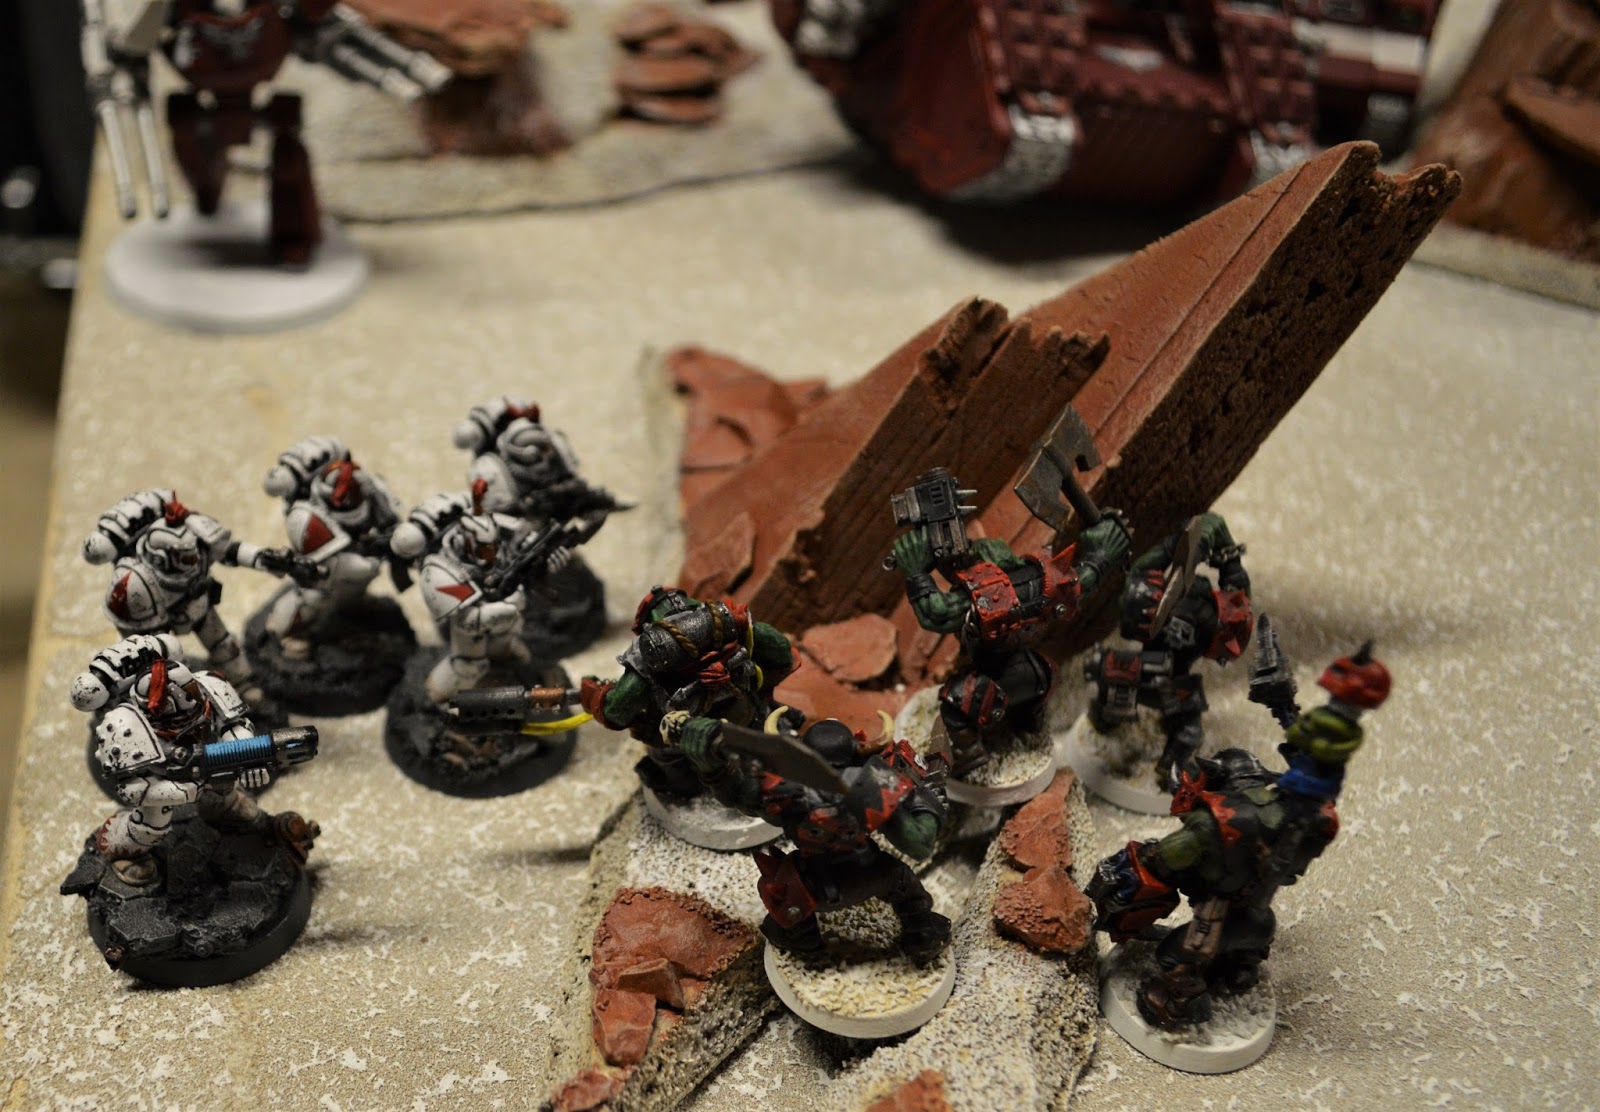
| The 'ard boyz roll up in their ramshackle trukk, ready for a good scrap. Staring across at the bulk of the marine force, there are no shortages of targets! |
 |
| The techno-savage tankbustas move through the ruined remains of a mining processing and administrative complex. |
 |
| Warbikers race across the frozen, irradiated landscape, looking for the 'oomies in the red metal suits. |
Marine Deployment and Strategy (Pete):
I was excited to try this mission with a designated attacker, defender and overall objective. Simple and straightforward. However, it was a bit of role reversal to have my marines be the attacker and the orks charged with defending a stationary point on the battlefield. When picking my army list there were no real decisions to be made - it was going to include every painted model of the Imperium at my disposal, including Phil's Drop Troops and White Scars.
As I deployed my troops, after getting the benefit of seeing the entire Ork army on the table first, I decided to keep them together on one side of the battlefield. In games past I had gotten into trouble when overwhelming numbers of orks were engaging each of my units without the support of each other. Marines vs. orks do much better when the marines can focus multiple units of their own on a common target and annihilate it or scatter it to the table edge before moving on to the next one or two.
My big plan was to hopefully sweep the table in a arc starting at the fulcrum of the Comm Tower and ending the maneuver at the Kleinhaurker primary objective. I was hopeful that half of Phil's army would be chasing me in a mirror arc and spend the game fighting the vacuum where my army was the previous turn. I'd then be free to focus the awesome firepower of my entire army on a overwhelmed foe, pushing them out of the way and back against the ruined cityscape.
I planned to screen the Devastators with the Drop Troops for a squishy human shield. I anticipated the Land Raider blocking for the Razorback with an objective-securing tactical squad in tow. The White Scars and the Dreadnought would form the outermost arc and hopefully break Phil's flank. Tactical Squad Alpha was designated as a sacrificial squad meant to slow down the advancing orks coming around the ruined city in a hail of bolter fire and missles. I figured they could block a few squads or vehicles for a moment while the bulk of my army competed for the Kleinhaurker.
 |
| A small force of White Scars lend their bolters to the defense of Xhorik Prime, advancing alongside the mighty dreadnought. |
 |
| The devastator squad takes up a commanding position on the hill with the communications tower. |
 |
| The Xhorik 87th Drop Troops have returned to their home world, but instead of being disbanded as expected, they are thrown back into the meat grinder. |
 |
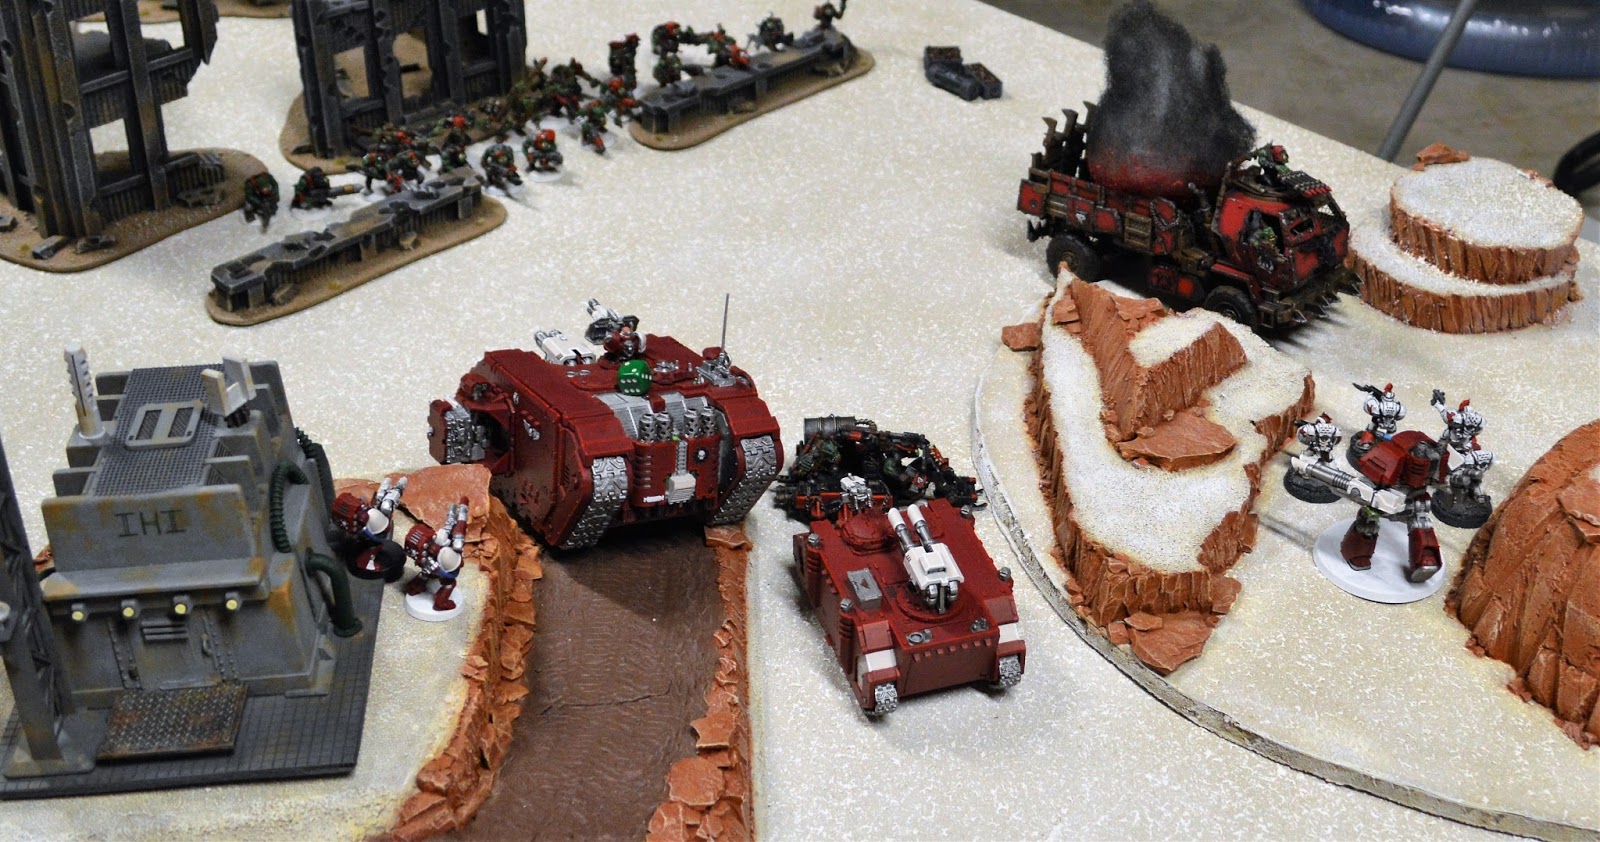
| The massive land raider and its cargo, the terminators and Captain Kane, form the heart of the space marine assault on the orks' captured Kleinhaurker. It cannot be allowed to fall to into the hands of the xenos scum! |
Orks Turn 1:
My plan was to clog up the middle of the table and force the marines to slog their way across to my deployment zone inch by inch. So I moved the center of my army straight forward.
The key move for this turn was disembarking the 'ard boyz and then moving their trukk flat out right in front of his tanks, forcing him to make the trukk Explode. He would either have to shoot it apart, meaning not moving in the movement phase, or try to Ram it, where he could only get past it if it Exploded (unlikely) and if he did, he could only shoot snap shots that turn in the shooting phase.
 |
| The skorcha sled races around the ruined buildings, headed for the marine flank. |
 |
| The meganobz were disappointed to have no enemies nearby so they raced off to the north where the big fight was breaking out. |
 |
| The main mob surges forward, using the grotz as a living shield against the impending marine fire. |
 |
| The killa kan climbs up onto a jagged rock and fires a rokkit into the devastators, killing the sergeant for the only casualty of the turn! As usual, the unfortunate devastator sergeant was standing a half step in front of his men and thus nobly volunteered to take the first rokkit. |
Shooting was uneventful as the devastators made all their saves against the bikes.
 |
| The ork forces close in on the marine position. |
 |
| Ork Turn 1: The orks run forward into the center of the battlefield while the bikes and one trukk do their best to slow the marine advance. |
Orks: 0
Marines: 0
Space Marine Turn 1:
The marine strike force in the two tanks could not advance much due to the trukk blocking their way.
 |
| The White Scars and the dreadnought advance on the 'ard boyz and together bring down four of the armored beasts. |
 |
| The Razorback damages the trukk and the Land Raider finishes it off, creating a large explosion that hits the bikes and White Scars, but doesn't kill anyone. The hurricane bolters then take down a few of the ork bikers. |
 |
| The drop troops race down the hill toward the ork lines, knowing they are giving their lives so their families might be safe from the alien menace. |
 |
| Maine Turn 1: The marines don't move much, but they inflict serious damage on the ork left flank. |
Orks: 0
Marines: 1 (First Blood - trukk)
Orks Turn 2:
The bikes failed to rally and fled the field. My left flank was in bad shape and the loss of the bikes really hurt, but the sacrificial trukk did its job and the marine strike force was still stuck in their deployment zone. In this turn, I planned to continue to put the pressure on Pete with three assaults across the table. I also continued to throw my vehicles forward to slow him down with the kan and rokkit buggy moving to block the road to the objective and the meganobz moving into a position to threaten the land raider if it moved too far forward on Pete's next turn.
 |
| The ork slugga boyz race toward the juicy target, eager to crack some skulls while the grotz wisely move aside, lest they get trampled in the race to make the first kill! |
In the shooting phase, the shoota boyz, tankbustas and skorcha kill four members of Squad Alpha. The mek with the 'ard boyz brings down a White Scar with his kustom mega blasta.
 |
| The drop troops bravely fire overwatch into the oncoming green wall to no effect. |
 |
| The 'ard boyz charge the White Scars, eager to be the first in the warband to claim a trophy from these new foes. Unfortunately, two fall to overwatch before they can reach melee, leaving only six orks against the seven marines. |
 |
| The kommandos race out of the ruins, using the power of the warboss' Waagh!!! to cover the ground to the marine lines. |
 |
| The slugga boyz make short work of the over matched drop troops. I only got to roll half my dice! |
 |
| The marines kill one ork while the orks bring down two foes in return, causing the White Scars to fall back from melee, much to the dismay of the orks, who were just starting to have fun! |
 |
| The kommandos kill four marines and the two survivors fall back. |
 |
| The White Scars use a classic tactic from their tribal past, the false retreat. After falling back from combat, they immediately rally and turn their guns on the orks. |
 |
| After Squad Alpha falls back, the sneaky kommandos make a kunnin' move to climb up behind the Comm Tower for a sneak attack on the marines' rear position. |
 |
| Ork Turn 2: The orks continue to drive forward, winning three assaults, but not inflicting any crippling damage on the marines. |
Orks: 0
Marines: 1
Space Marine Turn 2:
 |
| After a false retreat, the White Scars swing back toward the 'ard boyz, killing three with point blank shooting. |
 |
| The Land Raider disgorges the terminators, who climb the hill and open fire on the main ork mob, killing seven of the foul aliens. |
 |
| The Land Raider and the Razorback combine their firepower again, this time to destroy the killa kan advancing across the rocks. They continue to slowly clear a path through the wall of ork light vehicles. |
 |
| The White Scars charge into the last few 'ard boyz, killing one, but the orks hold due to mob rule. |
 |
| Marine Turn 2: The marines counter attack, continuing to inflict heavy damage on the orks, but only making slow progress toward the objective. |
Orks: 0
Marines: 1
Orks Turn 3:
I had the board position I wanted, but I was taking heavy losses and my reserves were too far back holding the objective to support my main advance. Still, I had about a dozen orks left of my main mob, including a warboss, nob and painboy and I felt that was enough to take down the mighty Captain Kane and get me that much-need VP for Slay the Warlord.
The shoota boyz finish off Tactical Squad Alpha while spreading out behind the barricades. The tankbustas take up position behind them, forming the last line of defense against the impending advance of the mechanized marine strike force. The warbuggy zips past the Land Raider to take a shot at the Razorback, but misses.
 |
| The meganobz hope to use the rocks as cover as they continue to hold their position near the objective. |
 |
| The last four kommandos complete their sneak attack on the devastators, but the lightning reflexes of the marines catch them off guard as two are vaporized by heavy weapons overwatch fire. The last boy is killed in melee, leaving only the nob, who brings down two marines with his power klaw. |
 |
| The slugg boyz advance on the terminators, thrilled to be fighting against the best of the 'oomies. |
 |
| WAAAGH!!! The orks charge. |
 |
| Massive carnage ensues and only a few are left standing after the first bloody exchange of blows, including both warlords. The orks pass morale and the fight continues. |
 |
| Ork Turn 3: The orks assault the marine center position, but the fighting is inconclusive after one round. The rest of the ork units hang back to guard the objective, trying to use what cover is available from awesome firepower of the Crusader. |
Orks: 0
Marines: 1
Space Marine Turn 3:
 |
| After dispatching the 'ard boyz, the White Scars destroy the warbuggy with their plasma gun. |
 |
| For the third time, the Razorback and Land Raider concentrate their fire. Their unlucky victim this time is the mega trukk. |
 |
| With their trukk wrecked, the meganobz disembark looking for revenge. However, they are quickly decimated by the remaining weapons of the Land Raider. The lone survivor falls back. |
 |
| The marine strike force advances, sweeping the ork resistance aside. |
 |
| Marine Turn 3: The marines make their push on the objective, destroying most of the remnants of the ork left and center. |
Orks: 0
Marines: 2
Orks Turn 4:
My army was mostly gone, but I still had a chance to fulfill my plan. I just had to kill the marine commander with my warboss and hope my last two mobs could hold out near the objective long enough for the game to end.
I doubted my warboss would survive another round of hits from the Teeth of Terra so I threw my grots into the melee to absorb some hits, hoping my warboss would live long enough to use his klaw one more time. Besides, how funny would it be if a grot somehow managed to inflict a wound on the marine captain?
I slid my shoota boyz west to get within claiming distance of the objective, while still staying mostly in hard cover. The tankbustas were screened by the shoota boyz and were ready to either assault the Land Raider if it got closer, or to run down to claim the objective if the shootas were to get killed or broken in Pete's turn. At this point, the game could end anytime and I needed to hold the objective to have a chance winning.
The shoota boyz and tankbustas combined their rokkit and kustom mega blasta fire to land a single glancing hit on the Land Raider, removing one of its four hull points.
 |
| The slaver leads his grotz in a charge to support his warboss and claim the biggest trophy of all! |
 |
| Thanks to Rampage from his relic sword, Kane cuts down the slaver and two grots and still deals two wounds to the warboss, killing the mighty ork! The rest of the grots are destroyed in a sweeping advance. |
 |
| The skorcha sled attempts to slow the marine advance on the objective by blocking the road. |
 |
| Ork Turn 4: The warboss is killed by the captain while the remaining orks move to secure the objective. |
Ouch. Losing my warlord hurt doubly bad because not only did Pete get a Victory Point, but now I had almost no chance of killing his warlord after he consolidated back behind the hill. The best I could hope for at this point was to hold the objective and prevent the marines from destroying it in order to force a draw.
Orks: 0
Marines: 2 (First Blood + Slay the Warlord)
Space Marine Turn 4:
With his forces still too far away to contest the objective and the risk that the game could end early looming, Pete saw his opportunity to win. If he could break the shoota boyz, the orks would not have a unit claiming the objective and would therefore not make the attempt to end the game early. He also knew that the longer the game went, the more likely he was to win given his vastly superior remaining forces.
 |
| The White Scars sprint toward the objective marker, their path now totally clear of resistance. |
 |
| The mechanized strike force continues to roll forward, spewing death to the orks, but finding their progress continually hampered by orks blocking their path. |
 |
| Marine Turn 4: Everything moves toward the objective and fires into the shoota boyz in an attempt to dislodge them from the Kleinhaurker objective but the orks pass morale and hold on! |
Orks: 0
Marines: 2 (First Blood + Slay the Warlord)
As some orks were still holding the objective and a draw was the best I could hope for at this point, I (Phil) elected to try the roll to end the game early. Pete had not damaged the objective at all so I had to get a 13 or less on 3d6. I rolled a 5, 6 and 1! Game over!!
Final Result:
Orks: 2 (Hold Primary Objective)
Space Marines: 2 (First Blood + Slay the Warlord)
DRAW!
POST-GAME ANALYSIS:
Pete (Marines): Whew! That was an intense four-turn game filled with highs and lows for each side. I was really hoping for the opportunity of one more turn, as I know I could have knocked some significant hitpoints off that objective or destroyed it outright. And looking back, I probably should have shot that final Razorback lascannon shot at the Kleinhaurker and had a great chance to reduce its hitpoints by a point or two. I figured I'd have a better chance at scattering the shoota boys and removing them off the objective by them failing a morale check on an 8+. Hindsight is 20/20. I'm still proud of how my army performed and how my strategy was still partially realized despite the orks' cunning attempts to stop us. I hadn't thought of Phil using his vehicles to literally block my path, slow me down and trap me in a corner as his forces moved in to overwhelm us with their far superior numbers. I was tempted to try to ram through with my Land Raider on more than one occasion for a breakout maneuver, but it would have no doubt ended in being swarmed and destroyed by the bulk of Phil's army hammering the tank with power claws and rockets.
I was very keen on getting First Blood's victory point and knew there was a great chance it would be mine, as the orks have numerous vehicles with low enough armor values that it's a very doable objective. And I hoped for Slay the Warlord too, and with it I knew the worst I could do as the attacker was a tie, unless Kane went down. And that was a pivotal moment of the battle - Kane making 3+ invulnerable saving throws against the Warboss. In games I win that tends to be the case. In games I lose... he isn't so lucky.
Marine MVP: The Land Raider was its usual badass self with its multi-melta turning vehicles to goop, hurricane bolters and assault cannon mowing down masses of orks, and dropping off its payload of terminators and Captain Kane at the right time and place on the battlefield. The Land Raider also acted as cover for the Razorback and Tactical Squad Beta whose mission was to stay alive and advance on the Kleinhaurker. With only armor value 11, rockets could penetrate the Razorback half the time they hit. I had my doubts about the White Scars ever making it to the objective in time so to me the Razorback staying functional and mobile was vital to my overall strategy.
Marine Disappointment: The Terminators were a disappointment as usual. As a 200 point unit, they are far too vulnerable against the orks. I can see why no one who fields tournament competitive armies ever take them. The orks cause them to take far too many saving throws, particularly from a seemingly endless amount of attacks they face in close combat, and their own attacks are wasted on regular choppa boys while the nobs and warboss evade any damage. Perhaps a squad of lightning claw terminators would do alright since they'd fight at initiative 4 and have 3 attacks each, but they still might get overwhelmed by a big mob. I think I'll stop using my terminators when I get more models painted.
Key Moment: To me, the key moment of the battle was Phil rushing his trukk into the path of my Land Raider on turn one, effectively putting me a full turn behind schedule the whole battle. Rather than securing the objective on turn 4 per the plan, we were still a good 8-10 inches away from it and scrambling to remove the current tenets, the shoota boys. His thoughtful decision to block my army's progress with steel and ork guts was a wise one, rather than just fight a more traditional strategy. My Razorback and Tactical Squad Beta never got going and sputtered forward blocked by the trukk and then the flame wagon. The Land Raider did its job, but with such a short game of only four turns, Phil used the mission to thwart me just as much as his army's bullets and power claws.
Phil (Orks): That was an intense finish with the outcome of the game riding on a couple of critical dice rolls, first the shoota boy morale check and then the roll to end the game. The rolls both went my way and salvaged an otherwise rough day for the orks! I knew it would be an uphill battle from the moment I saw Pete's concentrated deployment against my spread-out forces as I just didn't see any way to bring enough threats to bear on his armored spearhead at the same time to guarantee one getting through. So, I figured that since kill points did not matter in this game and Pete's army was fairly mobile but lacked any truly fast units, I would use my orks as living speed bumps to slow down the marine advance enough to keep them from the objective at the end of the game. The plan worked, but just barely. I am sure that one more turn would have seen most of my remaining orks wiped out or the objective destroyed by his multitude of heavy weapons and there was no way I could stop all of his remaining vehicles.
Overall, Pete used his refused flank deployment to decimate my army very effectively. But he may have been having a little too much fun killing orks and didn't pursue the mission objective with enough urgency.
One of the keys to this game was morale and it played a much bigger role than usual. I lost the remnants of two key units (the bikers and meganobz) due to failed morale and failed mob rule checks, while the marines were able to use their morale to their advantage by falling back out of combat twice (with no chance to be caught in a sweeping advance) and then automatically rallying in their own turn to spin around and shoot up the boyz they just ran from! So even though I "won" both combats, the outcomes were very bad for me! And with Pete's warlord having the Fear warlord trait this game, my main slugga mob and warboss fought at WS1 in a couple of key rounds (I think we forgot it in the first round, but applied it in the next two) due to failed leadership checks with no chance at mob rule. This meant I landed fewer blows on his captain and he stayed alive to finish me off. And in the end it was a morale roll that I finally passed that salvaged the day for me.
Overwatch was also abnormally deadly in this game, costing me 10 orks (for 92 points) in a game where I launched only four assaults.
Ork MVP: I can't say any of my units performed well from a combat perspective as Pete mostly wiped the floor with me all across the battlefield. I guess by default I have to say the shoota boyz as they held the objective to earn the draw. They were forced to hold back out of the main action and were only able to pick off a few marines here and there at the edge of their range, but their numbers allowed them to spread out where they could contribute in small ways while absorbing a lot of firepower on that last turn. Like true orks, their most useful trait is to be able to take a hard punch and keep standing! This was the case in the last game against the tyranids as well.
Ork Disappointment: The warbikes and meganobz are normally some of my favorite and most effective units, but this game they both fled off the table without inflicting any damage whatsoever. I think my orks are starting to really fear his Land Raider as it caused both of these units to fail morale and flee the field. The meganobz at least used their threatening presence near the objective to force Pete to slow his mechanized rush until he dealt with them, costing him critical time, so they were still able to make a contribution to my overall strategy.
Key Moment: Obviously both of the dice rolls at the end of the game were extremely intense. But by that point, winning the game was out of reach for me so I was only hoping to save the night from becoming a total embarrassment for my orks. The real key moment was the duel between Kane and my warboss with Kane making two 3++ saves in the first round, then another two or three in the second round, and then landing five wounds in the third round to kill the slaver, two grots and finish my warboss before I could hit him again. We found out after the battle that the Teeth of Terra does not let you gain the +1Attack for two close combat weapons so the captain should have had three base attacks before applying Rampage rather than the four attacks we were using during this game, so that combat could have turned out differently. Two VPs hung in the balance so this combat was just as critical as holding the objective to the overall outcome.
Lessons Learned: So what would I do differently? As I already mentioned, I should have spread the tankbustas and meganobz farther apart in my initial deployment so the Land Raider could not so easily avoid them both. But overall, I think I played pretty well considering the mission. I stayed focused on the objectives the whole game and I could have won if Pete would have failed just one save against my warboss. The mission forced us both to play our armies out of our normal comfort zone, which made for a fun, strategic and unpredictable game. I can't wait for the next battle! Especially since I would get to build and use my first battlewagon because my boyz held on to the objective!
As Kane looked down at his legendary blade, the Teeth of Terra and saw it completely coated in the blackish ork blood, he wondered if he had briefly succumbed to his own hatred of the foul orks and his desire to see every one of them killed in retaliation for the battle brothers he had lost. Had he been more eager to take his vengeance on the orks than to complete the more strategic objective? He knew there was no place for emotion in war and his men counted on him leading with nothing but cold, tactical calculation. He vowed not to make the mistake again. Yet, it seemed that every time he wielded the fearsome Teeth of Terra against these orks, he felt a hot anger rise through him that made his blade feel as light as a feather and as powerful as thunderbolt. Perhaps the mysterious weapon had an effect on him, or perhaps the ancient relic had its own reason to seek vengeance on the orks. Commander Kane dismissed the thought as a side effect of the exhaustion of the last month.
......
Filgakk Skullsplitta smiled widely (a gruesome sight indeed) as he watched the crates of Kleinhaurker being carried to his meks' makeshift workshop behind the front lines, cobbled together out of an IHI refueling station. The loss of Ugruk didn't bother him too much, although he was a quite capable and vicious commander. No, old Ugruk was getting a little too big for his boots and it was only a matter of time before Filgakk was going to have to cut him down to size anyway. Besides, with most of Ugruk's warband killed or scattered, he didn't need him anyway. The few surviving orks would now fall under Filgakk's personal banna pole, which suited him just fine.
The reports of the battle at the processing station did trouble Filgakk, however. That 'oomie warboss and his giant Kroosader tank seemed to be everywhere his boyz went, destroying far too many of his best trukks and mobs. He thought he had personally killed that beakie boss in their last encounter, but he was proving to be tougher and more resilient than expected. Filgakk felt he was a worthy opponent and looked forward to the day they fought again so he could add his fancy red helmet (with head still inside) to his trophy pole. That would earn the respect of all da ladz. He noticed some of his boyz seemed to be getting a little hesitant to go on a raid when they've heard that Kane and his tank will be there.
Yup, those Kroosader tanks were an even bigger problem. Filgakk knew he needed an answer if he was going to defeat these puny 'oomies and take everything he wanted from this planet. He had ordered his meks to get descriptions from every ork boy who had faced a Kroosader so far in this invasion and lived to tell about it (a rather small group, Filgakk thought glumly). He would build his own Kroosaders and they would be even better than the 'oomie ones because they would be more... orky! Filgakk grinned to himself again, jagged teeth jutting out of his twisted lips, invoking a grimacing snarl more than a smile. He couldn't wait to see the look on those 'oomies' faces when they saw what his mek boyz were going to put together from that shiny rock!
... to be continued ...
No comments:
Post a Comment