
ARMY SELECTION: 850 Points
Death Guard Eradication Patrol - Pete
- Praetor Wolfgang: Terminator armor, Paragon Blade, volkite charger, digilasers
- Tactical Squad Stärke: 14 marines with close combat weapons, sergeant with power fist and artificer armor
- Tactical Support Squad März: 7 marines with volkite calivers
- Heavy Support Squad Tragen: 3 marines with missile launchers
- Contemptor Dreadnought Friedrich: multi-melta, meltagun, dreadnought close combat weapon
White Scars and Drop Troops - Phil
R.A.P.T.O.R. Team (Rapid Assault, Precision Tactical Operations and Reconnaissance)
R.A.P.T.O.R. Team (Rapid Assault, Precision Tactical Operations and Reconnaissance)
White Scars, Brotherhood of the Wind
- Consul Kuyuk: Power glaive, bolter, cyber-hawk
- Tactical Squad Kheeg: 10 marines
- Tactical Support Squad Khoer: 5 marines with plasma guns
- Legion Outrider Squad Anchin: 3 bikes with twin-linked plasma guns
- 2nd Platoon (remnants)
- Platoon command squad with melta gun
- Infantry squad with grenade launcher
- Attached Storm Trooper Squad: 8 storm troopers
- Tauros with grenade launcher
PRE-GAME
Mission: We decided to use the mission system we devised back in Game 2 a second time. It consists of eight simple missions with victory conditions for a Minor and Major success. If one player scored a higher level of success than the other, that player would win. We would each draw one at random from the pile and it would be secret from the other player. If a player felt he had little chance of success, he could draw a new one, but then would have to reveal his mission to his opponent, giving the opponent a strategic advantage. The goal was to come up with simple missions that small armies of 4 - 5 units could focus on accomplishing.
1. Assassinate:
Minor: Enemy warlord reduced to 50% of starting Wounds.
Major: Enemy warlord is destroyed or off the table at the end of the game.
2. Seek and Destroy:
Target is the unit in the enemy's army with the highest total point cost, not including attached HQ choices.
Minor: Target reduced to 50% of starting Wounds or Hull Points.
Major: Target destroyed, falling back, off table, or immobilized with all weapons destroyed.
3. Rescue:
Rescue objective placed halfway out and about 1/4 to 1/3 from one table edge. Objective can be moved by infantry only.
Minor: Control (contested) objective at end of game.
Major: Move objective off your own table edge before end of game.
 |
| The Rescue Objective: A heretical preacher, spreading doubt and fear about the False Emperor. The loyalists might need to interrogate this apostate, while the traitors might need to rescue this influential paragon of truth so she can continue to lead others to the light of Horus. |
4. Take and Hold:
Take and Hold objective placed halfway out and about 1/4 to 1/3 from the opposite table edge of the Rescue objective. Objective cannot be moved.
Minor: Control (contested) objective at end of game.
Major: Control (uncontested) objective at end of game.
For this game, the other potential objective is a small supply depot, with provisions and war materiel that may be desperately needed by either side.
5. Cleanse:
Minor: Control (uncontested) more table quarters than your opponent at end of game.
Major: Control (uncontested) two more table quarters than your opponent at end of game.
6. Control Target Area:
Minor: Hold both the Rescue objective and the Take and Hold objective at the end of any two of your turns.
Major: Hold both objectives at the end of three of your turns.
7. Breakout:
Minor: Get one unit off your opponent's table edge.
Major: Get two units off your opponent's table edge.
8. Hold the Line:
Minor: Control (uncontested) your deployment zone.
Major: Control (uncontested) your table half.
Game length would be 4 turns with a 3+ chance of turn 5 and then a 4+ chance of turn 6, which would be the last possible turn.
Mission Assignments:
Pete: I drew the “Cleanse” mission, which is absolutely a doable objective for my army, as the plan is always to wipe out Phil’s army and control the board. Nothing too fancy, as I don’t have a finesse army; more of a hammer and anvil style.
Phil: I drew "Control Target Area" and kept it. I thought I had a reasonable chance of quickly getting to the objectives and holding them for a couple of turns before Pete could push me off with his stronger, slower army.
With the missions selected, we decided the White Scars were trying to hold this area for long enough for some of their non-combatant supporting functions to loot the supply depot and interrogate the heretic preacher. If they could hold the area for two turns, they could get a sufficient amount of supplies and information, but with three turns, they could obtain the full amount of both.
The Death Guard had the simple objective of clearing all enemy resistance from as many city sectors as possible and controlling those sectors with their own forces.
 |
| The Battlefield: The war-ravaged city of Bielyr. |
Roll for table edge and Phil wins.
Phil: The table edges looked pretty even, but I went with the west edge so I could use the southern ruins to approach the Rescue Objective, while landing my deep striking reserves on the Take & Hold Objective.
Roll for first turn and Phil wins.
Phil: Since my mission depended on control at end of each turn rather than the end of the game, I elected to deploy and go first.
Deployment:
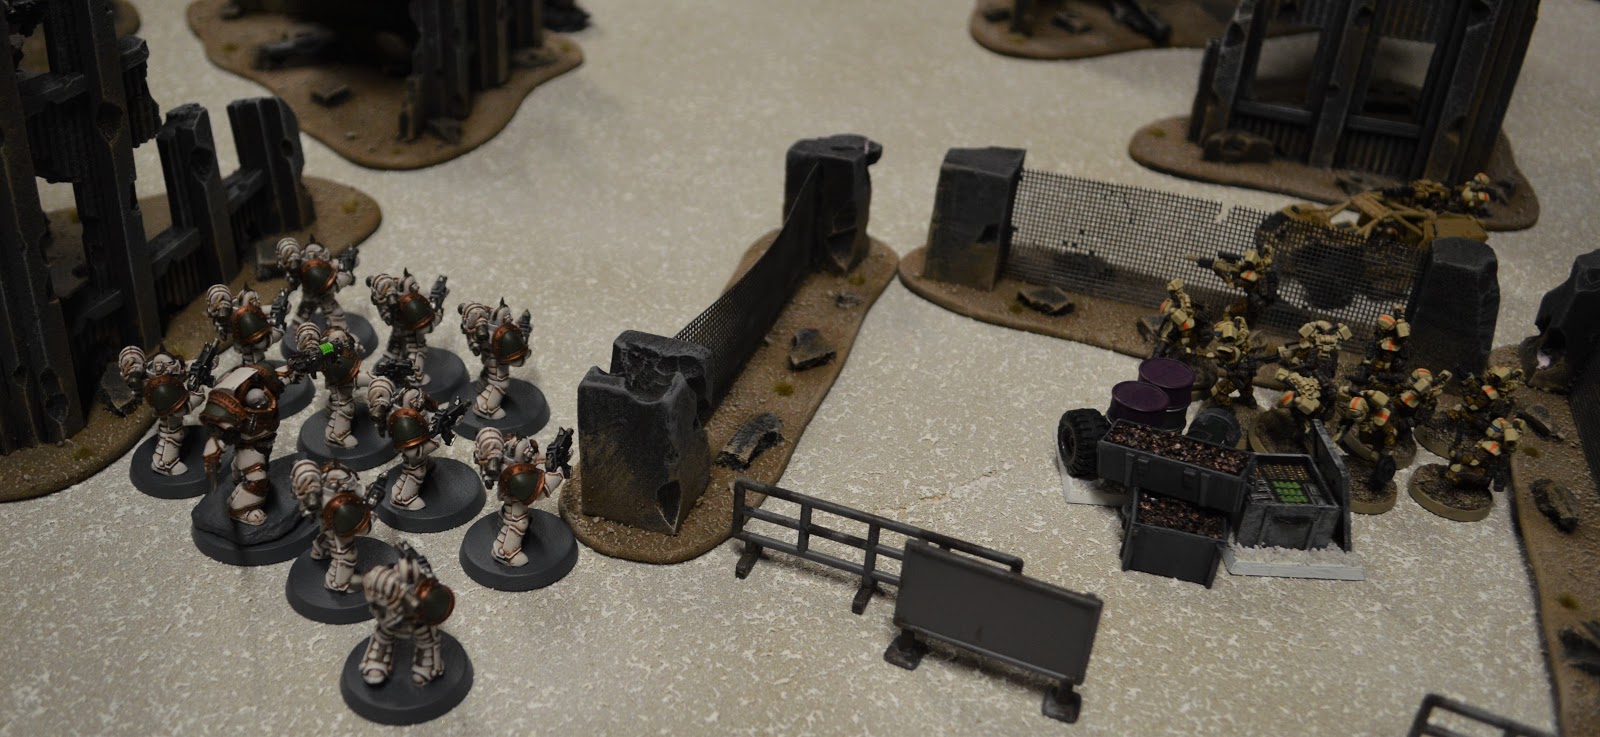
 |
| Deployment. The White Scars deployed first, mostly concentrated in the southern ruins near the Rescue Objective. The Death Guard then deployed in two blocks, with most of their forces near the northern Take & Hold Objective. The Outriders and Tauros then made their scout moves. |
White Scars Deployment and Plan:
I decided to use the large ruins in the southern end of the battlefield to shield the advance of my infantry toward the Rescue Objective. The plan was to grab her and get back into cover to try to survive for a few turns. I didn't deploy anything near the Take & Hold Objective, hoping to make Pete think I had the Rescue mission, or at least that I didn't care about that objective. I was hoping he would deploy most of his slow-moving units to the south to counter my main force, which would leave the Take & Hold Objective mostly unguarded for my drop troops or my Tauros to take and then survive for a few turns until he could slog over there.
After seeing Pete's deployment, it became painfully clear that he didn't take the bait and that it would be my infantry that were out of position. I knew my drop troops would have an almost-impossible challenge to hold the supply depot objective out in the open against his large tactical squad all of those volkite calivers in the ruins.
But I had my Scout moves with the Outriders and Tauros and the first turn, so I decided to be aggressive and try to put him on his back foot right out of the gate in order to control the center of the table for a couple of turns. Hopefully I could hold out long enough to complete my major victory condition. I scouted my Outriders straight ahead toward his southern force.
Death Guard Deployment and Plan:
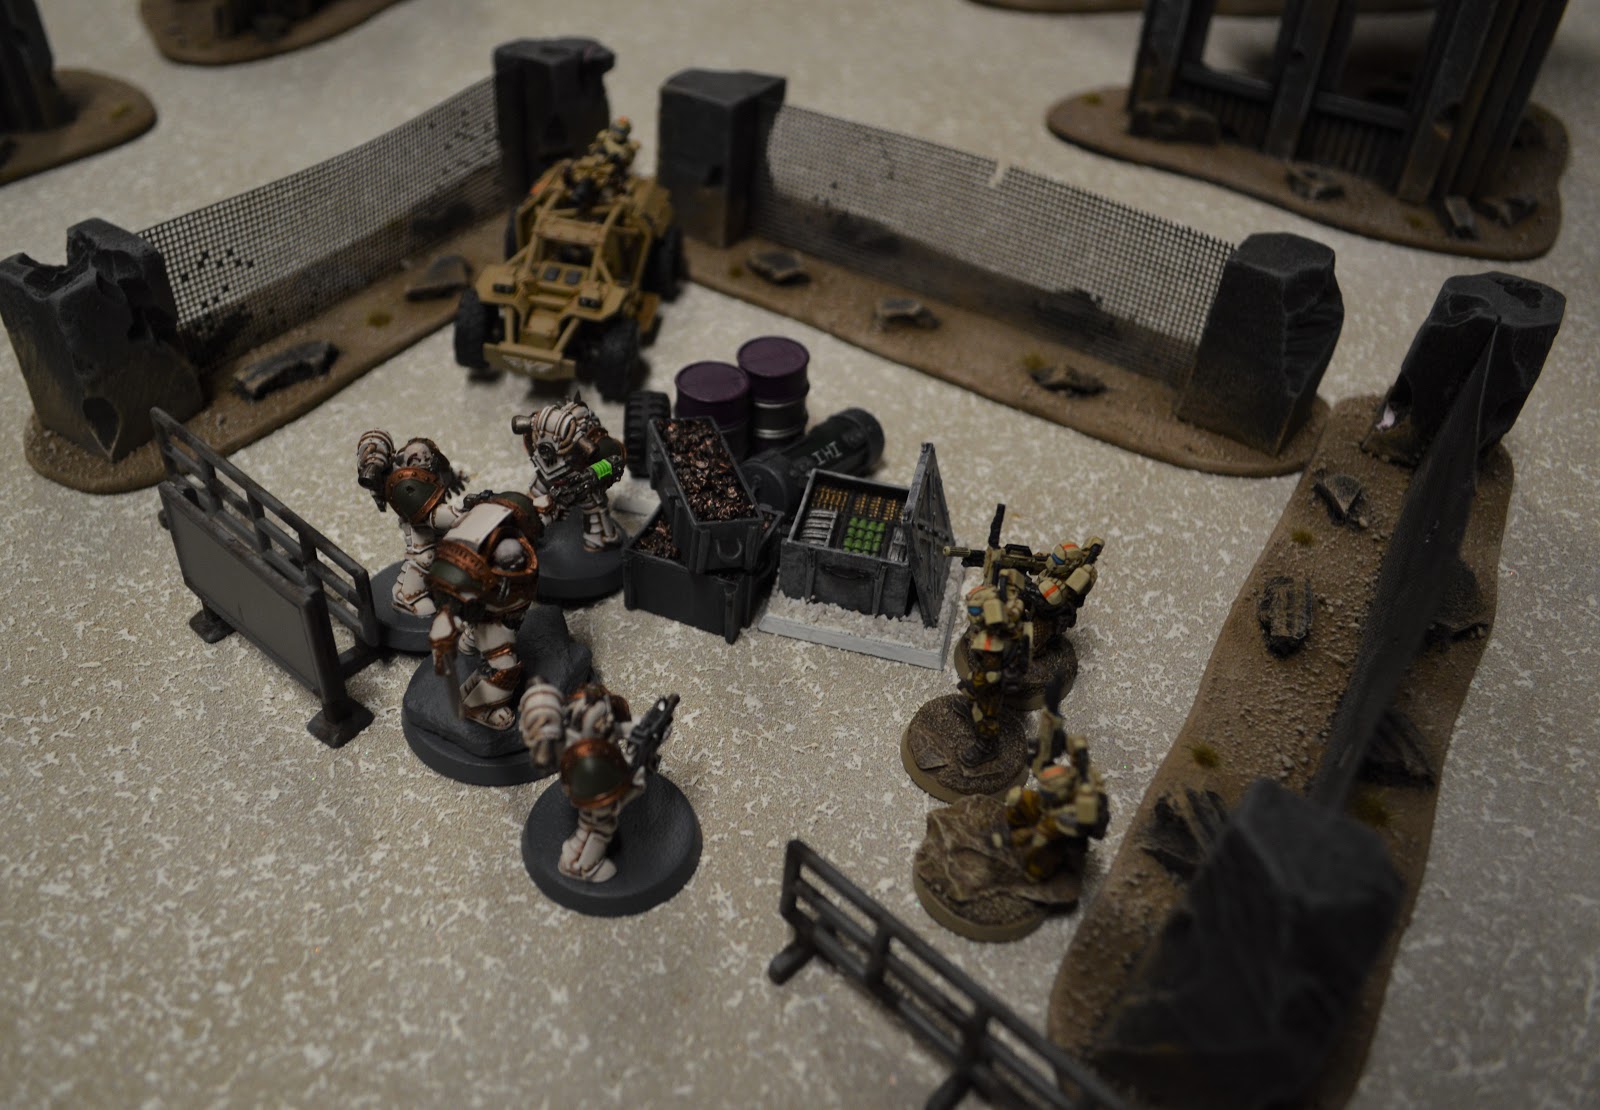
The tactical support squad of volkite calivers would remain up in the ruined tower, with a 30” range of strength 6 Martian death rays. They’d theoretically get an entire turn of shooting while any of Phil’s units other than the super-speedy Outriders took time to get in range. And it’s also part of the mission objective to secure a table quarter, which the squad would remain on all game.
Wolfgang and his brutish tactical squad would secure the ammo depot objective, and then on to the
northwest table quarter. Laying low any resistance in their path.
 |
| The Tauros Scout Vehicle advances slowly through the ruins of Bielyr, spotting the vital supply depot. |
 |
| The White Scars stalk their target: the heretical preacher Iggas Afsal. |
 |
| Aztai scans the ruins from the air and returns to Consul Kuyuk with the location of the apostate preacher. |
 |
| From the east march Preator Wolfgang and his Death Guard Eradication Patrol, looking to cleanse the area of any resistance. |
 |
| Praetor Wolfgang is developing a fearsome reputation amongst the loyalists for his tenacity and brutality. |
 |
| Tactical Support Squad März quietly moves into the shell of a ruined tower, ready to lay down supporting fire for advancing infantry. |
 |
| The Outriders scout ahead of the main force, closing in on their objective and the Death Guard forces spotted ahead in the ruins. |
 |
| The Tauros spots the enemy patrol. Immediately calling for airborne reinforcements, the scout vehicle races to engage the targets. |
White Scars Turn 1:
My infantry couldn't see or shoot anyone so they all ran toward the Rescue objective, hoping to reach her in Turn 2 unless she moved directly away from me. The Outriders took advantage of their Scout move and their speed to race across the table and strike the heavy support squad that was deployed out in the open. This unit is fast and powerful, but their defense against heavy weapons comes from jinking, which leaves them much weaker on offense, so I knew how important it would be to shoot his missile launchers before they could shoot me.
On the other flank, the Tauros moved toward the Take & Hold objective, but wasn't able to do any damage to the tactical marines.
 |
| The Outriders race forward to get within range of the Death Guard heavy support squad. |
 |
| Aztai soars over the Death Guard, feeding precision targeting information back to the Outriders. |
 |
| The Outriders are able to decimate their targets with a precision volley of deadly plasma. |
Death Guard Turn 1:
Hmm, kind of a discouraging first turn. My missile launchers are turned into molten goo by the wicked-fast outriders. Their speed and ferocity shook my confidence and will cause me to battle plan better in the future. Their reach on turn one is nearly unlimited. Heavy cover is a must going forward.
The dreadnought cannot bring down a single biker due to their impressive 3+ invulnerable saving
throws. His thick armor value 13 on his front should keep him around for a while, but I’m nervous due to the sheer number of strength 7 plasma guns on this side of the table.
My northern detachment advances forward as planned, without much to do besides look scary.
 |
| Contemptor dreadnought Friedrich advances and fires hat the Outriders, forcing them to jink to avoid the melta rays. |
 |
| The Death Guard begin their implacable advance in the north, opposed only by the lone Tauros, for now. |
At the end of the turn, heretic preacher moved east. Clearly, she did not want to be interrogated by the White Scars!
White Scars Turn 2:
I passed both of my reserves rolls and threw all of my deep striking units at the Take & Hold objective. I knew the guardsmen could never hold out for long on their own so I had the bikes Turbo Boost to the north to provide much-needed support, since they had jinked and therefore wouldn't have much chance of destroying the dreadnought anyway.
My White Scars infantry squads both ran again and were able to get close enough to control the Rescue objective.
At the end of my turn, I revealed my mission and announced that I controlled both objectives.
 |
| Drop troopers arrive all around the objective and the Death Guard infantry. |
 |
| The drop troops land on target and open fire into the approaching Death Guard, bringing down one armored superhuman with masses of lasgun fire. |
 |
| The elite Storm Troopers drop in behind the Death Guard, catching them in cross fire and killing several with their super-charged lasguns. |
 |
| The Outriders open their throttles and race as fast as they can to the north, to support the drop troopers. |
 |
| White Scars Turn 1 and 2: The Outriders destroy the heavy support squad and then race to support their allies in the north. The White Scars infantry reach the apostate preacher. The drop troopers arrive and claim the supply depot objective, fighting desperately to hold it as long as possible. |
Death Guard Turn 2:
On Phil’s turn I cringe as his bikers streak across the table toward my vulnerable power armored
marines, worrying me about their lack of saving throws against these beasts. I also am not happy to lose 4 of my tactical marines to Drop Troop fire, as that isn’t a sustainable level of losses for a four or five turn game. Damn those hot shot lasguns!
On my second turn, I bring my Praetor and his retinue forward and annihilates one of the Drop Troop
squads. Although I’m feeling awfully exposed after the combat leaves them without cover. The volkite does its thing and sets off a devastating chain reaction among the storm troopers and wipes them out.
I’m still hopeful that the dreadnought will be enough on the south side of the table to break up Phil’s
attempt at controlling the preacher objective for two or three turns.
 |
| Tactical Squad Stärke prepares to advance into the supply depot and eliminate all resistance. They advance, fire and charge into the survivors, killing them to a man. |
 |
| Friedrich marches forward and melts down two plasma gunners from squad Khoer. |
 |
| From their elevated position, Squad März make short work of the exposed Storm Troopers by igniting their flesh inside their armor and creating a chain reaction within the tightly-packed squad as each flaming and flailing body crashes into his companions. |
 |
| Death Guard Turn 2: The Death Guard hammer the loyalists as they wipe out two squads and half of another for a total of 20 casualties. They take control of the ammo depot and free the preacher from the White Scars. |
White Scars Turn 3:
With my northern forces in tatters and my southern forces facing the dreadnought with only three plasma guns, I knew it would be a struggle to hold both objectives for two more turns to earn the major victory condition. All I could do was throw everything at the tactical squad on the supply depot and try to shift them so I could reclaim it with my platoon command squad.
My Tauros, platoon command squad and Outriders poured fire into the Death Guard tactical squad, inflicting six casualties and, amazingly, breaking their morale! Breaking the squad was critical as that meant they were currently not considered a scoring unit, allowing me to reclaim control of the Take & Hold objective.
The White Scars tactical squad had to run to regain control of the Rescue objective, which kept moving to the northeast, obviously drawn toward the foul stench of the traitors. The tactical support squad tried to block off the street to prevent the dreadnought from getting past them, effectively sacrificing themselves for the good of the mission.
 |
| The brave men of squad Khoer fire at the unstoppable war machine and try to block its way to their brothers who are interrogating the heretic. |
 |
| The loyalists desperately attack the traitors from all sides, killing six. |
 |
| The deadly crossfire is enough to force Praetor Wolfgang to fall back in an attempt to regroup his surviving men. The drop troops claim the supply depot objective and resume their looting. |
 |
| White Scars Turn 3: The loyalists are able to drive back the Death Guard tactical squad and re-take the supply depot in the north. In the south, the White Scars recapture the preacher and resume interrogation. |
Death Guard Turn 3:
My chance at victory is dim at this point. My main battle group suffers 60% casualties and fails its moral check! Phil will control both objectives for a second turn. Argh! Despair overtakes me and I know my unit has to rally to have any chance.
Then my turn 3 happens… and Mortarian himself would be proud. Wolfgang pulls his small band
together by drawing upon their hate and burning desire to extinguish the false emperors’ flame in this
galaxy. He charges his men forward and retakes the objective, stalling Phil’s chance at a major victory.
The tactical support squad rains down death with their ray guns upon the bikers. Their weapons’ high
strength comes in handy to wound these toughness 5 models and the sheer volume of shots makes Phil roll too many saving throws. Friedrich squeezes past the plasma gunners and destroys the tactical squad Kheeg in an unexpectedly overwhelming assault. Just like that the battle seems to be won.
 |
| Woflgang rallies the battered remnants of Tactical Squad Stärke and leads them toward the drop troopers. "Vengeance shall be ours." |
 |
| Amid the haze of the ruined city, Tactical Support Squad März again take aim with their volkite calivers, overwhelming the speeding Outriders with their Martian death rays |
 |
| Bolters tear apart two of the drop troopers as the Death Guard claim the supply depot. |
 |
| The massive Contemptor Friedrich runs past the brave plasma gunners and into Tactical Squad Kheeg, killing three and causing the rest to scatter from the battlefield, abandoning their quarry to the giant construct that they have no way of hurting. |
 |
| Death Guard Turn 3: With the fervor that only true hatred can bring, the Death Guard slaughter their foes: Three loyalist squads are destroyed in the carnage. |
White Scars Turn 4:
The only thing that saved my last few drop troopers was that the Death Guard could only fire snap shots and could not charge on the turn they rallied. But still there was almost no hope for me to take claim the supply depot objective. All I could do was fire with my drop troops and Tauros in attempt to somehow kill two models and force a morale check, which he would have to fail. I was lucky just to kill one, but it was too little, too late.
To the south, my last few marines were able to recapture the Rescue objective and damage the dreadnought, but without the supply depot, I could not meet my Major Victory condition and now I could only sit back and watch Pete's turn and hope that he somehow could not achieve his either, whatever it might be.
 |
| The drop troopers bravely fight back against the elite superhumans and manage to kill one of the armored giants, but they cannot drive their foes from the strategic objective. |
 |
| Tactical Support Squad Khoer recapture the heretic and make one last attempt to bring down the Contemptor against the odds. They inflict significant damage, but the unstoppable machine keeps coming. |
 |
| The drop troopers prepare to make their last stand and give their lives for The Emperor. |
 |
| White Scars Turn 4: The loyalist forces make a desperate attempt to snatch victory from the jaws of defeat, but are only able to control one of the two objectives and just miss their Major Victory condition. |
Un oh, I thought I positioned my dreadnought in a way that his front armor would be facing the three
plasma marines and they found a way to shoot his side armor! The game would be tied if Friedrich was destroyed as each of us would only be left with a minor victory condition. Thankfully only 2 hull points were removed and he was left standing.
On my final turn I rushed the dread forward and destroyed the plasma gunners to secure the southeast
table quarter. Wolfgang and the volkite calivers make quick work of the remaining northern detachment of Phil’s army and secure the major victory!
 |
| The Death Guard infantry took everything the loyalists could throw at them and are battered but still standing. |
 |
| "For Mortarion!" The Death Guard assault the over-matched the drop troops and cut them down with satisfaction. |
Loyalists: Minor Victory Condition
Traitors: Major Victory Condition
Result: Traitors Win
Loyalist Post-Game Analysis:
Despite getting totally wiped off the table in the last two turns, I actually had a great chance at achieving my Major Victory condition, but somehow in the heat of the battle I missed it. Writing up this report, I want to go back and slap myself. With my Scout moves and fast units, I could have easily held both objectives at the end of my first turn! For some reason, I had it in my mind that I would get both objectives in Turn 2 when my reserves hopefully arrived at the supply depot and my marine infantry reached the Rescue objective. But I could easily have positioned my Outriders one inch farther back to be within three inches of the preacher and still been in shooting range of the Heavy Support Squad (as long as I was past the preacher at mid-table, I would be within my 24" range). And of course with a 12" Scout move and ability to move Flat Out and re-roll dangerous terrain if needed, the Tauros could easily have reached the supply depot on Turn 1. I would have achieved the Major Victory condition by the end of Turn 3! Ah, hindsight...
As it was, this game was full of exciting moments:
Pete played a good game and used each unit to the best of its abilities. The volkite caliver squad continues to earn my respect. Every single turn that they fire with full effect (not snap shots) they destroy an entire unit of mine. Two shots, two units destroyed in Battle Report 2. And then three shots, three units destroyed in this game (for a total of 353 of my 850 points!). As our armies stand right now, I really can't match Pete's level of firepower and durability: I have been tabled in three of our four games and only had models left at the end of Game 3 because Pete only got three turns; a few more turns and the result would have been the same. It's been tough sledding to start this campaign, but these last two games were exciting and had I played better, I might have forced a draw today. And the army is just really fun to play with so many movement and deployment options (scout, outflank, deepstrike), at least in the first few turns, before everything gets killed! I look forward to adding to our armies for the next installment.
We will never succumb! Onward, for the Emperor!
Death Guard Post-Game Analysis:
Loyalist Post-Game Analysis:
Despite getting totally wiped off the table in the last two turns, I actually had a great chance at achieving my Major Victory condition, but somehow in the heat of the battle I missed it. Writing up this report, I want to go back and slap myself. With my Scout moves and fast units, I could have easily held both objectives at the end of my first turn! For some reason, I had it in my mind that I would get both objectives in Turn 2 when my reserves hopefully arrived at the supply depot and my marine infantry reached the Rescue objective. But I could easily have positioned my Outriders one inch farther back to be within three inches of the preacher and still been in shooting range of the Heavy Support Squad (as long as I was past the preacher at mid-table, I would be within my 24" range). And of course with a 12" Scout move and ability to move Flat Out and re-roll dangerous terrain if needed, the Tauros could easily have reached the supply depot on Turn 1. I would have achieved the Major Victory condition by the end of Turn 3! Ah, hindsight...
As it was, this game was full of exciting moments:
- The Outriders scouting forward and then wiping out the heavy support squad, taking Pete by surprise with their first turn reach and ability to threaten vulnerable units in a huge range.
- Breaking Pete's main tactical squad with concentrated fire and forcing them to fall back from the objective, allowing me to control it in Turn 3.
- And of course, the dreadnought wiping out my entire tactical squad and warlord in single round of assault and a sweeping advance! Ouch!
Pete played a good game and used each unit to the best of its abilities. The volkite caliver squad continues to earn my respect. Every single turn that they fire with full effect (not snap shots) they destroy an entire unit of mine. Two shots, two units destroyed in Battle Report 2. And then three shots, three units destroyed in this game (for a total of 353 of my 850 points!). As our armies stand right now, I really can't match Pete's level of firepower and durability: I have been tabled in three of our four games and only had models left at the end of Game 3 because Pete only got three turns; a few more turns and the result would have been the same. It's been tough sledding to start this campaign, but these last two games were exciting and had I played better, I might have forced a draw today. And the army is just really fun to play with so many movement and deployment options (scout, outflank, deepstrike), at least in the first few turns, before everything gets killed! I look forward to adding to our armies for the next installment.
We will never succumb! Onward, for the Emperor!
Death Guard Post-Game Analysis:
Another really fun game. Games of Horus Heresy are really neat – the setting, story, units and weapons add a lot to the experience. This battle was full of ups and downs for me. When I set up, I figured I had a fool-proof plan and a great chance at victory. After turns 1 and 3 I’m wringing my hands, contemplating a gracious defeat. I couldn’t believe my Praetor’s leadership of 10 failed me and his squad fell back away from the battle!
If the volkite calivers are protected with distance and cover, they are a highly effective unit with a
medium-long range, high rate of fire and moderate strength that can threaten bikes, light vehicles and
infantry. They have consistently earned back their points and then some, when they get a chance to fire at full strength.
I’m pleased with where I deployed the units I had on the board, as I think that was the reason I won the game. Half of Phil’s army spend two turns running to get into the battle, rather than firing on my troops. His Drop Troops have thus far struggled to knock out my large tactical squad in a turn or two of firing, so I feel like until Phil brings in even more firepower, the Death Guard should win that skirmish a majority of the time. The dreadnought has been consistently a tough kill for Phil’s army, and I’m sensitive to the fact that in a small game of 850 points, his presence is perhaps a little overpowering at times. Although best not to forget the lucky meltagun overwatch shot that knocked him out of game 2!!
Phil’s objectives were fair and balanced again. Both armies had a real shot at the Minor and Major Victory conditions. We could definitely use them again in the future.
No comments:
Post a Comment