
Background:
The Warmaster Horus and his legion have finally arrived in the Xhorik System as part of their long march to Terra. Thanks to Praetor Wolfgang's armu of Deathguard and World Eaters, the main planet, Xhorik Prime, is firmly in the hands of the Traitors. Meanwhile, Xhorik Secundus remains loyal and is launching a planetary invasion of Xhorik Prime. Horus orders his advance forces to take the moon bases surrounding Xhorik Secundus to enable the capture of the last major Loyalist planet in the system while they are preoccupied with the war for Xhorik Prime. As part of the invasion of the first moon, a small band of Sons of Horus plan to take a comms relay station vita to the defender's communication network. Forward recon units have reported the relay to be only lightly guarded by a small detachment of Planetary Defense Forces (PDF). However, when the Traitor strike force arrives, they unexpectedly find the area reinforced by Loyalist marines of the Imperial Fists and Blood Angels legions, the latter having not been seen in the system previously. Although surprised by the stronger enemy arrayed against them, the Sons of Horus leader, Praetor Ezmen Vyke, has little choice but to press ahead with the attack.
Scenario: Take and Hold
Primary Objective
Control the comms relay at the end of the game: 3 VP
Secondary Objectives
Slay the Warlord: 1 VP
Attrition (destroy the most enemy units): 1 VP
Battle:
Attrition (destroy the most enemy units): 1 VP
Battle:
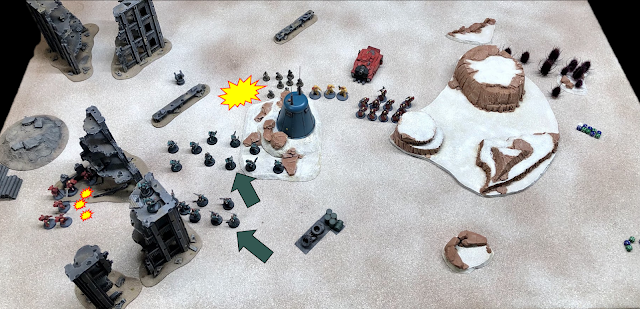
 |
| Deployment |
 |
| Sons of Horus tactical marines advance toward the comms relay. |
 |
| Massive Cataphractii terminators move through the ruins on the Traitor left flank. |
 |
| The Planetary Defense Force platoon is backed by Imperial Fists in terminator armor. |
 |
| The Imperial Fists vow to hold the line against the invaders. |
 |
| A breacher squad makes up the Loyalist left flank. |
 |
| The Blood Angels Praetor leads an assault squad through the cover of ruined buildings on the Loyalist right flank. |
 |
| The veteran sergeant known as The Scarab directs his unit's lascannon fire from the top of a ruin. |
 |
| Sons of Horus tactical and veteran infantry spread out as they advance, hoping to limit the damage of the Blood Angels' Vindicator's demolisher cannon. |
 |
| Blood Angels infantry move toward the comms relay. |
 |
| Blood Angels use their jump packs to asasult the Sons of Horus Terminators. |
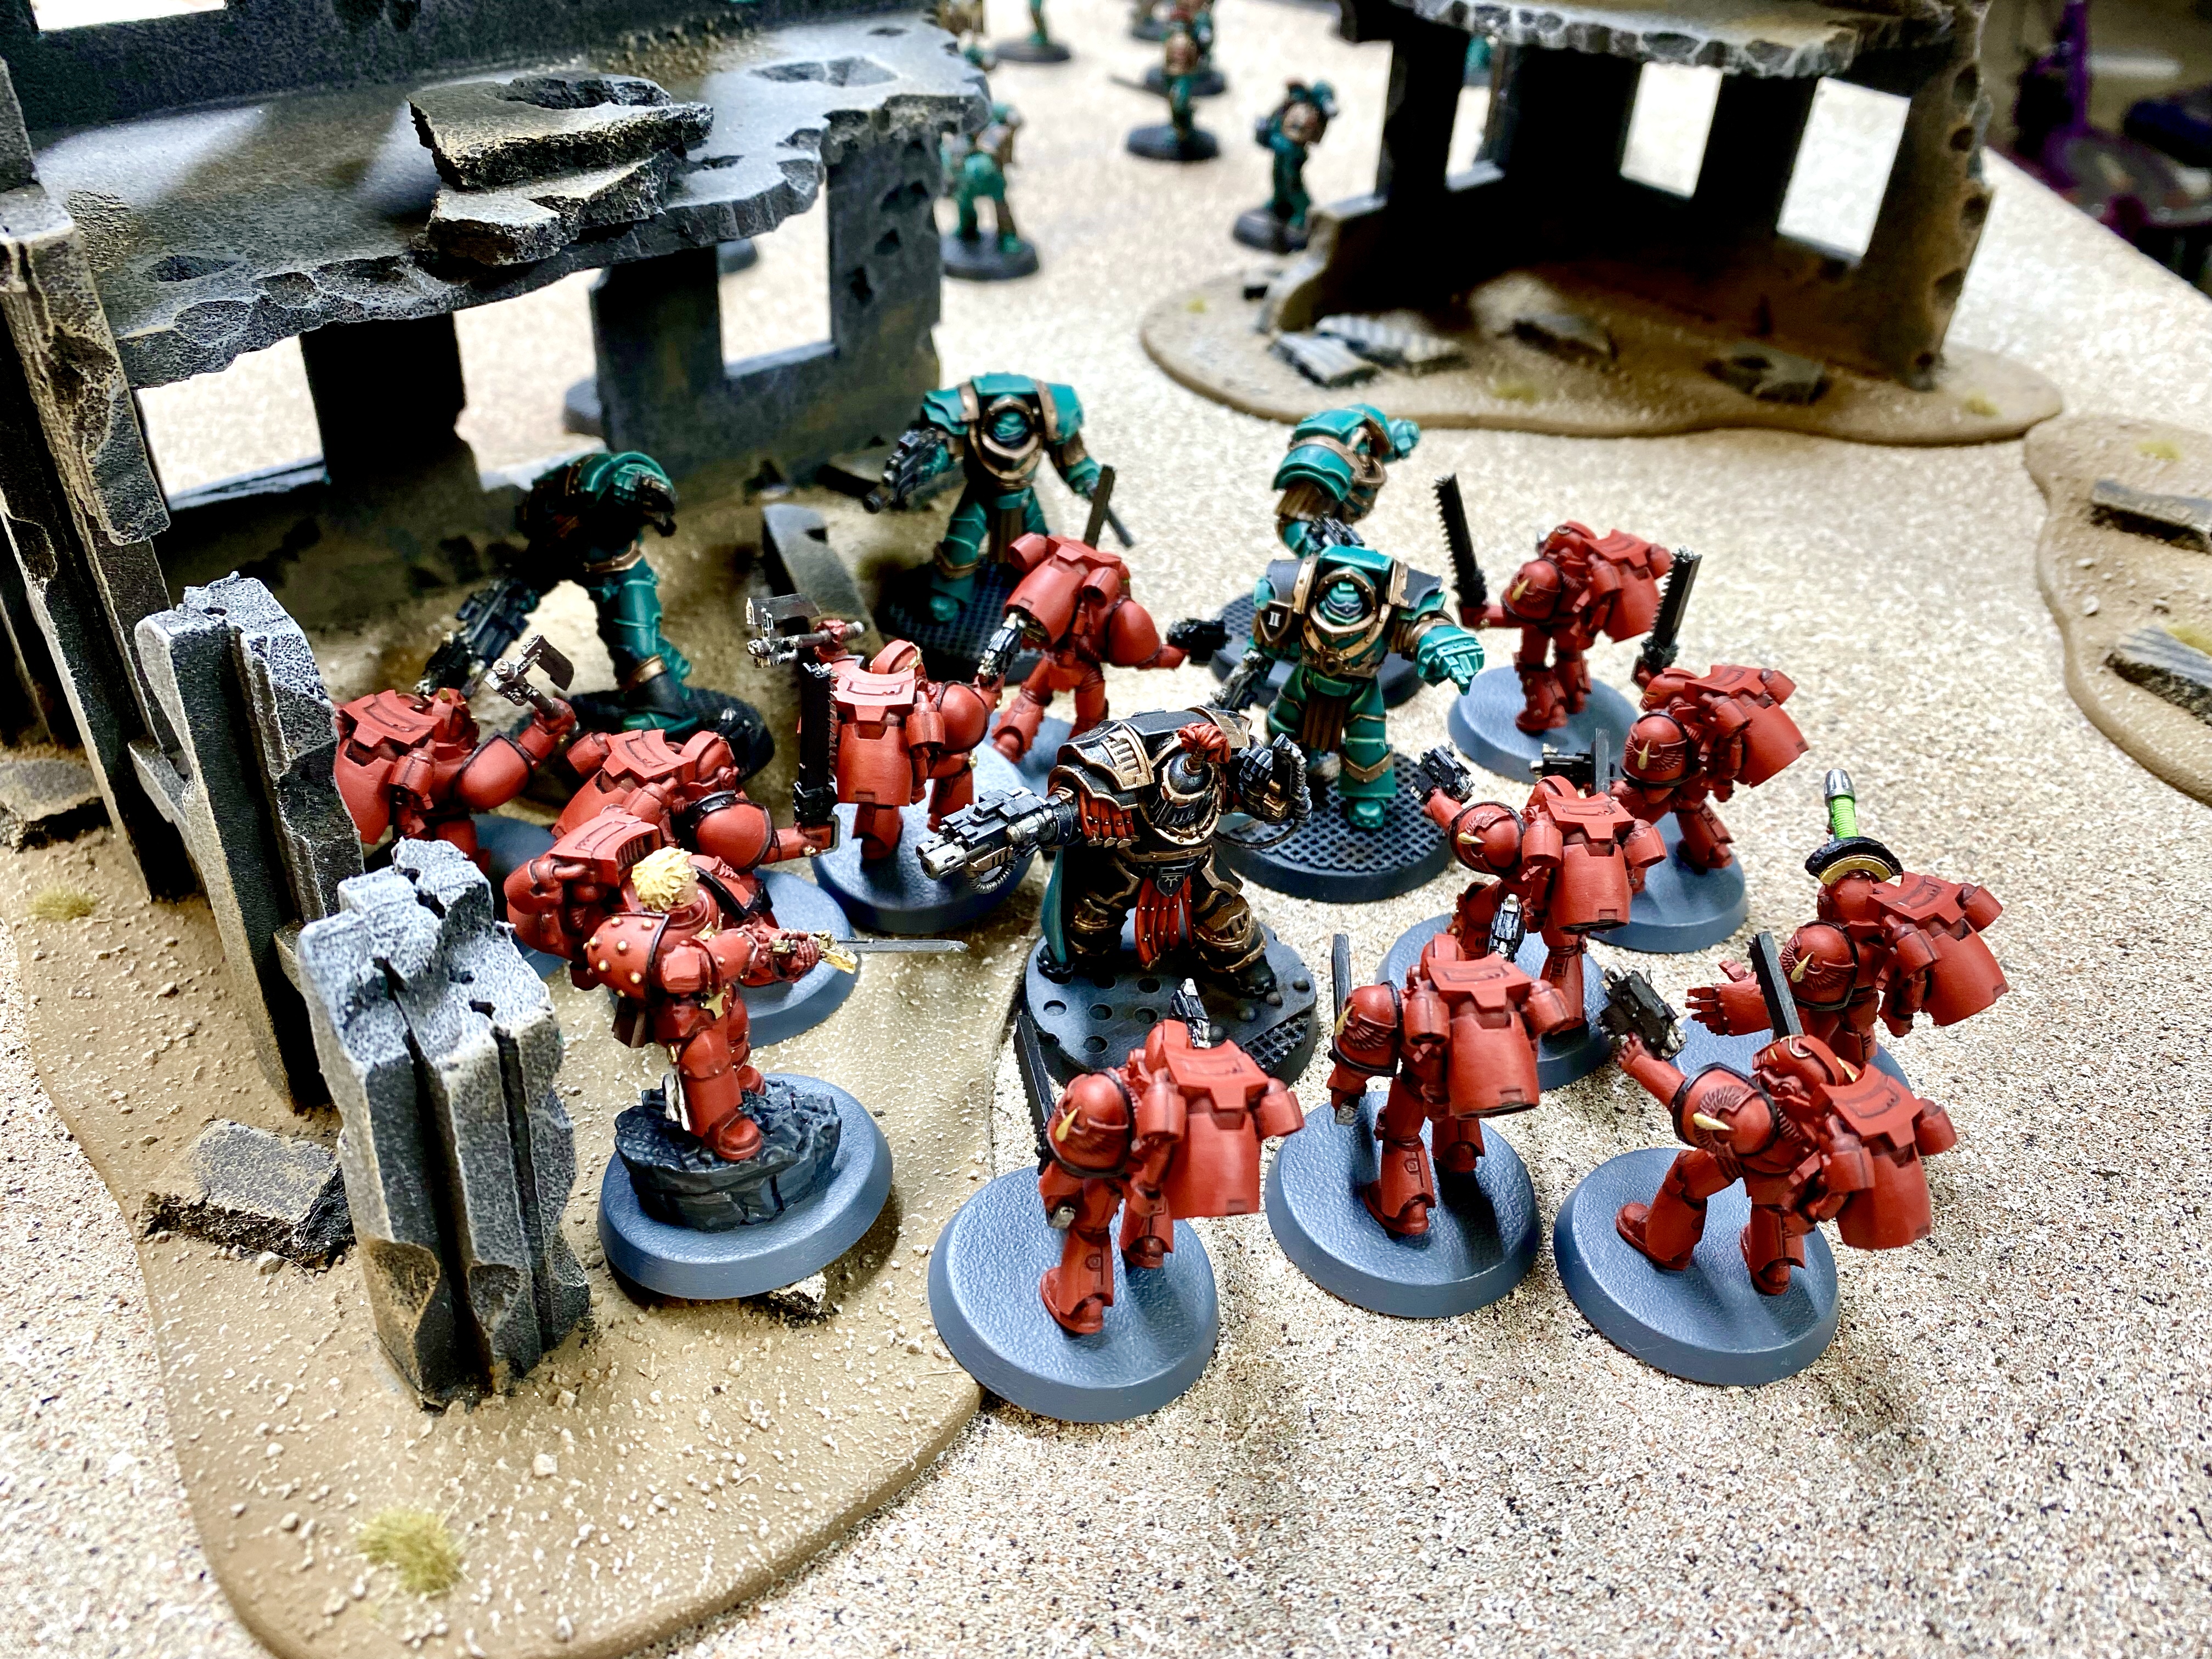 |
| The Sons of Horus have heavy weapons and armor, but the Blood Angels have the numbers, the momentum of the charge, and their inate savagery in melee. |
 |
| The two Praetors duel. The Blood Angel uses his quicker Blade of Perdition to bring down Ezmen before the Traitor can strike with his cumbersome chainfist. |
 |
| The last terminator fights bravely but the Traitors are destroyed by a sweeping advance. |
 |
| Turn 1 and top of turn 2 summary: Blood Angels assault squad destroys Sons of Horus terminator squad.The Vindicator and supporting Loyalist units destroy half of the tactial squad. Sons of Horus heavy support squad kills only two Imperial Fists terminators in return. |
 |
| Both sides square off around the comms relay. |
 |
| The Sons of Horus approach the objective and attempt to push back the Loyalist forces. |
 |
| The two sides engage in a short-range firefight around the objective. |
 |
| The Sons of Horus veterans attempt to charge the assault marines but cannot make the charge distance. |
 |
| Bottom of turn 2 summary: Sons of Horus advance and whittle down the PDF, but crucially the veteran squad cannot make the charge against the Blood Angels assault squad, leaving them exposed to the coutnerattck. |
 |
| The PDF troopers take heavy casualties but continue to advance. |
 |
| The breachers march to the comms relay objective. |
 |
| The Blood Angels assault marines respond by advancing and firing pistols. |
 |
| And now, the Loyalists charge into the Sons of Horus veterans. |
 | |
|
 |
| The Blood Angels win combat. The Sons of Horus try to flee and are scatted by a sweeping advance. |
 |
| At the end of the battle, only a few Sons of Horus marines remain. The Loyalsts secure the comm relay. |
 |
| Top of tun 3 recap: Combined firepower decimates the tactical squad and the two survivors fall back. The assault squad destroys the veterans. |
Result: Loyalists Victory
5 - 0
5 - 0
Achieved Primary Objective and both Secondary Objectives
Traitor Comments (Phil):
New army, but unfortunately, a familiar result: another major shellacking by Pete. This one was never close and we called it after two and a half turns when my army was nearly wiped out and had no chance to take the objective, while Pete's loyalists had not lost a single unit. Clearly, Praetor Ezmen Vyke was not prepared for the likes of the Blood Angels this day!
When planning for this game, we agreed to leave the Land Raider out, thinking it could be too dominant in such a small game. In hindsight, it would have been better to take it instead of the heavy support squad so my army would have some badly-needed protection and mobility. As it was, my infantry was exposed between the demolisher cannon and the fast assault squad, unable to make any charges and unable to get good firing lines for the heavy weapons. The lack of mobility meant that Pete could move his tank so that the comms relay blocked the line of sight from the static heavy supprot squad in the ruin, its only long-range threat. He also kept his assault squad hidden from the lascannons with ruins, meaning I could not shoot at the two biggest threats and wasted my crucial first turn shooting at terminators who were not an immediate danger to me.
Aside from that, I continued to be plagued by the Challenge and Sweeping Advance rules. Pete's Praetor could kill my characters in duels before they could strike with his double-wounding, high-initiative Blade of Perdition. That thing is wicked: it strikes at initiative 5, wounds on 2+ and every successful to-wound roll inflicts two wounds that must be saved with AP2. Against infantry, it is nearly like a power fist that swings at initiative. And his Praetor's high initiative helped him beat me on both sweeping advance rolls to destory the remnants of the terminator and veteran squads.
Pete and Bill, I would love to get your thoughts on what I should have done differently to make this a close game. I don't mind if the end result is a win or a loss as long as the game is exciting and fun, but I hate to see it so one-side that it is over in 2 - 3 turns. When I manage to win, it is usually a pretty narrow victory in a close, hard-fought game that could have gone either way. But there are way too many times that I lose in a blowout that is never really competitive. I need some advice!
Loyalist Comments (Pete):
Well, that went about as one-sided as possible! I’m going to say it was a mix of luck and imbalanced armies that led to such a route. Phil’s Sons of Horus were far too slow, which I can easily sympathize with as a Death Guard player, as he had graciously declined to bring along his Land Raider. My Blood Angel force is still too small points wise to match up with all Phil’s Sons so it was a needed omission, but obviously would have made all the difference in this skirmish. I’m not sure that the Vindicator could have hit a Land Raider 4 times and knocked off 4 hull points before it spilled its deadly cargo right in its face! In fact, let’s give that a zero percent chance…
Being able to start the entire assault squad in heavy cover and having more buildings between them and
their targets was a fantastic gift from the gods of war. Therefore, they made it into close combat at full
strength and were a very powerful unit in a game this size. By some poor luck, Phil’s terminators AND veterans were unable to make charges and the Sanguine Berzerkers got to pour in with their extra
attacks. In Horus Heresy close combat, that can make all the difference.
And somehow the vindicator was perfectly out of sight of a squad of lascannon wielding marines with an elevated position overlooking the entire battlefield!?! If they would have had some shots raining down on the Vindicator’s 11 side armor – “Kaboom!” I mean, I was definitely trying to keep the tank out of sight while still pummeling the advancing Sons tactical squad, but rarely does it actually work out like that.
Hey, at least the 2 armies looked really rad on the battlefield and are sharp as hell next to each other in
close combat. I’m really looking forward to each of us adding more units to the new escalating conflict
over Xhorik Secundus. And it’ll be neat to see some combinations of White Scars, Death Guard, Drop
Troopers and World Eaters mixed-in as well.
Hmmm, it's tough to say what you could have done differently without more info on who deployed first and what order you both placed your units. You didn't have any units on your right that could destroy the tank since your lascannons and chainfists were all on the left. The meltaguns and power fist of the vets might have had a chance but they would have to contend w that large blast marker as they jogged up to the vindicator and even then, they'd likely be charged by the imperial fists. As it turned out, Pete's jump pack doom squad made all your decisions about movement for you since you couldn't ignore them and couldn't escape. You got gobbled up on both flanks and shit out. Pete just had a solid army and simple, effective battle plan that really didn't give you any room to breathe or maneuver
ReplyDeleteI guess one difference is to decline challenges. You can't compete w that high initiative sword that hits like a fist. It's suicide so just let some regular Joe take the hits. Not that it even matters if you lose combat and get swept. It's going to be a major challenge to create a squad that can deflect or even defeat a 20 man assault squad w an unbeatable leader. Pete will no doubt keep them well protected as they approach so heavy weapons will be less effective. A huge squad of heavy bolters maybe? Their overwatch fire will kill a few and maybe make the rest fail their charge. A flamer squad could have similar results. I seem to recall Pete's plague flamers in a bunker were nearly impossible to displace. Melee units rushed in to get barbecued. I thought your vets had a couple flamers?
ReplyDeleteAfter taking a second look at the battle, it seems like your terminators didn't have much do. I know it seems like suicide to put them on the right w that demolisher cannon but 5 meltaguns and 3 chainfists vs a numerous lightly armored (for space Marines) assault squad seems like poor match. Lots of points worth of armor killing weapons that won't get used effectively if at all. Even if the terminators did somehow win the melee w the jump pack boys, they'd be way too far away from the tank to do any damage. The next nearest unit was the ultra lightly armored guardsmen who would have been even less appropriate of an opponent. They are the ultimate tank slayers fighting light infantry. If they had 5 flamers instead, things would have gone much differently. They could have cooked a dozen blood cherubs w overwatch and then, if you declined the challenge, may have had a chance in melee. However, w their anti-tank weapons, it seems like they were misplaced during deployment.
ReplyDeleteFinally, I find quite disappointing that your lascannon squad couldn't draw LoS on the vindicator. I presume it's because they were all stacked vertically in the tall ruins and had no flexibility in choosing targets. If they had been deployed on the ground, stretched out horizontally from left to right, they would have been able to target anything on the battlefield. At least a couple, but probably most of them, would be able to draw LoS on the tank. It may get a cover save but that's still better than wasting your shots on enemies you don't even care about. That's your first clue that your deployment or strategy stink! When you're shooting super strong weapons at nonthreatening enemies because there's nothing else to shoot at.
ReplyDeleteIt seems like the blood angels assault squad is far from invincible since, after only 3 turns, they had only the sarge and commander remaining. If you had just dished out a little more punishment, they'd have been wiped out. You'd still totally have gotten your ass kicked but that would have been a moral victory. Plus a single VP to put you on the board. I don't like the idea of an unstoppable and highly mobile squad unbalancing all your future games, but they seem quite killable. The trick will be to be keep your distance and shoot em up before they charge. It'll be much easier on your big table. They'll be more likely to end movement in the open and will take more turns to get within charge range.
ReplyDeleteCorrect - I do not think they are overpowered as a unit. They are just as killable as any other marines, but they are extra deadly in melee with their Blood Angel +1 to wound rolls. Also, I believe we misplayed the rules on the first charge and his guys got 4 attacks each instead of the coreect 3 attacks (we caught it and corrected it on the second charge vs the veterans). It was mostly perfect use of them by Pete to keep them out of line of sight and then take apart my force one unit at a time. Of course, failing my own charge with the vets was frustrating (I wished I had that nice Ork perk of re-rolling one of the dice!).
Delete