
It's always been a dream to have a Warhammer battle on a table with a river and a bridge. Being vital to army movement and as natural choke points, bridges are the focal points of many historical battles, which provides great inspiration. Bridges will also allow for some games with very different dynamics as the river will break up the battlefield and the bridge will be a vital focus for both armies.
This blog entry will document my progress in building a gaming table setup with a bridge over a river. This initial attempt will be very simple in order to get playing, but perhaps later we will have the desire to do something more detailed.
Update 1:
First I cut some foam insulation boards to fit the 8' x 5' table. This arrangement here is a 4' x 5' bank on the left, a 1' x 5' river in the middle, and a 3' x 5' bank on the right. The depth of the river channel is 2 inches.
I plan to paint the edges of the foam brown and lay the battle mats one on each side.

I bought a piece of blue satin fabric for $6 today to be a simple placeholder for a river until we can make something more realistic with resin. It was supposed to be 5' x 3', but it is just a fraction of an inch shy of 5' and leaves a bit of the brown table showing at each end.

Then I grabbed the road pieces that I made previously for our campaign. These two sections are each 1' x 3' and enable a normal tank to drive in each lane. It is a pretty wide road!
I was thinking to make the bridge match these road segments. If the bridge is a different size, then it will look funny with these roads. The other option would be to use it with no road, which would also look odd, or to have to build new, smaller road pieces. It seems easiest to just make the bridge match the road segments I have.
Here are the existing road segments laid on the table to test the look of their size with the river. This photo is from the other side of the table so there is 3' on the left of the river and 4' on the right, from this view.
I also cut the fabric piece in half to make two segments that are 2.5' wide by 3' long each. This will enable a river that is longer than the 5' width of the table so there will be no brown showing. The river could be 1' - 2' wide based on how much of the fabric is covered by the foam insulation.

I also bought more foam board (the giant folding poster boards that kids use for presentations). I tried putting the two existing road pieces at the edges of the table and then laying this 3' segment down. It buts up against the edge of the road on the longer side and overlaps the shorter side by 1' because the three roads together are 9' and the table is 8' long. I was debating whether to cut this white piece and to what length. If I make a 1' long bridge, I need another 1' of road in order to span the entire table. I was debating making a 2' piece that has 1' of bridge and 1' of road.

I was then thinking that a bridge that is 1' wide and 1' long looks a bit odd. the area over the river is a square, whereas realistic bridges tend to be much longer than they are wide. So I tried another arrangement, this time with a 2' wide river. The land on either side is now 3' x 5' and the river is 2' x 5'. This looks a bit more proportional. If I leave a bit of road overlapping on each side, it will hold up the bridge and will fill the full 8' length of the table with a little bit of road hanging off each short edge of the table.

For the bridge, I am thinking about doing a truss style, like this example from Wikipedia, because I think it seems doable and would look obviously like a bridge rather than a road magically floating over water. Plus, it should strengthen it since I am worried the current foam bridge could cave in with much weight on it.

The biggest problem I thought of with the truss style is that it may be too difficult to reach the miniatures on the bridge to move and position them. I may need to go with a more open-topped causeway approach.
More updates coming soon.
Update 2:
I cut down the size of the poster board piece from 12" x 36" to 12" x 32" (this will prevent the two existing road pieces from sticking off the ends of the table quite so far, although of course they will still stick out by about 4" each). This size will leave 24" to span the river and 4" on either side to give the bridge enough support.
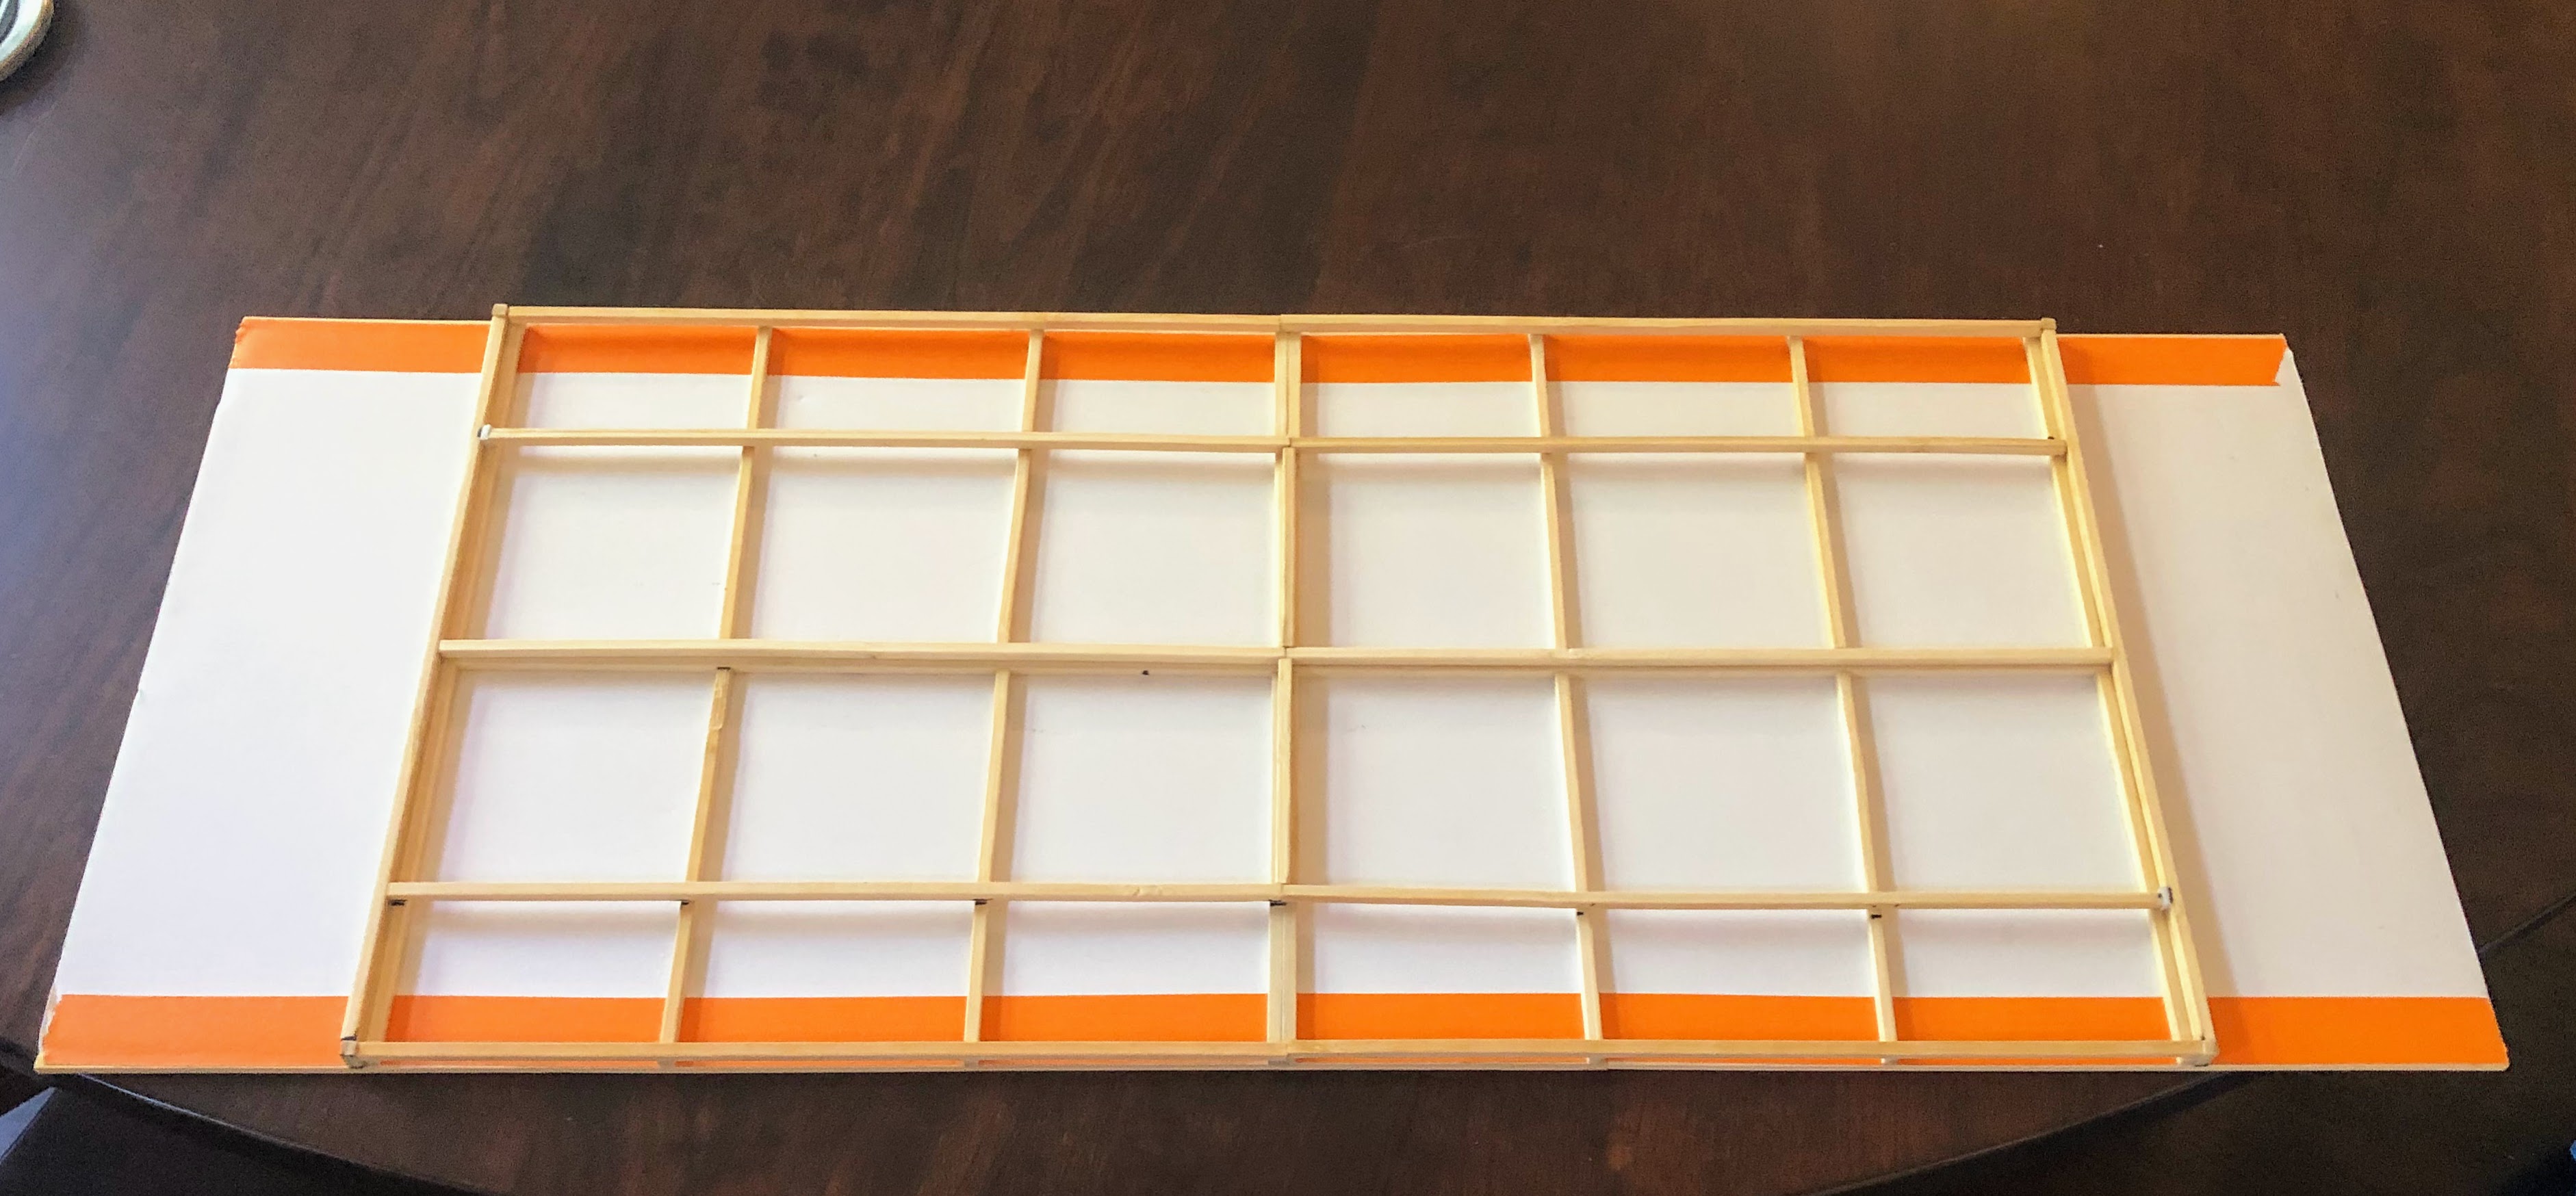
I then bought a pack of 12" x 1/4" x 1/4" bamboo sticks so I could build up some support for the foam board. With such a long span and a thin piece, the foam board was sagging under its own weight. I used the bamboo sticks to build up a frame. I started with cutting some pieces to fit the length and gluing on the edges. This should help keep the bridge from bending over the land where the lower frame does not exist.
I then bought a pack of 12" x 1/4" x 1/4" bamboo sticks so I could build up some support for the foam board. With such a long span and a thin piece, the foam board was sagging under its own weight. I used the bamboo sticks to build up a frame. I started with cutting some pieces to fit the length and gluing on the edges. This should help keep the bridge from bending over the land where the lower frame does not exist.
 |
| View of the bridge from the top with the bamboo sticks glued to the sides. |
I then built up a frame underneath in the part that will be spanning the river and unsupported by the land. The goal is to have the ends of the wood frame butt up directly to the foam land to keep the bridge from bending where it goes out over the river. The orange is masking tape that I ran along the edges to help hold the edge pieces onto the bridge, just to help keep them from coming loose during wear and tear.
 |
| Bamboo frame on the bottom of the bridge where it will span the 24" wide river. There are 4" on either side of the frame that will lay on the flat land. |
 |
| Better view of the frame. I wanted it to cross itself for better stability. |
I still need to create the support along the top that runs the full 32" from end to end. I think there will still be a tendency for the board to bend at the point where it goes from the land to being unsupported. So I am planning to add something along the top to keep it rigid and to make it look more like a bridge.
The two ideas I have so far are to add trusses or railings.
Trusses would consist of four triangles on either side with cross beams over the top. That would be the most stable and look the most like a bridge, but it will make moving and seeing the models a bit harder. And it will require more bamboo sticks. I calculated I need 26 more sticks and I only have have 16 left. 22 of the pieces would only need to be 8" and 4 would need to be the full 12". So technically I have enough total wood, but I would have to use two 4" cut-offs together to make 8" sections and that will be wobbly and look weird. It will also involve cutting a lot of wood to exact lengths and angles (60 degree cuts to be flush).
 |
| Truss bridge concept with four 8" equilateral triangles and 12" cross-supports. |
Railing would be a series of short ~3/4" poles or blocks with long rails along the top, such as the bamboo sticks. I have enough wood and it allows very easy access and viewing of the models on the bridge. I think it would provide enough stability as well, even if not as much as trusses. The problem is how to make it. I need about 50 small spacers to hold up the top rail that all need to be the same height. cutting pieces of wood or plastic will be uneven and not perfectly flat (they will be leaning). So I need to think about that a bit more. I am even contemplating Lego blocks with the smooth pieces on top.
 |
| Railing bridge concept. |
What do you guys think?
I was looking at more bridges and saw some examples with trusses on the sides without the cross-beam along the top. I think this would be the best of both worlds: looks like a classic bridge and also allows easy access to the models fore movement and photos.
Here is an attempt at a simple truss for the sides of the bridge.
 |
| Lining up the basic shape. |
 |
| Glued together and glued in place |
I like the look. Unfortunately, it is a little wobbly so I will be trying to reinforce it a bit to ensure it can hold up to an occasional bump while we are reaching across it to move models. And I still have to make an exact replica for the other side.
Update 4:
I finished the bamboo wood trusses for both sides. I started adding some plastic bits to where the wood beams join up in order to strengthen it and add a little more detail to make it look less like a bunch of sticks glued together. I added a strip of "grating" down the middle with strips of plastic along the sides. This is to represent the area between the lanes where rain water can drain from the bridge. It is hard to see in the photo because it is all white. I am planning to add rivets along the palsticard strips next and potentially along the outer edges of the bridge as well.

Update 5:
I finished adding the rest of the plastic bits to the trusses. Then I added that detail every good scratch-build terrain piece should have: lots of rivets. These are just glue-on beads for fingernail decorations.

Now I just need to decide if this is enough detail or if there is anything else to add before painting. I really need to get it primed this weekend if we are going to use it in a game next weekend!
I also still need to get the river edges of the foam boards painted as well.
Update 6:
Here is all of the progress from th last few weeks to get the bridge table done.
 |
| Primed black and ready to paint |
 |
| Painting done - weathering still to go. Conducting a weight test with approximately 8 pounds. |
 |
| I painted the edges of some foam insulation for a quick and simple canal look. Each shore is 3' x 5' and is covered with a battle mat. The |
 |
| The final table with the road and bridge spanning the two sides of the canal. |
 |
| And finally with some terrain and models around it. |
That does it for this project. It would be nice to add a few more details to the bridge such as some shells or a helmet. I might do that in the future but I have spent enough time on this for now. I think the final effect is pretty decent for not spending a ton of time or money. The bamboo sticks are pretty strong and hopefully this bridge will be durable enough for years of gaming.
No comments:
Post a Comment